Thursday, April 29, 2010

Thengai bun ( Coconut bun)

Thengai means Coconut. A popular stuffed bread available in the bakeries of Tirunelveli , Tuticorin (TN, India) and other places South to it. Usually they stuff the bread with sweetened coconut, raisins, cashews, cherries and left over fruit cake some times.

This is one of the snacks we usually buy in my father's house for evening tea. I love the way my mother used to keep a snack every evening while we return home from school. She was so dedicated and caring in such a way that at least she would buy some goodies from the nearby bakery for us:) When I told my hubby of those fond memories after marriage, he started bringing me my sweet breads when he comes to pick me up from the University, so that I won't starve till I reach home...hi..hi. Those were the touching moments , he waiting to pick me up after work and myself feeling embarrassed to do so. That was the most sweet bread any one can get..right!

So whenever we talk of our home town's specialties , this bun will make a great topic for us. We both are crazy for this but I never know a recipe to try it. So I tried a version myself with the pizza base and it came out fantastic. May be a bread dough can also work here. I don't know the exact recipe for that bread, but this gives me the exact taste and no wonder we enjoyed it to the core:)

Here is that special thengai bun for you all!

Thengai bun before slicing.


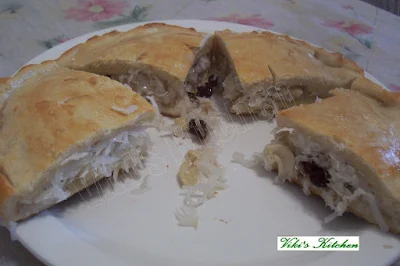
Sliced thengai bun , ready to eat:)

Ingredients:
Pizza base (or) bread dough - enough to make a medium size pizza.
butter - 1 tsp
egg white - 1 tbsp
water - 1 tsp

For stuffing:
Sweetened coconut - 1 1/2 cup
(I used store bought one. But we can make it at home by stirring 1 1/4 cup coconut with 1/4 cup sugar till it becomes dry).
raisins - 10
cashew - 10
cherry - 5 (halved)
cardamom powder - 1/8 tsp

Method:
Preheat the oven to 425 deg F.

Divide the dough into two equal portions.
Line a cookie sheet with aluminum foil. Grease it with butter (1/2 tsp).

Mix all the stuffing items. Let them cool, if we prepared the sweetened coconut at home.

Take one ball of the dough. Flatten it a circle of 1 inch thickness and almost 1/2 feet dia.
Place it on the sheet. Spread the stuffing uniformly.

Make a similar circle with the other half and cover the stuffing.
Gently fold the edges without any opening there.
Coat a 1/2 tsp butter over the top.

Make a few slits at the top to make vent.

Mix the egg with water and coat the top (Egg wash).
Egg wash makes the bread shiny and more brown and it is purely optional.

Place it in oven and bake for 12 to 15 minutes or till the top starts turning red.

Take out and slice it (into 4 or 5 pieces) after cooling a little.

Thengai bun is ready!

Serving suggestions:
Serve as dessert or snack.
I like it instead of regular pizza for dinner:)

Variations:
I won't use egg wash (don't wanna waste that yellow portion...hi..hi). A coat of butter / ghee will give a shiny brown top. Broiling will make it more gorgeous.
Some bakeries add scrambled fruit cake (that goes as waste or less priced snack), to this stuffing and make it like a less coconuty bun. That will also be tasty.

Wednesday, April 28, 2010

Idly Podi (flavorful version)

Idly podi - A kind of 'spicy hot' powder prepared in South Indian house hold and stocked up for a quick side dish for Idly. Usually it is mixed with sesame oil while serving. Otherwise, the host will serve the podi along with idly. The guest is expected to make a small indentation in the center of the (heaped) podi to allow the host to pour some sesame oil in it. Then the guest can mix it with the oil using the index finger and start tasting the idly by dipping it in 'podi ennai' (podi mixed with oil).

I have seen many people mixing the oil and podi in a separate bowl before serving. This too holds good.

There are many ways to prepare a Idly podi. I am describing a more flavorful method adopted in my house. This is my mom's version. But after marriage I started adding tamarind to it as per my hubby's grandma's method. I think adding tamarind is a deep South trend and it makes the podi more tasty and versatile (see my tips below for other uses of podi).


The ingredients for 'Idly podi' dry roasted and kept to cool.

Idly podi stocked up and presented along with sesame oil.

To make 1/4 kg Idly podi (approx):
Ingredients:
Channa dhal (Kadalai paruppu)- 100 gm (1/2 cup)
Urad dhal (black gram) - 100 gm (1/2 cup)
Dry red chilly - approximately 20 to 25 numbers
(I used Indian long dry red chillies )
(Reduce chillies if you need a lesser spicy version)
Curry leaf - 2 sprig
Tamarind - 2 inch (optional)
salt - to taste (untreated sea salt is best here)
garlic - 4 cloves
Asafoetida (hing / Perunkaayam) - 2 pinch

Method:
Heat a wok and dry roast the curry leaves till they turn crispy. Keep aside.

Again heat the wok. Add the urad dhal and dry roast till we get a nice aroma with the dhal turning mild red. Take it out immediately.

Now start roasting the channa dhal, garlic, tamarind and take it out as the dhal turns mild red.

Now add the salt, red chillies. Dry roast till the chillies loose all the moisture and becomes crispy. Add the hing and switch off immediately.
(Adding the salt with red chillies prevent us to get the hot flavors. Otherwise we may start sneezing. So roast the chillies at the end along with salt).

Put the roasted chillies along with the others above and let them cool completely.

After they get cooled, grind them to a medium fine powder using a coffee grinder / mixer. Store in air tight container (even at room temperature). Holds good for more than a month or two.

Idly podi is ready!

Serving suggestions / tips:
Take a tbsp of podi, mix well with enough sesame oil / ghee and serve as side dish with Idly or dosai.
The fresh podi tastes more always. So prepare them in small batches according to need.
Idly coated with this 'podi-ennai' (podi+oil) tastes great and makes a good packed lunch for long journey. It won't get spoiled for a day.
The podi can also be mixed with cooked rice and a drop of ghee as main course meal.
We can use this podi in making side dishes like poriyal also.

Monday, April 26, 2010

Mutton kheema curry

I am sure many of you will love to get a grand breakfast on festive days or Sundays. In my hometown, they prepare many delicacies like liver curry (eeral kuzhambu), mutton kuruma , paya (goat leg kuruma) etc along with idly / dosa to honor the guests. I have seen the grannies starting to slow cook the goat leg even before the dawn. Mostly the Sons in law are always lucky there to enjoy such a nice feast. Anyway we ladies have to struggle in the kitchen even on the festivals.

Though I prefer to make a mutton kuruma for idly for my guests, I don't like the long hours, the mutton takes to get cooked. So I prefer to make liver kuzhambu or the mutton kheema, which gets cooked in 30 minutes (without pressure cooking).

So here is that simple , yet delicious mutton kheema curry.

Ingredients:
Minced mutton (kheema)- 1 lb
onion - 1 big (or) shallot - 15
curry leaf - 2 sprig
ginger garlic paste - 2 tbsp
Tomato - 2 (big)
mint, cilantro - a handful each
coconut milk - 2 cup (from 1/2 coconut)
Turmeric powder - 1/4 tsp
cumin powder - 1/2 tsp
garam masal powder - 1 tbsp
red chilly powder - 1 tbsp
coriander powder - 3 tsp
Sesame oil - 1/4 cup
Fennel seed - 1 tsp
cinnamon - 2 inch

Method:
Buy a well minced mutton kheema. Wash and clean once. Remove the sediments , if present.(If we cannot get the minced meat, then we can grind the boneless mutton in a mixer instead).

Heat oil in a wok. Add the fennel, cinnamon and let it get red.

Then add the finely chopped onion, curry leaf and fry till the onion becomes golden brown.

Next put the ginger garlic paste and cook till raw smell vanishes (30 seconds).

Then add the finely chopped tomato and saute till oil separates.

Add the cleaned minced meat fry for some time, till we see the fat changes color. Add all the powders said above, add some water to cover the meat.

Cover and cook till the meat gets cooked. Wait till we see oil starts separating, if we need a thick curry. (we can use it as such if needed).

Pour the coconut milk and adjust the salt, water .

Switch off. Mutton kheema curry is ready!

Serving suggestions:
Serve as side dish with idly, dosa, chapathi, ghee rice, biryani etc.
Serves 5 people.

Friday, April 23, 2010

Porikadalai laddu

Here is a sweet that we can prepare in a jiffy!

Other names: Pottu kadalai ladoo, maladu, nei laddu, nei urundai, dalia ladoo.


Ingredients:
Puffed channa dhal - 1 cup
sugar - 1 cup
(sugar : dhal = 1:1 ratio)
ghee - 1 cup
cardamom powder - 1/4 tsp
cashew nut - 10
raisin - 10

Method:
Dry grind the puffed channa dhal and sugar to a fine powder.
Mix the cardamom powder with it.

Heat a tsp of ghee and fry the cashews, raisins. Mix it with the powdered dhal.

Melt the ghee.

Mix it with the powdered dhal little by little and make small key-lime size balls while it is hot. (Melt the ghee then and there while preparing the ladoo).

Pottu kadalai ladoo is ready!

Serving suggestions:
Serve as snack.
It can be stored in air tight container for a week.
Makes 12 ladoos (approx).

Alternative method:
I made this ladoo for a quick snack and changed the recipe by reducing the ghee. But the traditional method explained above tastes better than my healthy version. Anyway if you need some snack with less ghee follow mine:).

Here I have added only 1 tbsp ghee. Replaced the ghee by very little milk, as the addition of milk with sugar makes it easy.

But this ladoo won't last long in room temperature, because of the addition of milk.

Wednesday, April 21, 2010

Ulunthu vadai

When I was searching something else in my blog I found out that I am missing one of the most cherished delicacies of India, the 'Ulunthu Vadai'. Then only I realized the old picture remaining in my draft for a very long time.

Ulunthu vadai is a kind of spicy snack available in India along with hot tea or coffee.

Now it is the time to recollect something behind this recipe for my younger brother, who always looks for my nostalgic anecdotes:) It is my mom's most favorite snack and she used to prepare it along with coffee whenever we have a guest. She used to cut a small piece of banana leaf from our garden and use it as the surface to flatten the vadai. Very rarely I have seen her using a well washed empty milk sachet (Aavin milk cover) to flatten the vadai. But vadai made over a banana leaf is always a pleasant sight to me:)

My grandmas' cousin (Sulochana Achi) taught me to do it with just one hand, without any base to flatten the dough. I find it much useful after practice and thanks to her, everyone in my family loves my vadai. I love the way my father in law appreciates my vadai. After marriage I planted some plantain trees in our backyard just for leaves and tried my best to serve the meals over banana leaf for my in laws, who absolutely love the native food.

Along with the most favored food comes the best memories too. Right!

Hot crispy urid dal vadai served with chutney. Save some for thayir vadai:)


Vadai mavu (batter)
Vadai batter - Urid dhal soaked and ground to a fine paste.

Ingredients: (For 12 small size vadai)
Urid dhal - 1 cup (200 gm)
Oil (peanut oil / corn oil) - 200 ml
Shallot / red onion (chopped) - 1/2 cup
green chilly - 2 (finely chopped)
cumin - 1/4 tsp
whole black pepper - 1 tbsp + 1 tsp
curry leaf - 1 sprig
Ginger - 1 tsp (finely chopped) -> (I don't add it)

Method:
Wash the urid dhal twice thoroughly. Soak the urid dhal in cold water for 1 to 1 1/2  hours. Grind it to a fine paste with very little water. The final consistency should be like the above photo. Imagine the consistency of soften butter to get the correct batter(vadai mavu).

Add the required salt + 1 tsp black pepper and grind again for a while.

Pour the batter to a mixing bowl. Taste and adjust the salt now.
Mix the finely chopped onion, green chilly, curry leaf , whole pepper, cumin with the batter.

Heat the oil in a wok. Wait till it reaches the hottest point. Reduce the flame to medium.

Wet a plastic sheet or banana leaf (small square). Take a small ball of batter , place it on the sheet, gently flatten it and make a small hole at the center.

Deep fry the vadai in medium heat till it gets the golden red color.

Drain the oil , take out and place on kitchen towel / multi holed basin to drain excess oil.

Ulunthu vadai is ready!

Serving suggestions;
Serve with coconut chutney along with hot coffee or tea in the evening.
Also makes a good side dish with Idly, Venn pongal, sarkarai pongal etc.

Tips for a perfect ulunthu vadai:
Making ulunthu vadai is always a challenge for many. So I insist on the following points whenever any one asks me.

1.Always use unsplit, whole skinless urid dhal for making vada and idly. (If we are using split dhal with skin then increase the amount of dhal while soaking. But we can't get more fluffy batter with them).

2.It is better to soak the dhal inside fridge. The purpose is to prevent fermentation of urid dhal, as leaving the batter in hot weather results in little fermentation, which makes the vadai absorb more oil while frying. So I always soak it inside fridge.

3.The batter can be prepared 2 days earlier, but should be kept inside fridge till we add onion and fry.

4.Never add more water to grind the batter. The vadai batter made using Indian grinder yields more number of vadai than that of the Indian mixer made. Most days I use mixie to prepare my batter, sometimes my Ultra grinder (after 2014).

5.If the vadai batter becomes little watery,add a tbsp or more of rice flour. But it will reduce the taste. So leave the watery batter overnight in fridge to remove the excess water.

6.The vadai should be crispy in the outer layer and soft at the inside. So fry it in medium heat. Never allow the oil till smoking point.

7. Always use a thick iron wok to deep fry the vadai, it helps in uniform cooking . This is done to avoid the batter uncooked in the center of the vadai.

Monday, April 19, 2010

A day with Butter fish !

Hope many of you know my passion to cook sea food. So I look for an opportunity to buy newer and cuter fish varieties whenever I visit a nearby Asian market.
Last time I saw a pack of fresh 'butter fish' at a great deal. Believe me, I got some 6 fishes in that pack for just $3. Suddenly I grabbed it and started planning something gorgeous. I couldn't think of anything beyond my usual curry and fry. But wished to make it a post for the fish-lovers out there:)

Do you know the fish curry tastes amazing the next day and it will make a great pair with idly? So the next time if you make meen kulambu,  make some extra servings. Ok:)

I prepared a fish curry with 2 fishes and did a 'full fish fry' using the remaining four fishes. The result was awesome and it reminded me of the 'Besant Nagar beach' (Chennai, India) style fish fry. Here are some pictures and recipes to enjoy:)

Translation: Butter fish -> Karapudi meen , kuthippu (Tamil).

Yes buddies! We had a superb fish meal on that day and the next day breakfast was a memorable one too:)

Have a beautiful week ahead!

Deal of the day:)

Fishes marinated in masala and lime juice.
(Mmmm...shall I fry 4 fishes or the whole lot? Ok. Lets make some gravy too).


Fishes getting deep fried.


Full fish fry arranged for lunch:)

Ingredients:
Butter fish (whole)- 4
Oil to deep fry - 200 ml

lemon - 1/2
salt - to taste (approximately 1 tsp)
Red chilli powder - 1 tsp
coiander powder - 3 tsp
black pepper powder - 1/2 tsp
cumin powder - 1/2 tsp
tumeric powder- 1/2 tsp (for coating the fish)

Cleaning the fish:
Wash the fish and remove all the fins and scales by a sharp knife.
Make a small longitudinal slit under the jaw and remove the inner parts.
Remove the mouth and gills (red flower like part inside the jaw).
Apply little turmeric powder over the fish and keep aside.

Make small slits in slanting manner (2 or 3) on both sides of the fish.

Method:
Squeeze lemon and mix all the masalas given above except the fish and oil.
(Lemon makes the fish stiff , removes bad odor and discourages breaking of fish while frying).

Apply this mixture all over the fish and dab some masala inside the fish too. Marinate it for 1 hour .
Heat oil in a broad pan. Reduce the flame to medium. Put the pieces one or two at a time and fry both sides crispy. Do this in low flame for a long time, so that the masala inside the fish also gets cooked up.
Drain and take out the fried fishes.

Full fish fry is ready!

Serving suggestions:
Serve hot with rice and Meen Kulambu (Fish curry).
It also goes fine with rasam or paruppu kulambu, with rice.

Meen Kulambu
:
The other two fishes were made into a curry along with boiled eggs.

Fish curry Preparation:
(To make 3 cups of thick gravy)

Items required:
Butter fish - 2 (300 gm)
sesame oil - 2 tbsp
mustard seeds- 1 tsp
fenugreek seeds- 1/2 tsp
Tamarind - 1 small lemon size
Red chilly powder -1.5 tsp
coriander powder- 3 tsp
turmeric powder-1/4 tsp
tomato - 2
green chillies - 2
curry leaves- 2 sprigs.

To grind:
shredded coconut - 1/2 cup
shallot - 8
cumin seeds - 1 tsp

Cleaning the fish:
Wash the fish and remove all the fins and scales by a knife.
Make a small longitudinal slit under the jaw and remove the inner parts.
Remove the mouth and gills (red flower like part inside the jaw).
Then slice it into big chunks. Try to use the head portion, which will add extra oiliness and add to the taste of the curry. Wash again.
Apply little turmeric powder over the fish and keep aside.

Curry preparation:
Extract juice from tamarind and add chilli powder, coriander powder, pinch of turmeric powder, salt and mix well.Keep aside.

Heat the sesame oil in vessel. (Fish curry prepared in earthen vessel tastes good).Add mustard and fenugreek seeds. After the mustard seeds crackle add the curry leaves .

Then add chopped tomato and saute till oil separates.
Add tamarind juice mixture and let it boil for 5 minutes.
Then add the finely ground coconut-onion paste.
Immediately after this starts boiling add the fish pieces.
cover the vessel and simmer the heat.

Keep the curry gets cooked in simmer heat for 15 minutes.
DO NOT stir the curry after adding the fish, otherwise you may end up with broken pieces.
Then put off fire.Garnish with chopped green chillies and curry leaves.

Serving suggestions:
Serve hot with rice , chapathi or Idly or dosai .
Deep fried fish, omelet ,ripe mango are good side dishes along with meen kuzhambu and rice.

Wednesday, April 14, 2010

Stromboli (Veg)

Last year we had the 'stromboli' for the first time in a restaurant in Philadelphia. Click to read more on stromboli and its origin. On that day the options were minimum as we prefer vegetarian foods only during travel:) So while browsing through the menu this was very catchy and we enjoyed every bit of this spicy hot roll. I don't know what made me crazy for this stromboli, whether the tiresome travel or that unbearable hunger....whatever it may be, I became addicted to this :) From then on, I wished to create one myself and had tips from here and here. Thank you buddies!

To my surprise the process was very easy and I am sure any one can make a great dinner with this simple recipe. Wish to make this stromboli more often:)

Ingredients:
Pizza dough - to make a medium size pizza

Filling:
Spinach - 3 cups (chopped)
kale leaf or any other green- 2 cups (chopped)
red bell pepper- 1/2 cup
olives - 5
olive oil - 1 tbsp
garlic - 2 (crushed)
red chilly flakes - 1 tsp
salt - 1/8 tsp
mozzarella chesse - 1/2 cup

Heat oil in a wok. Fry the garlic and chilly flakes lightly. Now add the chopped vegetables and greens except olives. saute them with salt till they loose the moisture.

Let them cool. Add the cheese, chopped olives . The filling is ready.

Method:
Preheat the oven to 375 deg F.

Divide the dough into two. Take one and flatten the pizza dough to 3/4inch thick rectangle / oval shape.


Grease an aluminum foil and place the base. Spread the above filling leaving 1 cm gap in all the edges.


Gently roll and make a log shape . Place the log such that the seam faces down.


Make slits in the top using a sharp knife.


Spread some cheese (1 tbsp) over the stromboli. (Likewise prepare the next half dough too).

Bake for 15 minutes or till golden.


Take out, slice them into 6 inch pieces and serve hot.

Stromboli is ready!

Serving suggestions:
Serve as lunch / dinner with marinara sauce or tomato sauce.

Tips:
The fillings can be done in many ways with cooked meat, vegetables etc.
An egg wash over the stromboli before baking will yield a shiny crust. I didn't do the egg wash part.

Monday, April 12, 2010

Anchovy fish fry

If you are a great fan of sea food and belong to Chennai, then you won't need an introduction to this crispy starter, the deep fried anchovies (Nethili meen varuval). In Chennai (Madras), India the restaurants like Madurai Appu, Ponnusamy,Velu military hotel,Pandyas, Anjappar (the list goes on....)are known for their exotic non-veg menus. So don't miss a plate of these crispy anchovies if you get a chance.

I have seen some restaurants serving the full anchovy (with head , tail and small fins too) removing the tract. Believe me this kind will taste great. But I have to remove most of the parts because of my Xav:) He hates fish head and I love it ...weird huh:)So if you are like me, then use the whole fish.

Mostly I prefer non vegetarian buffets while visiting my favorite Indian restaurants. The power of the Indian starters like tandoori chicken , kebab, fish fry will be such that one cannot get satisfied with a single selection of starter:)
I know many of you are like me and so here is an attractive dish to satisfy our palates:)


Anchovy fish deep fried.

Ingredients:
Anchovy fish (nethili meen)- 1 lb
(1 kg will approximately yield 80 big size anchovies)
Salt - to taste (1 1/2 tsp)
Red chilly powder - 1 tbsp
cumin powder - 1tsp
coriander powder - 1tbsp
lemon juice / vinegar - 2 tbsp
rice flour - 2 tbsp (for crispiness)
Red food color - 1/10 tsp (optional)
Turmeric powder - 1/2 tsp

Oil to deep fry - 200 ml

How to clean anchovy fish?
Wash and clean the anchovies to remove any sand or impurities. Rinse it in large amount of water thrice to remove the sand, if bought fresh.

Then remove or retain the head as per taste. (If you are frying them, then the head will taste great). Cut and remove the tail. Slit gently in the boneless side to remove the (greenish) digestive tract.

Again rinse once. Apply 1 tsp turmeric powder and keep aside.

The anchovies are ready for cooking now.

Method:
Add all the powders, salt, food color, lemon juice and mix well.
Mix this with the cleaned anchovies and marinate for an hour.
We can fry them immediately also.

Heat oil in a pan.
Deep fry the fishes in small batches till crispy.
Anchovy fish fry is ready!

Serving suggestions:
Serve as starter or side dish with rasam / sambar / fish curry in rice.

Friday, April 9, 2010

Kothu keerai

Kothu keerai / poriyal - Finely chopped greens stir fried with shredded coconut.
Click to see the photos of various amaranth....I like this site very much:)

Amaranth is a leafy green used just like spinach in Indian cooking.In this recipe I have used red spinach which resembles more like an Indian amaranth (thandu keerai / thandankeerai)

Why the name 'Kothu keerai' instead of poriyal or thovaran?
It is the name mom used to say. There is one more common recipe called 'keerai kadanchathu or keerai masiyal' (mashed version) with these greens.I love the way she minced those thandankeerai (amaranth) or the arakeerai. she used to chop them finely by placing the leaves over a broad stone called ammi (stone mortar) using a sharp knife. May be she could have longed for a larger cutting board, I guess:)she would chop them so finely with great care and I believe that the cutting style itself renders more taste to the keerai. Anyways I am not that great at artistic chopping. still tried my best to create it the original way so that my brothers may recollect mom's cuisine through this.

Here is a snap to enjoy the fresh looking Red spinach.


Red spinach leaves cleaned and ready to cook.

Keerai poriyal with lot of freshly grated coconut.

Ingredients:
Thandan keerai (amaranth)/ red spinach - 1 bunch
Shallot / red onion (chopped) - 1/2 cup
garlic - 5 cloves
shredded coconut - 1/2 cup
mustard - 1/2 tsp
oil / ghee - 1 tbsp
cumin - 1/2 tsp
green chilly / dry red chilly - 2

Method:
Pluck the leaves and young stem alone. (We can use the matured stem in making sambar, so save them in fridge).

Wash and clean the greens in large amounts of water multiple times to remove all the dirt / sand. Chop it finely.

Heat oil / ghee in a wok. Add the mustard seeds and let it splutter.
Chop the onion, garlic, chillies, curry leaf (optional) finely and add to the wok.
Stir till onion turns soft.

Add the finely chopped greens and stir fry for some time. Sprinkle a handful of water and cook covered for 3-5 minutes.
Open the lid. Let all the moisture dries up.

Add salt, cumin and fry a bit. After the poriyal looks very loose without any moisture, switch off.
Then put the freshly shredded coconut.

Kothu keerai is ready!

Serving suggestions:
The perfect combination can be with sambar rice or curd rice.

Wednesday, April 7, 2010

Gobi channa masala

Gobi is the Hindi word for cauliflower and channa stands for chick peas.

Its my habit to include some protein in all the meals. So while making a simple cauliflower kuruma, I added the kondai kadalai (chick peas) and it turned out awesome.

Here goes a healthy side dish for chapathi.


Ingredients:
Chick peas / white channa - 1 cup
cauliflower (chopped) - 1 cup/200 gm
tomato - 2
Red onion - 1 (medium size)
green chillies - 4
coriander leaves - a handful.
mint leaves - few
curd - 1/2 cup
red chilli powder - 1 tbsp
turmeric powder - a pich
MTR channa masala powder - 1 tsp (optional)
(We can use any garam masala too)
salt - to taste
olive oil - 1 tbsp
bay leaf - 1
cinnamon - 1 inch

Method:
Soak channa dal overnight and cook it to tender in a pressure cooker for 5 whistles.
After getting the first whistle ,I reduce the flame to the minimum and heat the cooker for another 10 minutes to cook this dal.

(But in this curry I used 1 cup cooked channa from can).

Grind ginger and garlic together.

Chop and cook the tomatoes. saute the onion in 1 tsp oil and let them cool.
Grind cooked tomato, curd and onion together. keep aside.

Heat oil in a pan. Fry some cinnamon and bay leaf.

Add the green chillies, cilantro and mint leaves. Then put the ginger garlic paste and saute till raw smell goes. Then add all the powders mentioned above along with the ground masala and cook till oil starts showing up.

Next add the chopped cauliflower , salt and cook covered.

After the cauliflower gets cooked put the cooked channa and stir well.

Gobi channa is ready!

Serving suggestions:
Garnish with minced cilantro, freshly chopped onion and a few drops of lemon juice on top.
Goes well with parathas ,poori , roti and naan .
Makes 3-4 cups of gravy.

Monday, April 5, 2010

cabbage soup

Here is a healthy cabbage soup for the days which need a lighter meal. As usual I didn't add any cream but sauteed the cabbage in little butter and blended the vegetable in milk. The croutons are home made. I just cubed some bread slices, buttered them and placed in a hot oven to make the croutons.


Ingredients:
Cabbage - 2 cups (chopped)
black pepper - 1 tsp
green chilly - 1
onion - 1
garlic - 3 cloves
cumin - 1/2 tsp
tomato - 1
Tomato sauce - 1 tbsp (optional)
olive oil / butter - 1 tbsp
milk - 1/4 cup or cream - 2 tbsp
crouton / sliced bread - 1 cup

Method:
Heat olive oil in a wok.
Put the garlic, cumin, pepper and fry till garlic welts.
Add the chopped onion , chilly and cabbage. Stir fry till cabbage gets half cooked.
Now put the chopped tomato and cook everything for 3 minutes (till the cabbage looses the raw flavor).
Let it cool completely. Grind it to a fine paste and bring it to boil.
Add salt to taste. Mix some tomato sauce to enhance the taste.
Fry some croutons in butter .
Add cream along with fried croutons before serving.

Cabbage soup is ready!

Thursday, April 1, 2010

Kuzha puttu

Puttu - A breakfast item common in Kerala and Southern TamilNadu.Generally rice flour is steamed with shredded cocount and served with sugar / banana / spicy kadalai curry.

Kuzha puttu - A puttu resembling a pipe.

There are many ways to steam this puttu. We can use a simple cloth over hot steam or idly making plates or this special tool 'puttu kudam' for steaming the flour.
The most authentic and tasty variety of puttu is made by using the red rice flour (rose matta arisi or sivappu samba rice).

I used the store bought ready made red rice flour (double roasted). Instead we can roast the ordinary white rice also.Some people prepare the flour from scratch by soaking and dry grinding the rice.


Puttu maker in box along with the ingredients.
Recently I bought this puttu maker from an Indian store. Love it very much:)

Puttu kuzhal and puttu kudam with ingredients .
Puttu maker consists of 2 main parts: The puttu kuzhal (to fill the processed rice flour) and kudam (to fill water and generate steam).


Puttu served. The white coconut is the frozen shredded coconut and the darker one is what I got from fresh coconut:)

Ingredients:
(For 2 kuzha puttu)
Red rice flour - 1 cup
(If not readymade, roast it till we get a pleasant smell and the grains look very flowy)
salt - 1/4 tsp
Shredded coconut - 1/2 + 1/2 cup
(Coconut should be almost equal to that of rice flour.We can reduce it too, but we can't get the real taste.)

Method:
Fill the puttu kudam (the broader vessel) with water to its 3/4 th. Close the top with the given lid that has the nozzle.
Start heating it.

In the same time bring to boil 1/4 cup water along with the salt.

Place the roasted rice flour in a mixing bowl.
Slowly sprinkle the boiling water and mix well without any lumps.
The consistency should be such that we should be able to make a solid with the flour, but the solid should be breakable in to flour when touched gently.
Totally we should get a wet flour but not any lumpy.

Now mix 1/2 cup shredded coconut to it and mix well.

Take the puttu kuzhal. Fill the bottom with 2 tsp shredded coconut. Then put the prepared flour and fill half way very loosely. Again spread 2 tsp coconut and fill the pipe with prepared rice flour.

Now check if the steam starts hushing out of the puttu kudam.

Close the puttu kuzhal and fit it over the nozzle.Make some holes in the filled flour using the stick given.

Heat till we see steam out of the top of puttu maker.
Then continue heating for 5 minutes and switch off.

Carefully take out and serve immediately.

Kuzha puttu is ready!

Serving suggestions:
Serve hot with sugar and banana.
Other combination are channa masala (kadalai curry), green gram chundal etc.

Note:
Try to serve the puttu immediately otherwise it may turn hard. Reheating in microwave helps a bit.

Ulunthu kazhi

Ulunthu Kali is a highly energetic food, rich in protein and vitamins. This kaLi is given to girls who have reached puberty for nearly 16 da...