Tuesday, November 8, 2011

Vegetable biriyani in cooker

Cooker briyani is very common among Tamilnadu people.Though biriyani experts won't accept it as a real briyani, I love this version because of the taste and simplicity. If we have all the ingredients in hand, we can make this briyani within an hour.'Cooker briyani' may be my first dish under the supervision of my mom. Nothing can beat mom's simple cooker biriyani and I can never achieved her perfection till now:) Her secrets are very good quality ghee and cashews, which I hesitate to use because of diet. But I am narrating her procedure here. This kind of biriyani has been a challenge to me since I got used to the dhum / tawa process, as we can't check the rice often in cooker method. But tried this for my blog and got it successful. Posting this fool-proof method for those 'briyani lovers' longing for mom's style briyani:)

Vegetable briyani with potato chips and carrot onion raita.

Vegetables:
Cauli flower - 1/4 flower, potato - 1, butter beans(cooked)-1/2 cup ,
green beans - 10 , carrot -1 , green peas - 1/2 cup .

Other Ingredients:
Basmathi rice / Jeeraga samba raw rice - 2 1/4 cups
salt - to taste
Turmeric powder - 1/4 tsp
Red onion - 1 (big)
green chillis - 5 (slit).
Lemon - 1/4
water - (rice x 2) - 1 = 3 1/2 - curd measure = 3 cups
curd - 1/2 cup

To dry roast and powder:
(or use garam masala powder)
Fennel - 1 tsp
star aniseed - 1/2
kali jeera - 1/4 tsp
cinnamom stick - 2 inch
cardamom - 6
cloves - 4
cumin - 1/4 tsp

To temper: (whole spices)
bay leaves - 2
cashew nuts -10
raisins- 10.
ghee - 5 tbsp

Masala 1:
Tomato - 2

Masala 2:
cilantro- 20 tender plants
mint leaf -1  cup leaves
green chilly - 10
cashew - 5

Masala 3:
Ginger - 2 inch
Garlic - 5 cloves

Preparation:
wash and clean the vegetables. peel the skin of carrot, potato and cut into long thin slices.
Cut the green beans in to long pieces.
Pluck 5 -6 florets from the cauliflower.
Defreeze the green peas.

Wash the rice and soak it for 1/2 an hour.

Grind all the pastes separately.

Chop onion, chilly into long thin slices and keep aside.

Method:
Heat ghee in a broad vessel or cooker.
Add the bay leaves and items given under tempering.
Then goes the chopped onion .
Fry it till golden brown and add the ginger garlic paste and stir well till the raw smell goes.
Now add the tomato paste and cook till the oil oozes out of it.
Then add the cilantro , mint paste and cook till the oil start oozing out. Now put the vegetables and add salt, powdered garam masala. Just stir well. Don't cook them now.
Now add the soaked rice and uncut green chillies to the cooker vessel along with the prepared masala. Squeeze some lime juice over.
Boil the require water separately and pour water, curd, mix well now and check for salt in this stage.Let it come to a boil. (Boiling the water before adding helps in evenly cooking the rice , otherwise sometimes we get some uncooked rice while making briyani).
Close with the cooker lid and put a pressure valve.

(I use a cooker vessel inside the cooker and pour some water around the base cooker, just like idly cooking. Mine is a 10 liter cooker, but we can prepare it directly in cooker if we have a small pressure cooker).

Wait till a whistle comes. Reduce the flame to medium and cook for exactly 5 minutes. Switch off and open lid once the pressure is gone.
Add a little ghee over the biriyani and wait for few minutes. Don't stir now.

Vegetable biriyani in cooker is ready!

Serving suggestions:
Take out the briyani carefully without mashing the whole rice and serve hot.
Serve vegetable biryani hot with onion raitha  and potato chips.
Serves 4 people or more people.

My other briyanis:
Layered vegetable biryani,
Hyderabadi vegetable briyani
vegetable tawa biriyani.

Thursday, November 3, 2011

Kathamba Chutney (mixed chutney)

Kadambam / kathambam - mix of varieties; Chutney - Indian dipping.

Even though coconut chutney is a common side dish for Idly , there are many chutnies in my native that will make us vote for the homely Idly dosa. Every ingredient in this chutney is a blessing that makes it healthy and flavorful.

This is my mom's favorite too. I thought it will be nice to publish this as it is her birthday. Some years back, one fine morning my Amutha Anni (Sister inlaw) prepared it with Idly during her first visit. It was a big delight for our taste buds that got used to the regular coconut chutney and also it was her first dish in my dad's home. We were all surprised to see the young doctor preparing that chutney extremely delicious. Mom liked the chutney very much and told everyone she knew of it:) I fondly remember the way she admired anni and after that , this mixed chutney has become my favorite too.

Enjoy!


Ingredients:
Onion - 1 big
Cilantro / coriander leaf - a small bunch
mint leaf - handful
curry leaf - 2 sprig
tomato - 1
garlic - 2
ginger - 1 inch
cumin - 1/4 tsp
salt - to taste
tamarind - 2 inch
coconut - 1 tbsp
red chilly - 5
black gram - 1 tbsp
mustard - 1/2 tsp
oil - 1 tbsp + 1 tsp

Method:
Heat 1 tbsp oil in a wok.
Fry the dry red chillies, urad dhal (black gram), till the chillies turn glossy and take them out.
In the same wok, add the onion , ginger, garlic and fry till onion gets a golden color.
Add the tomato and cook till it mashes.
At the same time wash the cilantro and mint leaves to remove any impurities.
(I wash thrice or till it runs clear).
Slide in the clantro, curry leaf, mint leaf and stir for a few seconds / till they wilt.
Switch off. Put the salt, cumin, fried chillies, dhal and let them cool.

Grind the ingredients with 1 tbsp water.

Take the chutney in a serving bowl.

In a separate wok pop the mustard seeds in 1 tsp sesame oil, slide in some curry leaves and run over the chutney.

Mixed chutney is ready!

Serving suggestion:
Serve hot as side dish with idly or dosai.
Also goes well with chapathi.

Tuesday, November 1, 2011

Kappa kizhangu

Yezhu ilai kizhangu poriyal / aal valli kizhangu/  yucca root stir fry /  cassava / tapioca stir fry.

Though I am calling it as poriyal, this is not a poriyal for a Keralite. I have seen them serving this as 'kappa' along with fish curry. This is a main dish like rice.

I got introduced to this kappa kizhangu dish, through my mom's friend, Saranya Amma. Many years ago, she was our new neighbor when we did the housewarming in appa's new house. Her husband had a great taste for gardening and he planted a lot of tapioca roots in their backyard along with many beans and greens. Their kitchen garden was marvelous and we like the way she mingles with us all. I learned some gardening skills from that aunt. The tapioca grew extremely fast and he harvested lumps of roots, which they shared with the whole street:) She introduced us to many dishes using kappa.
One among them is the stir fry or poriyal. The more moistened version is taken along with fish curry just like rice as kappa.

Kappa Kizhangu.

Ingredients:
Yucca root - 2 lb (or) 1 (big)
green or red chillies - 3
salt - to taste
turmeric powder - 1 tsp
shredded fresh coconut - 1 cup
Coconut oil - 1 tsp
mustard seeds - 1 tsp
curry leaf - 1 sprig

Method:
Wash the root to remove the soil.
Slice it into big chunks (4 inch long) and remove the bark just like we do with a sharpener and  pencil:)
See 'How to remove the yucca skin?'. It is interesting:)
Then wash again and put the chunks in a big vessel and add enough water to cover it. Add the turmeric powder and 1 tbsp salt. Cook covered for 15 minutes. Check by piercing a knife. It should pass through easily and the root should start falling apart. Otherwise cook again till it becomes soft.

Remove the cooked roots and discard the water.
Chop it into 1 inch cubes.

Heat the oil in a wok and add the mustard seeds. Once it finish popping add the finely chopped chillies, curry leaves. Then slide in the yucca cubes and stir well. Add little more turmeric and salt if needed. Sprinkle a handful of water and cook covered to make more moist.

Switch off and add the freshly shredded coconut.

Kappa kizhangu is ready!

Serving suggestions:
Serve as main course along with fish curry.
Also can be simply served as tea time snack without any curry.

Thursday, October 27, 2011

Unniappam

Unniappam or Neyyappam is a famous sweet dish from Kerala. It is similar to Tamilnadu's 'inippu kuzhipaniyaram' with some banana. some months ago I tasted this made by a friend and absolutely loved it. Making perfect shaped paniyaram using my heavy pan is a challenge for me, so I needed a detailed recipe. Then I googled and got this recipe from this video that gave me the spongy unniappam. Try this during a rainy weekend and enjoy!

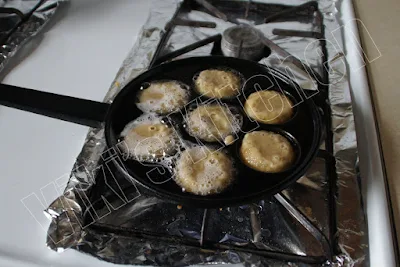
My puff pancake pan serving as traditional thick bottom appa kal:) Minimum heat is the secret behind paniyaram.
Unniappam after flipping.
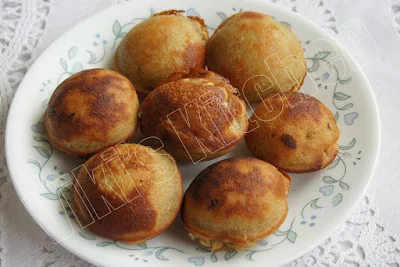
Pillow-soft unniappam ready to eat !

Ingredients:
Rice flour - 1 cup
maida (AP flour) - 1/2 cup
ravai (Sooji) - 2 tbsp
(sooji makes flipping easy)
jaggery (or) palm jaggery - 200 gm (1 cup)
coconut - 2 tbsp
cardamom - 2
banana - 1 (well ripe)
raisin - 4
baking soda - 1/4 tsp
coconut oil / ghee - 1/4 cup (as per need)

Method:
Mix jaggery with 1/2 cup water and bring it to a boil. Switch off, let it dissolve. Filter and remove any impurities. Let it cool.

Grind banana, coconut, raisin,cardamom together to a fine paste.

Mix all the three flours in a mixing bowl. Add the banana paste and jaggery solution, mix well. It should be thick like idly batter. Let it soak for 2 hours.
(We can keep the batter after 2 hours inside fridge and use for a week).

Just before preparing the unniappam, add the baking soda, mix well and let it rest for 10 minutes.

Heat a paniyarakkal (paniyaram pan / puff pancake pan) or appakaral. Add oil/ ghee till 1/2 of the depth of each hole (first time only, then 1 tsp in each hole will do). Let it get hot.

Then pour the uniappam mix in each hole till 3/4.
Reduce heat to the minimum and wait till its cooked on one side.
Then with the help of a wooden skewer (vadai kambi), gently flip the appams.
Let them cook in that side too.

Then take them out and drain the excess oil using a kitchen towel.

Unniappam is ready!

Serving suggestion:
Makes a tea time snack or a  traditional breakfast.
Makes 28 pieces
(7 hole paniyaram pan X 4 times)

Tips:
Mix oil and butter / ghee to get a more flavored neyappam.
Cook the unnippam covered with a tight lid, if it sticks to pan.

Monday, October 24, 2011

Badam Halwa

Happy Deepavali to all my readers and friends! Hope many are busy preparing Diwali snacks. Here is a recipe from my kitchen for your family.

Badam - Almond ; Halwa - fudge.

Batham halwa is a popular dessert of India. Till our good friend Mr.Kannan and family gave us a box of this Badam halwa, I never knew if it is my hubby's most favorite. Thank you friends! I have always ventured into typical South Indian desserts for festivals, but the way Xav enjoyed this almond halwa, scoop by scoop....made me try immediately:) Basically it is a one line recipe with just soaking, grinding and stirring....but involves some essential tips too. I got the recipe from this website and it was so simple and impeccable. Visit her and you will be definitely tempted by that big tray of Almond halwa. Thank you Chithramma!

Home made Badam halwa.

Ingredients:
Almond - 1 cup
milk - 1 cup
ghee - 1 cup
sugar - 1 cup
saffron - few strands
cardamom - 4

Essential Tools:
Thick bottom broad wok
a long handled stirring spatula.
hand gloves - a pair

Method:
Soak almond in water overnight and peel them (or) put them in boiling water and keep till its skin wrinkles. Then add cold water and peel them.
Grind the almonds to a paste using milk. It should be coarse like idly batter, so that we get a nice almond texture afterwards.
Put 1/2 cup ghee, ground almond and cook in a wok for few minutes. Then add the remaining ghee and sugar and stir continuously at medium heat.
Now we will see bubbles (approximately after 10 minutes), reduce the flame and stir carefully. Hand gloves is a must to remain safe at this stage.
After 5 minutes the bubbles will subdue and the halwa will start leaving the edges and ghee starts showing up.
Add the cardamom powder and saffron. Mix well.
(Yellow food color 1 drop can be added if we need more color.But that won't be essential).
Switch off and carefully transfer to a ghee coated ornamental vessel.
Total cooking time 20 minutes.

Serving suggestions:
Serve hot as dessert.


Happy Deepavali!

Tuesday, October 18, 2011

Thengai Podi

Thegai podi - dry coconut chutney powder, kopparai thenga podi, instant coconut rice powder.

I prepare this kind of ready to eat podi during festival times, as I will be much occupied with snack making and won't have much time to concentrate on regular cooking. Paruppu podi and thengai podi can make that hot rice heavenly with just a drop of ghee and appalam. Before marriage I packed this podi for hubby dear as a gift(along with paruppu podi and a sweet)and from then on it became his favorite. He saved those 'plastic sunrise coffee bottles' which I used to pack and showed me after marriage and keeps them as a treasure till now:) It may be a small gift from my side, but the way he remembers it makes me enjoy cooking:)

Thengai podi in container.
Ingredients:Shredded coconut - 1 1/2 cup (or) dried coconut / kopparai thengai - 1 (small)
(I used dry unsweetened coconut)
dry red chillies - 10
tamarind - 2 inch
bengal gram (kadalai paruppu / channa dhal) - 2 tbsp
black gram (urad dhal) - 2 tbsp
cumin - 1 tbsp
curry leaf - 2 sprig
salt to taste (1 tbsp)

Method:
Heat a tbsp oil  and fry the dhals, cumin, tamarind, curry leaf separately and keep aside.
With 1 drop of oil fry the red chilles to get a nice red flavor (not black).
In the same pan add  the coconut pieces / shredded coconut and fry to get a mild red color and nice flavor (do it in low heat). If needed add a few drops of oil.
Let them all cool. Then dry grind them to a fine powder.
It can be kept safely for a month without refrigeration.

Serving suggestion:
It can be served over hot rice with little ghee or mixed and served as quick coconut rice.
Its a good side dish for curd rice also.

Tips:
*Coconut chutney podi / thengai podi holds good as a travel food during vacations. Sometimes people require home made foods during long journey or pilgrimage. In that case a rice cooker along with this thengai podi will do the job:)
*This podi can be used as replacement for coconut paste in any dishes.
*Adding little water with a handful of this podi will become a chutney for idly/ dosa / tamarind rice.

Friday, October 14, 2011

Carrot orange juice

Breakfasts are a must for a healthy start. Juices coupled with a protein rich breakfast is a must for athletes or body builders and also for everyone :)  Homemade juices are not only healthy but also they can be altered according to our need. Here is a juice, rich in vitamins and minerals.

carrot orange juice.

Ingredients:
Carrot - 1
orange - 2
ginger - 2 inch
brown sugar - 4 tsp (optional)
cold water - 2 cup

Method:
Peel the carrot and grind it to a paste along with ginger.
Extract the juice using a filter and some water.
Squeeze the juice from orange. Don't filter to remove the fiber, as it is highly beneficial.
Mix the orange juice with the extracted carrot juice and add enough sugar.
Carrot orange juice is ready!

Serving suggestions:
Serve as a healthy drink along with breakfast.

Amazing moist Carrot cake & Cream cheese frosting

Here is my special thanksgiving recipe, the Best moist carrot cake. This recipes makes 9 x 13 inch rectangle cake. Serves nearly 25 people. ...