Wednesday, June 5, 2024

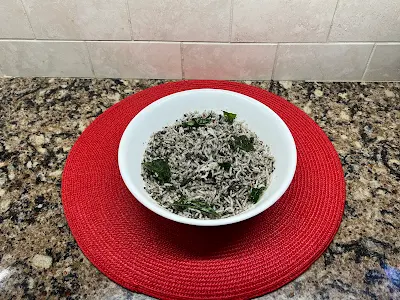
Ellu satham Sesame Rice

Sesame rice / Ellu Sadham is a 'variety rice'. This is a healthy rice.  This is prepared as starter rice (1 or 2 tbsp per person) when preparing some other variety rices namely, Puliyotharai, lemon rice, curd rice etc. along with vadai especially ulunthu vadai.
I have given the ingredients for small quantity. This makes one generous serving (good enough to fill a lunch box) or as 'starter variety rice'.
Mahabharata tells a lot about this sesame. Eat this once in a week or biweekly to get full body health. Sesame is a miraculous healing food. I read a lot about this sesame and found that it is pretty much helpful.

Ellu sadham and Ulunthu vadai 

Ellu Satham


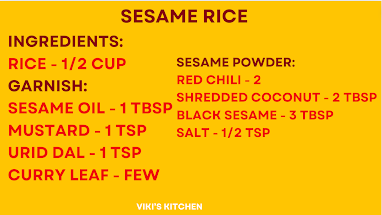
Ingredients: 
Rice - 1/2 cup 
Garnish:
Sesame oil - 1 tbsp
Mustard - 1 tsp
Urid dal - 1 tsp
Curry leaf - few
Sesame powder:
Red chili - 2
Shredded coconut - 2 tbsp
Black sesame - 3 tbsp
Salt - 1/2 tsp

Method:
Cook the rice as usual but grainy. I follow the stove top cooking method. After soaking the rice for 10 mins, cook it in stove with 5 cups of water. Let it boil for 10 mins (watch it often). Check if rice is cooked (not mushy). Drain water. Keep the rice aside.

Heat a wok, add 1 tbsp sesame oil. Add mustard , when it starts popping add urid dal. Then after it gets red, add curry leaf. Pour this fried items over cooked rice, but reserve the oil (see how I did in my video).
We can do the garnish later also, but after preparing the sesame powder, we may have to clean it before using it again. That's why  I do the garnish first.

Next prepare the sesame powder. Heat the same wok, with the remaining oil. If needed add 1 tsp sesame oil. Add dry red chilies and fry a few secs till it gets more crispy and flavorful. Take it out. Add the shredded coconut and fry for few minutes in low heat. Once the coconut starts turning red, add sesame seeds. We can use either black or white sesame. Toast for a few seconds to get a nice aroma (sesame may pop all over the stove. so cook covered if needed. Switch off. Put it in another vessel along with red chilies immediately. Let cool. Grind to a coarse powder without adding water. 

Add this powder to rice and mix well.

Sesame rice Ellu sadham is ready !

Serving suggestion:
Makes a starter dish if we are preparing a lot of different 'variety rices'.
Sesame is good for our bones , makes our bones strong as it contains lot of calcium in absorbable form.
It is a super food that helps our body completely, gets rid of pains, inflammation.


Paneer Tikka (baked)

Tikka is a kind of kebab prepared in  India and surrounding countries. Click to see my chicken tikka kebab video and blog.
I usually make this Paneer Tikka with Ghee rice, Saravana Bhavan kuruma and raitha.


Ingredients:
Paneer - 1 lb (450 gm)
Bell pepper - 2

Tikka Masala
Maida (AP flour ) - 3 tbsp
Turmeric - 1 tsp
Red chilly powder - 1.5 tsp
Coriander Powder - 3 tsp
Garam masala powder - 1 tbsp
Chaat masala - 1 tsp
Cumin powder - 1 /2 tsp
Salt - 2 tsp
Pink Salt - 1/2 tsp
Red food color - a pinch
Vinegar 1 tbsp (or) Lemon1/2
Ginger garlic paste - 2 tbsp
Peanut oil - 2 tbsp 
Thick Indian yogurt - 1/2 cup


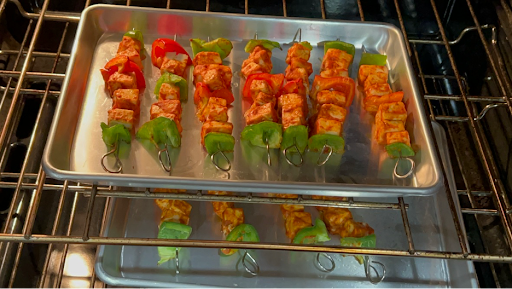
Prepared kabab before baking


Bake @ 425 F for 15 mins

 
Baked Paneer Tikka kebab
Paneer Tikka with coconut milk rice, veg kuruma and raitha.


Method:
Blend the masalas listed under Tikka together in a mixing bowl.
Soak the bamboo skewers in water more than 1 hour.
Cut the paneer into 1.5 inch size cubes (big cubes).
Mix the paneer pieces with required masala. Add it little by little until all the pieces are coated well.
No need to marinate. But If we are preparing this for some party, then marinate the paneer overnight inside fridge (or few hrs before) to make things easier.
Cut 2 colorful bellpeppers into 2 inch size pieces (little bigger than paneer, as capsicum shrinks while cooking). 
Thread the pieces of paneer and bell pepper in the skewer with a little spacing. 
Preheat oven to 425 F (10 mins).
Brush some peanut oil  or butter allover the kebab.
Arrange on a baking tray.
Bake the kebabs in oven at 425 F for 10mins one side. Then flip , apply oil / butter using a basting brush and bake for 5 mins.
The time varies as per oven, so check in between. 
(Instead the pieces can be grilled , shallow fried or deep fried also).
Take out and enjoy !
(Brush some oil or butter over the kebab to keep it shiny and moist. Also keep it wrapped inside an aluminum foil or inside an air tight container till served. Reheating in the oven is ok, but this paneer kebab tastes good immediately after baking.  Chicken kebabs and paneer kebabs can be warmed in oven for few mins only).

Paneer tikka is ready!

Serving suggestion:
We can serve them simply as a starter along with white sauce or as snack or side dish or stuffing inside chapati rolls.


Friday, May 31, 2024

Red Cabbage Stir-fry

Red cabbage is more nutritious than the regular green cabbage (says the internet and I believe this).
Purple cabbage / Red cabbage is a nice alternative to the usual green cabbage we see everyday. I think I am lucky to get this in USA (as I love new veggies very much). 
Also there is a reason why I look for unique and tasty vegetables that grow locally. I cook Indian foods often (say 90%). So I have to shop at an Indian grocery store every week just like anyone. But we need some specific foods like 'fat-free milk', bread, egg, chicken etc. And the desi stores I visit don't have them. So I have to go to 2 stores every week ie., an Indian store for vegetables and one American store for milk, egg, bread, meat etc. But I found that going to 2 stores would make me buy more stuffs (if I like or not, I feel the urge to buy). So to reduce that habit and to save some money, I decided to go to one store per week. (Trust me, this is a very good way to save money and time). When I go to American store I would stock up for next week too and vice versa. I am practicing this as much as possible.
Long story short, this habit has made me explore new vegetables and I got creative to include all the local  vegetables in my Indian style food.
This is not the only story behind this red cabbage. I love this pink color so much that , I love to eat these fancy colored veggies. Ha ha ! So here goes an yummy Indianised stir-fry using this cute red cabbage.
Besides this simple stir fry , I click to see my salad and Sauerkraut using this red cabbage.


Taiwan cabbage and Red cabbage, Green cabbage in Asian grocery store - Piscataway


Ingredients

Purple cabbage Stir-fry


Our Lunch: Red cabbage stir fry with paruppu kulambu rice, pickle

Ingredients:
Red Cabbage - 200 gms
Green peas - 1 cup
Red Onion - 1 
Ginger - 1 inch
Dry Red Chili - 2 
curry leaf - 1 sprig
Shredded coconut - 2 tbsp
cumin - 1 tsp
Coconut oil - 1 tbsp
Mustard seed - 1 tsp
Salt - 1 tsp

Method:
Finely chop the cabbage and keep aside.
Chop the red onion, ginger finely. Cut the dry red chili into small pieces.
Heat oil in a wok.
Add mustard seeds and let them pop.
Immediately add chopped onion, curry leaf, dry red chili , ginger and stir well til the onion gets semi cooked.
Then add the green peas (I used frozen green peas. I defrost them by rinsing the peas in water).
Stir fry the peas (2 mins).
Now add the chopped cabbage.
Stir for few seconds.
Add salt to taste (1 tsp)
Add 1/4 cup water and cook it tightly covered (5 mins).
Open the lid and let the water evaporate.
Once the water is evaporated add the cumin and shredded coconut and stir well.
Switch off.

Red Cabbage stir-fry is ready!

Serving suggestions:

The above said quantity can be served for 4 people.
Serve as side dish with sambar rice, rasam or any spicy puli kulambu.


Thursday, May 30, 2024

Pad Thai

Meaning of Pad Thai. Pad - fried, Thai - Thai 

Thai noodles cooked with tofu, veggies and a tamarind based sauce.


Pad Thai is a traditional Thai dish made with stir-fried rice noodles, eggs, tofu, beansprouts, and spices. This is one of the famous street foods in the world. It is a popular restaurant delicacy or mall food in America. Pad Thai is sweetish and has a nutty flavor. While Pad kee moa is more tangy.


Ingredients: (4 Servings)
Pad Thai noodles - 200 gm (1/2 pack)
Tofu - 200 gm (1/2 pack)
Sesame oil - 2+2 tbsp
Onion -1 
Garlic - 3 cloves
Green Bell pepper - 1/2
Red bell pepper - 1/2
Broccoli - 1 cup
Zucchini - 1/2
Spring onion - 1 bunch
Roasted peanut - 1/4 cup
Red chili flakes - 1/2 tsp

Pad Thai Sauce:
Brown Sugar - 3 tbsp
Thai Tamarind sauce - 2 tbsp
Lemon - 1/2
Fish sauce / Oyster sauce - 2 tbsp
Soy sauce - 1 tbsp
Red chili flake - 1 tsp
Salt - 1 tsp
fresh Ginger pieces - 1 tbsp

Preparation:
Drain water from tofu. Cut the tofu into 1 inch cubes. Place on paper towel or clean dish cloth for 15 mins to drain all water. This is essential step to avoid deep frying.
Cut the bell pepper, carrot, zucchini into long strips. Cut the broccoli to small florets.
Dry roast the peanut (in microwave for 2 mins), remove skin and crush it into coarse pieces using a mortar. 
Mix the items given under sauce and keep aside.

Method:
Cook the noodles. 
Take 1/2 of the pack of Thai noodles (take 200 gm).
Put it in a bowl. Add water to cover it. Soak the noodles for 10 mins.
Heat 4 cups water. Add noodles and cook till al dente (cooked but firm).
Rinse in normal temperature water and mix a tsp of oil.
Saute:
Saute the tofu and take it out.
Saute  the veggies until crisp-tender. 
Add everything together:
Then add everything tofu, cooked noodles, sauce, green onions, peanut, pineapple chunks  and give the mixture a good toss until everything is evenly coated in the sauce.  Add crushed peanuts. Squeeze lemon (check sour taste and add lemon).

Serving suggestion:
Serve the noodles hot. Makes 3 servings.


Thursday, May 23, 2024

Thengai satham / Coconut Rice

Thengai satham / coconut rice is one of the 'variety rices' prepared in South India. This is usually made as lunch box maincourses while growing up. I too make this for my hubby often. This recipe is a very quick recipe. This recipe if enough for  2 adults. After we cook the rice (which takes 20 mins) , it takes only 10 mins to prepare this dish. So while cooking the rice I prepare the garnish and mix .  

I learned to cook these variety rices (kalantha satham / chithrannam ) when I started helping my mom when I was just 12 or 13. It came handy on many mornings as I would cook and pack all of us 3 siblings lunch boxes and would leave some 2 more lunches for amma and appa too to impress amma some days. Not only on Mother's day, almost all weekends, I used to make amma bed-coffee and would help her in kitchen during my school / college vacations.
Learning cooking at an early age is easy and important as we get more energy and lesser chores at that age. But as we grow up we get more busy and learning something like cooking becomes a humongous task.


Ingredients: (for 2 adults)
Rice (pacharisi / Basmathi) - 1 1/4 cup
Shredded coconut - 3/4 cup
Mustard - 1 tsp
Moong dal - 2 tsp
Curry leaf - 1 sprig
Dry red chilly - 2
Sesame oil - 2 tbsp

cooking the rice:
(I prefer stove top method for pulao and 'variety rices'. we can microwave also. But the pressure cooker method makes the rice mushy. Rice cooker can also be used to prepare the rice).

Wash and soak the rice for 10 minutes.
Bring to boil some 4 cups of water along with 1/4 tsp salt.
Add the soaked , drained rice and reduce heat. Cook covered till almost done.
Switch off and pour it over a colander and remove the water completely.
Keep the rice open to maintain it as separate grains. Let it cool for sometime.

Method:
Heat 2 tbsp oil in a wok and add mustard seeds. As they start to crackle, slide in the moong dhal, red chillies (cut into small pieces), curry leaf, shredded coconut , in the same order and fry till the coconut starts smelling great. (See video) .

Switch off  when coconut starts turning red. During hot weather, it is better to roast the coconut till slightly golden brown.
Add some salt to taste (1 tsp). Switch off heat.

Gently mix the rice with the prepared coconut mixture without breaking the rice grains.

Coconut rice is ready!

Serving suggestions:
Good for a quick packed lunch.
It can also be served as starter rice before serving the sambar over plain rice in an elaborate lunch.
Serve with paruppu thogaiyal (fried dhal chutbney), potato chips etc, brinjal serva, egg thokku.


Monday, May 20, 2024

Mathi meen karuvadu varuval (Dryfish fry)

 Karuvadu - dry fish. This is one of my most favorites and I am sure anyone who likes this dry fish is going to love my recipe :)

Dried fish, which is a much less expensive food in Tamilnadu, is a very expensive one in USA. We can get it in any Asian / Chinese grocery stores. That too, dried sardine is the rare commodity here and it is devoured for its unique taste.
I grew up enjoying this dry fish thokku, along with paruppu kulambu (less spicy sambar) and rice. My mom used to make this on weekday dinners, if the veggie side dish she had made got over by lunch itself :) She used to make some egg podimas (scrambled egg) also along with this karuvadu thokku, as this is the favorite of few of us only, and this karuvadu would sound like feast to me !


Dried Herring (Sardines)


Karuvadu fry


Ingredients:
Dry fish (sardine) - 6 
Red onion - 1 big
Green chilly -3
Curry leaf - 2 sprigs
Peanut oil - 2 tbsp
Salt - 1/2 tsp
Red chilly powder - 1/2 tsp

Method:
Clean the dry fish by removing any scales or fins. Soak in water and rinse well to remove any sand or impurities. Keep aside.
Chop red onion, curry leaf, chillies finely.
Heat oil in a wok (kadai) and put the dry fish, before the oil gets hot.
Then add the chopped items, as if it covers the dry fish completely. By this way, we can cook the dry fish without letting out the strong smell.
Reduce flame and sprinkle a handful of water.  Cook covered.
After 5 minutes, the fish would have got cooked. Now mix everything in wok, add salt, chilly powder , 2 tbsp water and cook covered for 5- 10 minutes in low flame, till the fish gets cooked completely.
Karuvadu thokku is ready!

Serving suggestions:
Serve as sidedish or like pickle with sambar rice, rasam rice or curd rice.


Thursday, May 16, 2024

Aval Pazham

 If there is one easiest breakfast recipe in Indian, then it should be this one. LOL. Because all other recipes in India requires lot of ingredients and require more cooking time. So this is my first preference whenever we are returning to USA to our house after a vacation. I keep some frozen coconut handy and the aval is always in my pantry. Banana is an optional ingredient only. So this recipe (!) is a treasure for anyone who prefers homemade foods all time,

Poha / aval / beaten rice comes in many varieties - thin poha, medium poha, thick poha , red aval etc.

I use thick and red varieties. Any variety of poha can do the same. But the thin one can be eaten as soon as it is rinsed. Other thicker varieties (esp red) should be kept 10 minutes after rinsing.


Ingredients:
For 2 servings
Thick Aval (Red Poha) - 1 1/4 cup 
Shredded coconut - 1/4 cup
Brown sugar - as per need
Banana - 2

Method:
Rinse the aval. If it is a thin aval then we can use it immediately.
If it is a red aval or a thick or medium thick aval, then after rinsing it in water for one time, add 1 tbsp water and keep it covered for 10 minutes.
Don't add anymore water.
The aval will drink the moisture and will get soft.
After 10 minutes, add shredded coconut, brown sugar and mix well.
Mash the banana and mix with aval.
(OR) To serve it with style, put the soaked aval mixture in a cereal bowl.
Slice the banana into thick rounds (1/2 inch size) and add on top.

Aval Pazham is ready!

Serving suggestion:
Serves 2 adults (generously).


Amazing moist Carrot cake & Cream cheese frosting

Here is my special thanksgiving recipe, the Best moist carrot cake. This recipes makes 9 x 13 inch rectangle cake. Serves nearly 25 people. ...