Tuesday, July 2, 2024

Grilled Tandoori chicken in Airfryer (Ninja Foodi smart XL Grill)

Grilled Tandoori chicken in Airfryer (Ninja Foodi smart XL Grill)


Ingredients:
Chicken drumstick 
(or) chicken thighs -  2 lb

Tandoori Masala:
Peanut oil - 3 Tbsp
Ginger Garlic paste - 2 Tbsp
Curd - 2 Tbsp
Lemon - 1
Turmeric - 1 Tsp
Salt - 2 Tsp
Garam masala powder - 1 Tsp
Red chili Powder - 1 tsp
Pink salt - 1 Tsp
All purpose flour - 3 tbsp

Recipe:
Wash the chicken drumstick and pat dry using paper towel.
Make 3 to 4 slits per drumstick and keep aside.
Mix everything given for marination in a large mixing bowl.
Put the chicken pieces and mix well.
Cover and refrigerate 6 hours or keep marinated in room temperature for up to 3 hours.

In Ninja Foodi grill:
Place the grilling grate inside the grill .
Plug in the Ninja foodi grill.
Plug in the thermometer (see video above).
The display unit will light up.
Press start button on the left. 
Press 'Grill'.
Choose 'Hi' by using the left up and down arrows. This is the recommended grill plate temperature setting (as per manual for chicken).
As soon as the thermometer is plugged in, the units in the right side would come live stating, "Preset / Manual'. 
Choose Manual by touching 'Manual'.
If we are choosing 'Preset', then choose the meat variety . It will be cooked / grilled automatically.
We have chosen 'Manual' to get a special Tandoori chicken (which is not in menu).
Then using the left side arrows, set the targeted temperature to 210 deg F.
This temperature is the targeted temperature of the chicken (measured by the thermometer we inserted).
Once the preheat is done, the display will say ' ADD FOOD'.
Place 6-8 drumstick pieces or 6 chicken thighs (1 inch apart).
Insert the needle portion of thermometer to the thickest portion of the biggest piece of meat.
It should neither touch the bone nor kept on the upper layer like skin. It should be inserted as close to bone. but not touching it.
Close the hood.
Let it cook for 5-10 mins. At that time the temperature would have risen to half the targeted temperature.
Then the panel would send a visual as well as audio cue like beep sound as well as 'FLIP' in display.
Then open hood, flip the chicken. Remove the thermometer and insert it again,
Close hood and the required temperature will be achieved within 5 - 7 minutes.
Let it get the 'resting time' as per display.
Now open the hood . Take out the tandoori chicken.

Grilled Tandoori chicken is ready !


In Oven:
Preheat oven to 350 deg F.
Line a cookie sheet or baking tray with aluminum foil.
Apply a tbsp oil over the foil.
Keep the marinated chicken pieces with some spacing.
Turn after 15 minutes.
Let it bake both side for 10 minutes.
Then turn the oven to broil mode and keep for 3 minutes both sides or till we get red color.


Tips:
If needed add some red food color while marination.
BBq will also yield a similar quality tandoori.
If oven is not preferred, then shallow fry the pieces with very little oil and make it red by putting over hot dosa tawa.

Serving suggestion:
Sprinkle some chaat masala before serving.
Wrap a piece of aluminum foil at one end to make it holdable:)
Serve hot as side dish with biriyani, paratha etc.
Lemon wedges, onion slices or raitha are often served along with this tandoori.
It can be reheated by Microwave or using a dosa tawa.
The left over can be made into a gravy.


Monday, June 24, 2024

Vegetable Noodles

Simple noodles goes to next level when it is spiced up with vegetables and sauces. This is a comfort food for me and my husband as we love noodles very much.
Noodles is a less expensive grocery all over the world (I guess). So if we know how to jazz it up , then we can easily cook a meal with tons of vegetables.
Here goes the recipe from my kitchen to yours !


Ingredients:
Ramen noodles - 2 pack
(Original flavor noodles - 85 gm)
Water - 5 cups
Oil - 2 tbsp
Red onion - 1
Roma tomato - 2
Bell pepper -  1
Carrot -1 
Ginger - 1 inch
flavoring sachet in the noodles - 2
salt - 1/2 tsp
tomato Ketchup - 2 tbsp
Hot sauce - 1 tsp

Method:
Chop onion, tomato into small cubes.
Cut the carrot and capsicum into long thin slices.
Finely chop the ginger.
Keep aside.

Bring 5 cups of water to boil.
Open the noodles packets, remove the flavor sachets.
Break the noodles into 4 pieces.
Add to boiling water. Cook for 2 mins (half cooked).
Strain and remove water. Keep noodles aside.

Keep a pan on stove.
Add 2 tbsp cooking oil.
When oil is hot add carrot and onion. Saute 1 min.
Immediately add capsicum and tomato.
Saute till tomato turns mushy.

Add the flavoring items that came with the noodles.
Add 1 tsp hot sauce, 2 tbsp tomato ketchup.
Add 1/4 cup water. Bring to boil.
Then  add the cooked noodles and let it absorb the water and get cooked. Switch off.
Garnish with finely chopped spring onion and chilly flakes.

Vegetable noodles is ready!

Serving suggestion:
Serve hot as main course with any protein rich side dish.
Makes a good lunch pack too.


Friday, June 21, 2024

Perfect Traditional Adai Dosai

Perfect traditional Adai dosai.


To grind:
Idly rice / any rice - 1cup
Raw rice (Basmati) - 1 cup
Thoor dhal - 1/4 cup
Channa dhal - 1/2 cup
Moong Dal - 1/2 cup
urid dhal  - 2 tbsp
Ginger - 2 inch
Dry red chilli - 5
Asafoetida - 1/4 tsp
Turmeric powder - 1 tsp
Cumin - 1 tsp
Salt - 2 tsp

To temper:
Oil - 2 tbsp
Mustard - 1tsp
urid dhal - 1 tsp
onion - 2 cup
Green chili - 2
cilantro - a handful
curry leaf - 1 sprig

Method:

Wash and soak the rice , thoor dhal, channa dhal, urid dhal for 3 hours.
I soaked it by afternoon and made it for dinner.
Because while making adai , the dhals should not ferment. Moreover do not use fermented left over batter.
Grind soaked items along with Red chilli, ginger, asafoetida, turmeric, cumin and salt like coarse dosa batter .
Tempering the batter :
Heat a pan with oil and add mustard, as it crackles, add urid dhal.
When urid dal starts to get red in color, then add the chopped onion , cilantro, curry leaves and fry till the onion becomes transparent.
Then add this tempering to adai dosa batter.
Heat a dosa pan and coat it with a little sesame oil.
(Thick traditional dosa tawas make crispy adais than the non stick tawas)
Then pour a ladle of batter and make thick dosas.
Make a hole in the center of the adai and add 1 tsp sesame oil or ghee around the adai and in the center hole.
Flip it. Wait to get adai cooked on both sides (almost 1 - 2 minute each side at medium heat).
Like wise make as many as required.
Adai dosai is ready!

Serving suggestions:
Serve adai hot with coconut chutney or aviyal or onion chutney.
Do not prepare it in batches before serving. Because cold adai does not taste great.
So start making adai , as soon as anyone sits in front of the dinner plate.

Note:  
The taste will be enhanced if we add a handful of drumstick leaves to the batter before making adai.


Tuesday, June 18, 2024

Tirunelveli special Garlic Tamarind Rice (பூண்டு புளிசாதம் )

'Puli saatham' , the name itself has the power to make any one drool. There are so many variations in making a puli saatham.
In Tirunelveli (TamilNadu, India) ,we call it as Puliyotharai. The main variation is the addition of garlic and its roasted ingredients .Moreover we have the habit of using pure chekku Nallennai otherwise called Virgin Sesame oil for the pulihora and dosai.
Still I remember the vacations amma , athais and chithi used to make Puliyotharai for our temple visits. The post brings me the memories of our vacations in Tiruchendur resorts (a beach side village famous for its Lord Murugan Temple) and the long train journeys to Madras:) Mom used to pack the puliyotharai in broiled banana leaves.(Placing the banana leaf over the fire for a few seconds make it flexible to pack food). I have always wondered if the aroma of the puliyotharai comes from the banana leaf or by the gingelly oil:) But now I am sure it is by the love of the person who prepares it:)
Anyways here goes the recipe for Puliyotharai.


Other names: Puliyodharai / Tamarind rice / Puli saatham / Pulihora.

Ingredients:
Raw rice (Pacharisi) / Basmati rice - 2 cup
Salt - 1/2 tsp 
To roast and powder:
Mustard  - 1 tsp
Methi (Fenugreek) - 1/2 tsp
Sesame oil - 1 tsp
To Fry and add with rice:
Peanut  -  handful
Cashew - 15


For Puliyotharai mix:
Tamarind - a lemon size ball
Sea Salt - 1 tsp
Table salt - as per taste
Sesame oil - 3 tbsp 
Garlic - 1 whole
Mustard - 1 tsp
Channa dal - 2 tbsp
Dry red chilly - 2
Curry leaf - a sprig.
Turmeric powder - 1 tsp
Hing - a pinch


Cooking the rice:

Cook the rice with 1/2 tsp salt and ample water .
Drain the excess water. Spread the cooked rice in a wide plate (thambalam) and let it cool completely.

Puliyotharai powder:
Heat 1 tsp oil in a wok and fry the fenugreek seed and mustard till we get nice aroma.
Cool and powder it in a hand mortar / blender.

Puli kaachal (Tamarind masala):
Heat 1 tbsp sesame oil in a wok. Fry the ground nut, cashew nut separately and keep aside.
Again heat the remaining oil in the same wok.
Add mustard, Channa dhal, red chillies (torn into bits),curry leaf , asafoetida and fry well till mustard pops.
Then add the peeled garlic and stir till the garlic starts turning golden.

Extract juice from tamarind using 1 cup of water and pour the juice into the wok.

Now put the Turmeric powder , salt and boil till the oil starts showing.
Then add the freshly grind powder. Turn off heat.
Puli kaachal is ready. We can store it in refrigerator for further use also.

Puliyotharai preparation:

Sprinkle the roasted nuts over the cooked rice.
Add the puli kaachal to the cooked rice little by little and mix well till it tastes good (not too sour).
Puliyotharai is ready!
Keep the remaining gravy refrigerated for further use.

Serving suggestions:
Serve as main course lunch / dinner / breakfast.
Serves 2 adults.
The best side dishes can be the crispy masal vadai and thengai thovaiyal (thick coconut chutney) or simply with potato chips.
It goes well with hard boiled eggs, egg podimas too.

Note:
Tamarind rice cooked in this manner can stay fresh for nearly 3 days without refrigerator. So it can be packed as a best packed food for a long journey, if we prefer home made food.
If packed for a long journey , make separate parcels for every time use. Do not mix the touched food along with fresh one. Do not keep coconut chutney for the journey as it will get spoiled soon. Care should be taken not to touch the food with hand / wet spoon while cooking , and it  gets to live longer, 


Saturday, June 15, 2024

Indian Chinese Egg fried Rice

 This is an Indian street food called as 'Chinese egg fried rice'.


we can use any veggies like carrot, scallion, beans, peas, corn also.


Ingredients:
Jasmine Rice - 1 (uncooked)
Sesame oil - 4 Tbsp
Egg - 2
Broccoli - 1/2 cup (chopped)
Onion - 1/2 cup (Diced)
Green Bell pepper - 1/2 cup (Diced)
Red Bell pepper - 1/2 cup (Diced)
Garlic - 2 cloves
Salt - 1/2 tsp
White Pepper powder - 1 Tsp
Soy Sauce - 2 Tbsp
Tomato Ketchup - 1 Tbsp
Hot Sauce - 1 Tsp

Method:
Rinse rice. Soak the rice for 10 mins in room temperature water. 
Bring 5 cups water to boil.
Add rice and cook 10 mins till it is 3/4 th cooked (grainy).
Add 1 tsp butter or oil to make it non stick.
Drain water , let it cool.
Keep inside fridge until we are ready to prepare fried rice.
Chilled rice is best suitable for fried rice.
Heat 2 tbsp sesame oil in a pan.
Dice / cube the veggies to small pieces 1/2 inch or 1/4 inch cubes. Add chopped veggeies.
Saute at high heat for 1 min. Don't cook it well. They should be crunchy.
Peel and chop garlic. Add garlic to veggies.
Mix well.
Push them aside.
Add 2 tbsp sesame oil to the pan.
Break the eggs and add. Scramble the eggs. 
Sesaon with salt (1/4 tsp for each egg).
As soon as the egg gets cooked mix it with vegetables.
Sprinkle pepper powder and mix well.
Add soy sauce, tomato sauce, hot sauce and mix well.
Cook at high temp for 2-3 mins to brown / caramelize the ingredients.
If needed add 1 or 2 tsp sugar to get the color.
Add the cooked rice (2 cups). 
Mix well.
Cook at high temp for 2-3. mins, by continuosly tossing and mixing.

Indian style 'Chinese egg fried rice' is ready !

Serving Suggestion:
Makes 2 small size servings or one large platter.
Serve with grilled chicken, hot sauce , tomato sauce or any sauce that is suitable.
Sprinkle spring onion.


Tuesday, June 11, 2024

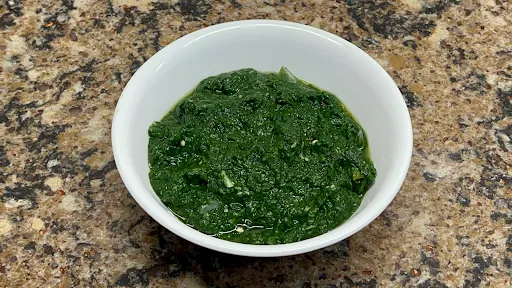
Kadanja Keerai or mashed spinach

 Kadanja keerai / Keerai masiyal / Mashed spinach in Indian style. This is one of my favorite versions of spinach which I used to enjoy growing up. My amma used to make this type of spinach almost on every other day along with fish curry. She used to buy arai keerai for preparing this dish. But I have used flat leaf spinach we usually get from any American grocery store. (Malabar spinach or Indian spinach is not suitable for this recipe)   


Ingredients:
Arai keerai / US Spinach - 1 bunch
Shallot - 1
Green chili - 2
Garlic - 2 cloves
Water - 1/4 cup
Salt - 1/4 tsp
Cumin - 1/2 tsp

Method:
Remove big stems off the spinach if any.
If using arai keerai, then use leaves and tender stems only. Discard the peelable matured stems.
Rinse the spinach well (see video). Remove water completely.


Heat 1/4 cup water in a cooking vessel.
Add peeled shallot, garlic, green chili. Boil for 5 mins.

Add spinach to the boiling ingredients. Cook uncovered for 5 mins. Stir after 3 mins and cook completely.
Switch off. Add salt, cumin.
Mash to a coarse semi thick gravy. In the video I have shown 'how to use kitchenaid blender' to mash spinach. We can use a 'kal chatty' an earthern vessel studded with coarse stones to mash this too (that is the authentic way).

Mashed spinach is ready !

Serving Suggestion:
Serve as side dish or as curry over rice.
Makes a healthy food for kids and adults.
1 lb spinach may be good enough for a 4 member family.
1/2 lb (1/4 kg) spinach / keerai would be more than enough for 2 adults.


Wednesday, June 5, 2024

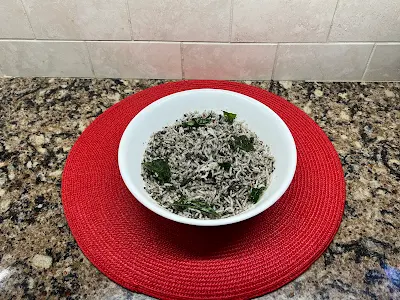
Ellu satham Sesame Rice

Sesame rice / Ellu Sadham is a 'variety rice'. This is a healthy rice.  This is prepared as starter rice (1 or 2 tbsp per person) when preparing some other variety rices namely, Puliyotharai, lemon rice, curd rice etc. along with vadai especially ulunthu vadai.
I have given the ingredients for small quantity. This makes one generous serving (good enough to fill a lunch box) or as 'starter variety rice'.
Mahabharata tells a lot about this sesame. Eat this once in a week or biweekly to get full body health. Sesame is a miraculous healing food. I read a lot about this sesame and found that it is pretty much helpful.

Ellu sadham and Ulunthu vadai 

Ellu Satham


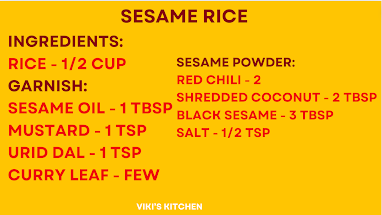
Ingredients: 
Rice - 1/2 cup 
Garnish:
Sesame oil - 1 tbsp
Mustard - 1 tsp
Urid dal - 1 tsp
Curry leaf - few
Sesame powder:
Red chili - 2
Shredded coconut - 2 tbsp
Black sesame - 3 tbsp
Salt - 1/2 tsp

Method:
Cook the rice as usual but grainy. I follow the stove top cooking method. After soaking the rice for 10 mins, cook it in stove with 5 cups of water. Let it boil for 10 mins (watch it often). Check if rice is cooked (not mushy). Drain water. Keep the rice aside.

Heat a wok, add 1 tbsp sesame oil. Add mustard , when it starts popping add urid dal. Then after it gets red, add curry leaf. Pour this fried items over cooked rice, but reserve the oil (see how I did in my video).
We can do the garnish later also, but after preparing the sesame powder, we may have to clean it before using it again. That's why  I do the garnish first.

Next prepare the sesame powder. Heat the same wok, with the remaining oil. If needed add 1 tsp sesame oil. Add dry red chilies and fry a few secs till it gets more crispy and flavorful. Take it out. Add the shredded coconut and fry for few minutes in low heat. Once the coconut starts turning red, add sesame seeds. We can use either black or white sesame. Toast for a few seconds to get a nice aroma (sesame may pop all over the stove. so cook covered if needed. Switch off. Put it in another vessel along with red chilies immediately. Let cool. Grind to a coarse powder without adding water. 

Add this powder to rice and mix well.

Sesame rice Ellu sadham is ready !

Serving suggestion:
Makes a starter dish if we are preparing a lot of different 'variety rices'.
Sesame is good for our bones , makes our bones strong as it contains lot of calcium in absorbable form.
It is a super food that helps our body completely, gets rid of pains, inflammation.


Amazing moist Carrot cake & Cream cheese frosting

Here is my special thanksgiving recipe, the Best moist carrot cake. This recipes makes 9 x 13 inch rectangle cake. Serves nearly 25 people. ...