Showing posts with label dessert. Show all posts

Wednesday, December 16, 2020

Double chocolate m&m cookies


If you are a chocolate fan, then this chocolate cookie will definitely become your most favorite cookie if you taste it one time. Cookies are my favorites to make, but I bake special desserts like this only during Christmas, Easter or for some church functions, festivals, or for my niece. I think this is the first dish that made her fall in love with my cooking. Chocolate is not my hubby's  favorite flavor. So I won't make anything with chocolate unless I find a reason (still I crave for chocolate).  For the first time I made this cookie while we went to meet my niece in her dorm, after that this has became a regular code for her and me to say our love for each other ☺️Also these 'chocolate chip m&m cookies' tastes  extremely delicious and 'rich' and definitely a 'crowd pleaser' for all festivals.

Double chocolate chip m&m cookies

Double chocolate chip m&m cookies


Ingredients:
Dry ingredients:
All purpose flour - 2 cup
Coco powder - 2/3 cup 
Baking soda - 3/4 tsp
Salt - 1/4 tsp
Creaming wet ingredients:
Butter - 1 cup (2 stick)
White sugar - 3/4 cup
Brown sugar - 3/4 cup
Egg - 2 (large)
Vanilla extract - 2 tsp
Lemon juice - 1 tbsp
Others:
M&M- 3/4  cup + 1/4 cup (or lesser as per need)
Chocolate chip - 1 cup

Method:
First the wet ingredients: Melt the butter (microwave for 30 seconds). Pour it into a large mixing bowl (or kitchenaid stand mixer bowl).
Mix the butter , sugar manually by using a whisk or by using stand mixer whisk attachment or a hand mixer.
Add egg, vanilla, lemon juice and mix well till sugar is dissolved.
Next comes the dry ingredients:
Sift the flour into the mixing bowl. 
Add coco powder (I use Hershey's brand), baking soda, salt , Mix well at high speed for 1-2  minutes until everything becomes a dough.
Then add 3/4 cup M&M chocolates, chocolate chips(Hershey's or Ghirardelli brand) and mix them for 30 seconds (or just mix with hands). 
Take out this dough and wrap using a plastic wrap. Keep in fridge (upto 30 minutes or until needed). 
Baking:
Preheat the oven to 350°F .
Before baking take the dough out and keep in room temperature for 10 minutes.
Take out small balls using a cookie scoop or hands.
Roll to balls. Flatten a little and place in baking sheets.
Bake for 8-10 minutes. 
Take out carefully using a spatula and let them cool over wire racks. 
Decorate:
If desired press some M&M on freshly baked cookies (instead of adding to dough) while they are still soft or just before baking. 
Double chocolate m&m cookies is ready !

FYI:
This cookie dough should be kept in fridge for atleast 1-2 hours before baking. Dough stays safe in fridge up to a week or in freezer for longer time (say a month or more). 
This cookie dough should be rolled to small balls and flattened a bit while arranging on baking tray. Don't try scoop and drop style.

Serving suggestion:
Serve as dessert or snack.
These cookies tastes extremely delicious and intoxicating, so consume in moderation 😀

Happy Cooking !

Tuesday, December 1, 2015

Khubani ka meetha

khubani / Qubani - apricot. Meetha - dessert.
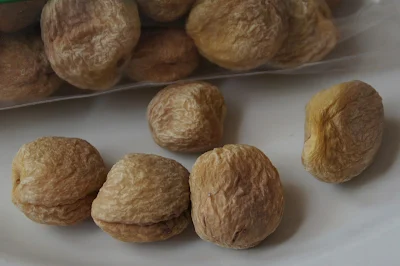
Khubani ka meeta is another fusion dessert of India. Mughal chefs at that time, who enjoyed cooking with fresh apricots in their native, brought India these dried apricots. Then these trees were cultivated around  Himalayas and they thrive there till now.
 Now to our dessert...Qubani ka meeta is a simple jam (preserve) like dish. It is popular among Hyderabad cuisine.
I came to know of this from a nearby restaurant. Then I got an idea of this recipe by the vahchef's video. Thanks to the vahchef, I learned this easy and delicious dessert.
Then I had a dilemma, if I should buy some dried apricots , which are too expensive at Indian grocery stores, while I can get fresh apricots from my nearby farmer's market. But then I thought of sticking to the original recipe, as this is  new to me. Anyway , I will try with fresh US grown apricots soon and will let you know how it came out .Till then enjoy this Turkish Qubani ka meetha  !


Qubani ka meeta


dried apricots from Indian grocery stores
soaked apricots
Seeded apricot, soaking water, seeds of apricot

Removing the shell of apricot seeds

Apricot nuts
Boiling apricot fruits


Apricot dessert ....qubani ka meeta

Yummm...enjoy qubani ka meetha with kulfi ice cream

Ingredients:
Dried apricots - 25
sugar - 1/2 cup
cardamom powder - 1/4 tsp

Method:
Rinse the dry apricots.
Soak the dried apricots in cold water overnight (inside fridge) or at room temperature for 6 hours.
Squeeze and remove the seeds.
Save the soaked water and seeds.
Gently crush the seeds (just to halve them) and take out the nuts.
The apricot nuts would look like almonds but with more flavor.
Now put the fruit in a wok along with soaked water.
Cook for  15-20 minutes or until the fruit gets a jam like consistency.
Add required sugar and stir well for 5 minutes.
Add cardamom powder and chopped apricot nuts.
Stir well and switch off.
Qubani ka meetha is ready!

Serving suggestion :
Serve  warm as dessert along with whipped cream or ice cream.
Happy Birthday Nissi

Friday, April 23, 2010

Porikadalai laddu

Here is a sweet that we can prepare in a jiffy!

Other names: Pottu kadalai ladoo, maladu, nei laddu, nei urundai, dalia ladoo.


Ingredients:
Puffed channa dhal - 1 cup
sugar - 1 cup
(sugar : dhal = 1:1 ratio)
ghee - 1 cup
cardamom powder - 1/4 tsp
cashew nut - 10
raisin - 10

Method:
Dry grind the puffed channa dhal and sugar to a fine powder.
Mix the cardamom powder with it.

Heat a tsp of ghee and fry the cashews, raisins. Mix it with the powdered dhal.

Melt the ghee.

Mix it with the powdered dhal little by little and make small key-lime size balls while it is hot. (Melt the ghee then and there while preparing the ladoo).

Pottu kadalai ladoo is ready!

Serving suggestions:
Serve as snack.
It can be stored in air tight container for a week.
Makes 12 ladoos (approx).

Alternative method:
I made this ladoo for a quick snack and changed the recipe by reducing the ghee. But the traditional method explained above tastes better than my healthy version. Anyway if you need some snack with less ghee follow mine:).

Here I have added only 1 tbsp ghee. Replaced the ghee by very little milk, as the addition of milk with sugar makes it easy.

But this ladoo won't last long in room temperature, because of the addition of milk.

Monday, May 4, 2009

Almond Kulfi (Indian Ice cream ) - A short cut

Whenever I do grocery shopping with my list , Inspite of the weather my man will stand in the Ice cream aisle and will try to accommodate a bunch of packs in his hand. After seeing me he will tell 'Oh, no honey ....some Ice cream packs were falling from the aisle while I opened and so I am arranging them ...hi..hi'.
Ok, you can guess the next scene. Myself reminding him of his diet plans and stuffing them back leaving only one for the whole month.
Can you imagine , if such a man is allowed to see the famous Indian Kulfi Icecream in Indian grocery store? That happened last month and he bought me a lot of kulfi forgetting my grocery list.
They were very teeny tiny packs with just a scoop in it and he took just a day to finish all of them:(
Then considering his thirst on them and health benefits I decided to make a low fat version of kulfi that too without an icecream maker and less effort.
Hence I infused some short cuts to get that authentic kulfi and the taste was very very similar to the original one. Now a days I am also in  LOVE with ICE CREAMS :)
Here goes the Lazy chef's Kulfi.


Ingredients:
Low fat Icecream - 2 cups
Almond - 1/2 cup
Pistachio - 5 (garnish)
Cardamom (Elakkai) - 5
Condensed milk - 4 tbsp
Saffron - a pinch

Method:
Soak almond overnight or in hot water for 4 hours.
Peel the skin and chop it in a blender/ mixie for just two pulses to chop it into big pieces.
chop the pistachio into small pieces.
Powder the cardamom and discard the skin or add the skin in the tea.
In a mixing bowl put the condensed milk, ice cream , cardamom , chopped almond and mix well.
Mix saffron in a spoon of milk and add it to the ice cream. Mix well.
Put it in kulfi molds (get from Indian grocery stores) or simply keep in lidded container.
Keep frozen for an hour or more.
(I got mine ready in just an hour).
Garnish with pistachio while serving.
Kulfi Ice cream is ready.

Serving suggestions:

Makes nearly 500 ml of Kulfi Ice cream.
Serve as dessert.

Events:

Sending this Almond Kulfi recipe to FF: Summer Treat event happening in Indian Khana.

Friday, April 24, 2009

Semiya Javvarisi Paal Paayasam

Semiya is an Indian style noodles mostly made of wheat. Javvarisi / sabudana are pearl like balls made of tapioca flour like sago. Whereas Paal means Milk and Paayasam means a Kheer (Hindi) or a rich pudding .
Payasam could be the typical dessert served with any Indian style full meals. We can make the paal payasam with milk and nuts alone with or without semiya . But the addition of Javvarisi gives a pearl like texture all over the dessert and it gives a sumptuous feeling too.
Javvarisi takes more time to cook than the semiya. So we should cook the Javvarisi first and then add the semiya.
Here goes the reccipe for the Semiya Javvarisi Paal payasam.


Semiya Javvarisi paal payasam / vermicelli kheer / milk payesh


Ingredients
Vermicelli / semiya - 150 gms
Javvarisi / sago /sabudana - 3/4 cup
2 % Milk - 2 cup
condensed milk - 4 tbsp
Sugar - 1 cup
Cashew nuts - 10
Raisins / dry grapes / kismis - 15
almond - 10
Saffron - a pinch
Cardamom - 4
ghee - 1 + 1 Tbsp
Water - 3 cup

Method:
Heat 1 tbsp ghee and fry the vermicelli till light brown.
(If we are using double roasted semiya, then proceed without roasting).
Boil 2 cups of water and add the Javvarisi (sago / sabudana) ,reduce flame, stir occasionally and cook covered till it becomes transparent.
Then add the semiya and cook it to tender.
Now add the sugar and continue to stir.
Put the saffron in the milk and dissolve it, add this milk to the semiya.
Powder the cardamom and add it to the mixture. (Store the skin of cardamom for tea).
Add the condensed milk and mix well.
Fry the cashew nuts and raisins in ghee and add them to the boiling semiya.
Put off fire immediately.
The consistency should be between thin and thick (easy to sip and drink).
Semiya Javvarisi paal payasam is ready!

Serving suggestion:

Pour the paal payasam into serving bowls and serve with spoon.
Chop the almonds into thin slices and sprinkle them over the hot payasam.
Serve as hot / cold dessert.
Makes nearly 6 cups (1 cup = 200 ml)of payasam.
Cooking time : 30 minutes.

Friday, April 17, 2009

Rava Kesari

Yellow color rava kesari is my favorite.

Rava kesari is the classic Indian dessert appreciated along with breakfast.
Moreover we can classify the 'Rava kesari' as the trade mark of TamilNadu's weddings and auspicious occasions. (I am not sure , if it is a must in other parts of India / if it is called by other name...). We can tell it as a dessert served along with breakfast or with fried items like bajji, sojji, vadai and filter coffee in the evening. .
The very sight of the server coming with a big vessel filled with 'ghee flavored' Rava kesari would make many lips to bloom.
Then only all will turn their attention towards the fluffy Idlies, the ghee smeared Venn Pongal and Uthappam served with piping hot sambar and chutney , on the tender banana leaf.
Traditionally it is made in saffron color by adding the food color.
But many make it in yellow color also.
It is the tradition to serve the sweet before all the items. (But the guests would be waiting to get the meal served completely before tasting).
Guests should be encouraged a lot to go for more and more servings while not asking so points out the lack of care for the guests, as the Indian tradition emphasizes treating the guest like God , irrespective of anything.

There is a poem / kural in Tamil from the famous Thirukkural written by Thiru Valluvar (virudhombal 10)
"Moppak kuzhiyum anichham;mugamthirindhu
Nokkak kuzhaiyum virundhu"

This kural (poem) compares the delicate nature of the guests with the rare and tender flower called 'anicham' which will wilt even when we smell it.
How nice . right. So it is the Indian culture to serve the guests even before they ask for more:)

Anyway the lingering taste of kesari will bring back the memories of so many unforgettable weddings and occasions to us.
Have a sweet weekend!

Special Note:

I got this recipe from a small scale but successful caterer in Tirunelveli,TN, India. If you want to make a fool proof one , just read the highlighted lines carefully. This recipe has helped me a lot while making bulk quantities, as it will not demand any muscle work like the home made version:)
Using bright orange food color in kesari is more traditional.

Rava kesari to celebrate Baby Jesus' Birthday, the Christmas, 2011

Ingredients:
Ravai / rava / semolina / sooji - 1/2 cup
water - 1.5  cups (thrice that of rava)
sugar - 1 cup (twice that of rava)
cashewnuts - 10
raisins - 15
ghee - 2 tsp
orange / yellow food color - 1/8 tsp
Cardamom - 4
(Powder the cardamom and discard the skin. (I put the skin in to the tea).)

Method:
Heat a thick wok / pan , which has a proper tight lid.
Then heat a tsp of ghee and fry the broken cashews , raisins one by one and keep aside.
Take out.

In the same pan add 1 more tsp ghee. 
Add ravai.
Dry roast the rava till a very few (not every particle)turns a mild red with a nice aroma.
Transfer it to a dry plate.

Add 3 cups of water in the same pan and let it come to a boil.
Add sugar.
Then add the food color and mix well.
As the water starts bubbling , reduce the flame (almost near switch off point).

Now add the rava in a wide spread manner . Do not put as lump in one place . 
Add it slowly without stirring and cover it tightly with a lid.
Add the fried cashews and raisins and cardamom powder.

Cook Covered in LOW HEAT.
Allow the rava to be cooked in that low heat .
Do not stir the kesari now, as it may create lumps.

After 5 minutes open and check if all the water has been absorbed by the rava.
 
Mix gently.
Perfect Rava kesari is ready !
 Rava kesari starts leaving the sides of the wok.  The end product should not be dry but somewhat sticky.
Rava kesari is ready!

Serving suggestions:

Serve as dessert along with breakfast or evening tea and spicy snacks.

Serves 6 people.

Friday, March 6, 2009

Paruppu Boli (dhal stuffed sweet parathas)

Boli is a south Indian sweet similar to a sweet stuffed paratha.
I got introduced to this boli in the train journeys from Chennai to Tirunelveli. The total traveling time may consume around 12 to 14 hours. Usually we board the train in the late evening and will reach Tirunelveli for breakfast:)
But before an hour to reach the destination, we have to halt in a station called 'vanchi Maniyachi' . It is the memorial spot for the Indian freedom fighter Mr. Vanchi Nathan. The train usually stops there for nearly 20 minutes , as it is a jucnction and also to get signal. But it will be a good time for the street vendors to sell their homely Boli, vadai ,Murukku, coffee, tea and Idly. The famous dishes are Murukku and boli.You know what, this stop will be my long waited one to get my favorite 'Boli'. I love to finish off my breakfast there with these yummy bolis alone. One more place famous for boli is Kadamboor in that area. My taste buds always crave to taste and compare them in different places. The differences I found were, the Maniyachi Bolis are thinner and made with sesame oil, while in other places they use ghee on the thicker version of boli.
Still it gives a native taste and I love it very much. I tried it last month and it came out very well.   Here is the recipe and you can try it this weekend:)


Paruppu Boli/ Maniyachi Boli / Sweet paratha.

outer layer:

All purpose flour - 1 1/2 cup
Turmeric powder - 1/4 tsp
baking soda - a pinch
salt - a pinch
Sesame oil - 1/2 cup

Mix the flour, salt , baking soda, Turmeric powder and mix well.
Add water little by little to get a thick chapathi dough like consistency.
Coat it with little sesame oil and cover it with a wet cloth.
Leave it for 4 - 6 hours . Mom used to make this dough in the morning and use it in the evening by 3 pm, so that we could have it with tea.(This setting time makes the dough very flexible and manageable. In the mean time prepare the stuffing or pooranam).
After that divide the whole dough into 15 equal portions.
Shape them in to balls. Keep aside.

stuffing:
Channa dhal (Bengal gram) - 1 cup
Jaggery - 3/4 cup
cardamom - 3
shredded coconut - 1/4 cup

Soak the dhal for 2 hours. cook the channa dhal completely and drain water.
(We can use the water to make rasam / soup).
Mash the dhal to fine paste using a mixie / a spatula.
Heat 1/4 cup water and dissolve the jaggery in it. Then filter any dust / sand present.
Mix the jaggery solution with mashed dhal and heat it in a wok.
Add coconut and powdered cardamom now.
Let it loose all the moisture and become a thick mass.
Switch off stove and let it cool.
Divide it in to 15 equal size balls.

Method:
Take one 'all purpose flour ball'.Apply oil to it. Using a rolling pin flatten it to a circle. Do not use flour to spread the circle. Instead apply oil generously to spread it.
Take one 'stuffing ball'. Place it on the center of the circle.
Now fold it with the covering dough closely , so that no stuffing can be seen from outside.
Now again apply some oil and carefully spread it to a thin circular shape (approximate diameter should be 5 - 6 inch). Don't worry if you see some pooranam from inside in this stage, as it will become fine after frying.
Heat a dosa tawa. Evenly apply sesame oil on the tawa .Reduce flame and fry the bolis on both sides till we see some brown dots all over.
Again increase the heat, apply oil, reduce heat and fry the bolis in lesser heat.
Take out and store in a container.
Like wise proceed with the rest of the dough.
Paruppu Boli is ready!

Serving suggestions:

Serve as dessert or evening snack.
Makes 15 Bolis .
The leftover boli (if any) can be wrapped in ziplock covers and kept refrigerated for a week.

Note:
Like wise we can make numerous verieties of sweet stuffed bolis like, coconut boli , date fruit boli, sesame boli, fruits boli, ghee boli, Jeera boli (boli soaked in sugar solution) etc. I have tasted some varieties in the sweet stalls of KK nagar , Chennai,India :) . You can experiment any thing with it and will become a fan of bolis soon:)

Sending this boli to Purva's Holi haii ! event.

Wednesday, January 21, 2009

Sesame Ladoo

Sesame ladoo / Ell urundai is a kind of primordial Indian sweet . It is believed that , the people who extract oil (nallennai in tamil) from sesame seeds could have invented this amazing sweet. Actually they mix palm jaggery with the left over crushed sesame seeds after getting the oil .
We cannot get palm jaggery easily in USA , so here is a modern recipe for our store bought sesame seeds with ordinary jaggery:)


Ingredients:

Black Sesame seeds - 1 cup
Jaggery - 1/2 cup (grated)
cardamom - 2 pods (optional)

Method:
Sprinkle little water over black sesame seeds and dry roast it.
Sprinkling water avoids jumping of sesame seeds. Let it cool .
Then coarsly grind (just 2 pulse) the sesame seeds and cardamom in a mixer.
Heat the crushed jaggery with a spoon of water and make a thick liquid out of it.
Take care not to char the jaggery.
Then mix the crushed sesame seeds with jaggery and make lemon size balls.
Sesame ladoo is ready.

Good for a healthy dessert for underweight kids!

Thursday, November 27, 2008

Mysore bah

This is the first time I have ever tried making Mysore bah at home.
When I was in Madras , there was no chance for me to prepare my favorite sweets because of its easy availability and fresh taste. But thanks to abroad life style all of us have become 'super chefs':)
I am sure all my regular readers and friends will know my schedule. So as usual here is a snack / dessert for the long weekend.
My request is do not get panic to see the measurements of oil and ghee here.
The bitter truth about Mysore bah is it contains lot and lot of oil:( I found out this while preparing this dish only. Now after making this sweet at home I am reconsidering my preference on sweets:)
Calorific value: 47 gms gives nearly 195 calories. (Reference The daily plate)
Reference:
Method from Vah chef and Ingredients from my mom's recipe note book.
Inspired by the pictures and presentations of Vibaas Besan burfi.
I am a great fan of the vah chef at vahrehvah.com. Kindly go through his videos before making this mysore bah. His procedures are wonderful and so easy to follow.

Ingredients:
Besan flour / Bengal gram flour - 1 1/4 cup (250 gms)
sugar - 2 cups
oil - 1 cup
ghee- 1/4 cup
cardamom - 3 pods (optional)

other items:
Big Non sick tawa - 1
vessel to heat oil - 1
Laddle for hot oil - 1
Long handle non stick spoon - 1
vessel for flour - 1
sieve
a plate / a cake mould.

Method:

Measure the besan flour and keep it in a broad vessel.
Heat oil and ghee together to smoky. Take a laddle of hot oil and pour to the flour.
Mix gently and remove the lumps by using a sieve. This is very important to keep the basan flour in a loose state without any lumps.
Now heat the water and sugar to boil. The consistency should be very thick enough to make soft balls if dropped in cool water.
Add the sieved besan flour little by little and stir continuously till it gets separate from the vessel.
Same time heat the oil to smoky hot and add to the hot mixture little by little.
Add hot oil in three or four intervals. You may see the flour forms a froth / bubble all over and starts to change color .
This is the perfect condition to switch off flamme.
Pour it to a plate and let it cool.
Cut in to small squares or diamond shapes.
Mysore bah is ready.

Serving suggestions:
Makes 30 pieces of size 2"x2"x2" diamond shapes. (Number may vary by height of plate and pieces size).
Serve as dessert.

Thursday, July 24, 2008

Mango kheer.


Mango kheer or Mango payasam is an excellent dessert prepared during summer.

Ingredients

Milk - 1/2 litre
Sago - two tablespoon (Javvarisi in Tamil)
Cashwenuts - 10 pieces
Cardamoms - 3
Fine Mango Puree (from 1 ripe mango) - 1 cup
Ripe mango - 1 chopped.
Ghee - 2 tablespoons
raisins - 10 .
Sugar - 1/2 cup taste

Method:

Soak the sago in water for 10 minutes and cook it completely till it becomes transparent.
Add milk and boil the sago.
Add sugar and powdered cardamom.
Simmer the stove till milk thickens.
Add the chopped mango pieces.
Heat Ghee and fry the cashewnuts ,raisins in it.
Add the fried cashews and raisins to the kheer.
Add the mango pulp and remove from fire.

Serving suggestions:

Makes 5 cups of Mango payasam.
Serve chill or hot.

Thursday, July 10, 2008

"Fibre rich " susiyam / sooyam (sweet stuffed balls)


Susiyam or seyyam or sooyam is an all time favorite for my husband . So i make it for festivals.Susiyam is traditionally made with channa dhal.But for a change , i tried making susiyam with germinated Green gram and cowpea and it came very tasty than ever.These sprouts are good for health also .

Ingrdients:
Green gram - 1 cup
cow pea (karamani)- 1/2 cup.
Jaggery - 150 gms (8-10 small cubes)
oil - 200 ml (to deep fry)
maida / All purpose flour - 3 spoons
rice flour- 2 spoons.
salt - 1/4 tsp.
tumeric powder- 1/4 tsp.
cardamom- 4.

Method:
(1)Soak the dhals for 4 hours and drain the water. Tie them loosely in a clean cloth and allow it to germinate for a night.
Now our dhals are loaded with vitamin E and vitamin C.
Pressure cook them with 1 cup water for one whistle . Take them out and mash them by a spoon.
(2) Add 1/4 cup water to jaggery and heat it. wait until it dissolves. Strain the jaggery solution and discard any sandy leftover at the bottom.
(3) Now add the jaggery solution to the mashed dhal and heat them in a vessel , until the mixture loses any moisture and becomes easy to handle.Add powdered cardamom.
(4) After the dough becomes cool, make small balls of the size of a "small Key lemon".
(5)Mix rice flour, all purpose flour , salt, turmeric powder, with 1 cup of water to get a thin batter.
(6)Heat corn oil in a frying pan . Take a ball , coat it with the batter by soaking . Then deep fry the coated balls for a 1 minute.
Take care not to char the balls.

Serving suggestions:
Makes 30 susiyams. It can be served as a dessert or a festive time snack.

Chicken Kofta kebab using Kitchenaid meat grinder attachment

This is a protein rich healthy chicken kebab recipe. In this recipe and video I have shown how to use kitchenaid meat grinder attachment and...