Showing posts with label indian festival snack. Show all posts

Thursday, October 27, 2011

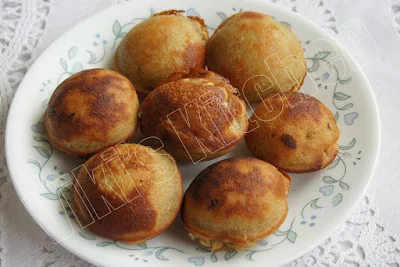
Unniappam

Unniappam or Neyyappam is a famous sweet dish from Kerala. It is similar to Tamilnadu's 'inippu kuzhipaniyaram' with some banana. some months ago I tasted this made by a friend and absolutely loved it. Making perfect shaped paniyaram using my heavy pan is a challenge for me, so I needed a detailed recipe. Then I googled and got this recipe from this video that gave me the spongy unniappam. Try this during a rainy weekend and enjoy!

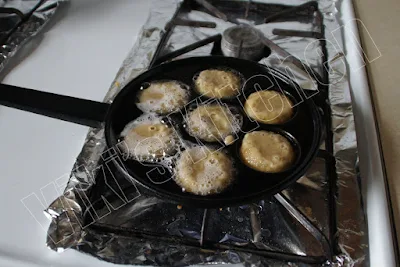
My puff pancake pan serving as traditional thick bottom appa kal:) Minimum heat is the secret behind paniyaram.
Unniappam after flipping.
Pillow-soft unniappam ready to eat !

Ingredients:
Rice flour - 1 cup
maida (AP flour) - 1/2 cup
ravai (Sooji) - 2 tbsp
(sooji makes flipping easy)
jaggery (or) palm jaggery - 200 gm (1 cup)
coconut - 2 tbsp
cardamom - 2
banana - 1 (well ripe)
raisin - 4
baking soda - 1/4 tsp
coconut oil / ghee - 1/4 cup (as per need)

Method:
Mix jaggery with 1/2 cup water and bring it to a boil. Switch off, let it dissolve. Filter and remove any impurities. Let it cool.

Grind banana, coconut, raisin,cardamom together to a fine paste.

Mix all the three flours in a mixing bowl. Add the banana paste and jaggery solution, mix well. It should be thick like idly batter. Let it soak for 2 hours.
(We can keep the batter after 2 hours inside fridge and use for a week).

Just before preparing the unniappam, add the baking soda, mix well and let it rest for 10 minutes.

Heat a paniyarakkal (paniyaram pan / puff pancake pan) or appakaral. Add oil/ ghee till 1/2 of the depth of each hole (first time only, then 1 tsp in each hole will do). Let it get hot.

Then pour the uniappam mix in each hole till 3/4.
Reduce heat to the minimum and wait till its cooked on one side.
Then with the help of a wooden skewer (vadai kambi), gently flip the appams.
Let them cook in that side too.

Then take them out and drain the excess oil using a kitchen towel.

Unniappam is ready!

Serving suggestion:
Makes a tea time snack or a  traditional breakfast.
Makes 28 pieces
(7 hole paniyaram pan X 4 times)

Tips:
Mix oil and butter / ghee to get a more flavored neyappam.
Cook the unnippam covered with a tight lid, if it sticks to pan.

Thursday, August 11, 2011

Kaju Katli

Wishing all my friends and readers a happy and blessed Varalakshmi Nonbu!

Hope many are busy with the Varalakshmi Nonbu pooja preparations. Here is an extremely easy dessert to make this day more special and let it be a good start.

Cashew burfi or kaju kathli is a famous dessert available in almost all the sweet stalls of India. It will be the first choice for many who do the snack shopping while planning to meet a friend or family.

Memories: Mom would buy some broken cashews (the powdery one we get for making kuruma) and do this. Her method involves soaking the cashews in milk for a couple of hours and make a fine paste out of it. Then She would prepare a sugar syrup of 2 string consistency and add this cashew paste,  little ghee. Then she would stir it in low heat till it starts leaving the sides and pour them on a ghee greased plate to make slices.
I have tried this before and I am sure it will be extremely delicious.

But I am describing a much easier version which I got from my friends. I think this is a short cut and much prevalent than my mom's:) Anyways we won't go wrong with any of these methods.

A box full of happiness and smile......Kaju katli:)

Ingredients:
Cashew nut (broken) - 1 cup
sugar - 1 cup
ghee - 1 tsp
water - 1/4 cup

Method:
Powder the cashew to a fine state.

Pour the water and sugar in a wok and start heating. Let it come to a boiling stage. Then reduce flame and heat till we get a single thread consistency.
Now add the cashew powder and mix well. Reduce flame to the lowest and stir continuously till it starts leaving the sides. Switch off.
Let it cool slightly. Now knead it like chapathi dough with ghee and place it over a clean plate / countertop. If powdery add a few drops of milk (or) if it is loose them MW it / stir in low flame again. It should be like a dough and much workable.
Press with a rolling pin and flatten it to 1/2 inch thick sheet. Make diagonal lines and cut that into 2 inch diamonds.

Place them on a greased plate and cool completely. Store in a clean dry vessel.

Kaju katli is ready!

Serving suggestion:
Makes a rich dessert.
Number of slices: Can't remember that:) so please count them from the picture and lemme know :)

Event:
kaju Katli goes to 'Mehjabeen Arif's Iftar night' event.
Wishing you all a blessed ramadan too. Happy hosting dear!

Sunday, January 9, 2011

Thengai paal murukku

 Thengai paal - coconut milk; murukku- an Indian snack.

This is a very common snack in my home town. Unlike the regular murukku, the thengai paal murukku requires very less butter. The flavor comes from freshly squeezed coconut milk. They shape it essentially like this. Whole green gram flour or urad dhal flour or puffed channa dhal flour are used along with rice flour.  I made this for Christmas. Actually getting this shape is a time taking process, so I prepared a few using this star murukku pattern and the rest in tri holed thenkulal pattern.

Thengai paal murukku


Ingredients:

Rice flour - 4 cups
(If you have a flour mill in your vicinity (just like Indian flour mills), then wash 4 cups of unboiled rice (pacharisi), drain the water, let the rice dry for a while and prepare flour. Otherwise we can use store bought flour also. But the ratio should be 4 : 1)
split urid dhal (Black gram) - 1 cup
coconut milk - from 1 coconut
coconut oil (or) butter - 2 tbsp
Cumin - 1 tbsp
sesame seeds - 2 tbsp
Hing (Asafoetida) - 1/8 tsp
Salt per taste
Water for mixing - (nearly 3 cups of water)
Oil - to deep fry (500 ml)

Coconut milk
1.Scrap the coconut and grind well. Add 1/2 cup luke warm water and extract the milk by filtering. Again add 1/2 cup warm water and extract milk. Do another time also. Use this milk to make murukku dough.
2. If using a coconut milk powder (I used Palmer brand), the prepare 1 cup thick milk and 1 cup thin milk.
3. If using canned coconut milk, go by the directions to get 1 cup thick milk and 1 cup thin milk.

Method:
Heat a wok and dry roast the urid dhal till it we get a nice flavor and starts to smell nice (do not make it turn red). (Always use split and white dhal. Roast the black gram dhal in small portions only).  Keep aside and let it cool. Then dry grind it to a fine powder using an Indian mixer.

In the same wok , dry roast the rice flour for about 10 minutes . When we touch it , we should feel it like river sand. Then let it cool.

Put both the flours in a large mixing bowl . Add cumin, sesame, asafoetida and butter. Mix well.

Dissolve the salt in some water. Mix this salt water along with coconut milk powder (or) just use fresh coconut milk + salt and add to the flour.Knead it to a soft chapathi dough consistency.

Now check salt and add more mixing with water,if necessary.

Fit a star pattern murukku mold and fill it with dough.

In the mean time heat the oil in a wide pan till smoking point. Then reduce flame.

Grease a few flat plates with oil and squeeze murukku in the above shape. Carefully slide them one by one into the hot oil. Do not crowd the oil, flip once after one side is done.

After the hissing sound and bubbles subdue, drain and remove the murukku. Place them on paper towel and store them in air tight containers after they get cool.

Coconut milk Murukku is ready!

Note:

Makes 15 big size murukku or 30 murukku of our palm diameter.
Can be served with tea or as a snack.
Adding some oil,/ butter will result in lesser oil absorption of murukku.
Pack the murukku in zip lock or plastic covers to prevent it getting less crispy (in humid areas).
If we are preparing more murukku, it is common to divide the flour into few parts and knead the dough just before squeezing.
Never allow the dough to sit in counter for a long time, as it will yield dark colored murukku.The dough can't be refrigerated too. So keep yourself free before starting to prepare murukku and don't stop the process in between.

Friday, April 17, 2009

Rava Kesari

Yellow color rava kesari is my favorite.

Rava kesari is the classic Indian dessert appreciated along with breakfast.
Moreover we can classify the 'Rava kesari' as the trade mark of TamilNadu's weddings and auspicious occasions. (I am not sure , if it is a must in other parts of India / if it is called by other name...). We can tell it as a dessert served along with breakfast or with fried items like bajji, sojji, vadai and filter coffee in the evening. .
The very sight of the server coming with a big vessel filled with 'ghee flavored' Rava kesari would make many lips to bloom.
Then only all will turn their attention towards the fluffy Idlies, the ghee smeared Venn Pongal and Uthappam served with piping hot sambar and chutney , on the tender banana leaf.
Traditionally it is made in saffron color by adding the food color.
But many make it in yellow color also.
It is the tradition to serve the sweet before all the items. (But the guests would be waiting to get the meal served completely before tasting).
Guests should be encouraged a lot to go for more and more servings while not asking so points out the lack of care for the guests, as the Indian tradition emphasizes treating the guest like God , irrespective of anything.

There is a poem / kural in Tamil from the famous Thirukkural written by Thiru Valluvar (virudhombal 10)
"Moppak kuzhiyum anichham;mugamthirindhu
Nokkak kuzhaiyum virundhu"

This kural (poem) compares the delicate nature of the guests with the rare and tender flower called 'anicham' which will wilt even when we smell it.
How nice . right. So it is the Indian culture to serve the guests even before they ask for more:)

Anyway the lingering taste of kesari will bring back the memories of so many unforgettable weddings and occasions to us.
Have a sweet weekend!

Special Note:

I got this recipe from a small scale but successful caterer in Tirunelveli,TN, India. If you want to make a fool proof one , just read the highlighted lines carefully. This recipe has helped me a lot while making bulk quantities, as it will not demand any muscle work like the home made version:)
Using bright orange food color in kesari is more traditional.

Rava kesari to celebrate Baby Jesus' Birthday, the Christmas, 2011

Ingredients:
Ravai / rava / semolina / sooji - 1/2 cup
water - 1.5  cups (thrice that of rava)
sugar - 1 cup (twice that of rava)
cashewnuts - 10
raisins - 15
ghee - 2 tsp
orange / yellow food color - 1/8 tsp
Cardamom - 4
(Powder the cardamom and discard the skin. (I put the skin in to the tea).)

Method:
Heat a thick wok / pan , which has a proper tight lid.
Then heat a tsp of ghee and fry the broken cashews , raisins one by one and keep aside.
Take out.

In the same pan add 1 more tsp ghee. 
Add ravai.
Dry roast the rava till a very few (not every particle)turns a mild red with a nice aroma.
Transfer it to a dry plate.

Add 3 cups of water in the same pan and let it come to a boil.
Add sugar.
Then add the food color and mix well.
As the water starts bubbling , reduce the flame (almost near switch off point).

Now add the rava in a wide spread manner . Do not put as lump in one place . 
Add it slowly without stirring and cover it tightly with a lid.
Add the fried cashews and raisins and cardamom powder.

Cook Covered in LOW HEAT.
Allow the rava to be cooked in that low heat .
Do not stir the kesari now, as it may create lumps.

After 5 minutes open and check if all the water has been absorbed by the rava.
 
Mix gently.
Perfect Rava kesari is ready !
 Rava kesari starts leaving the sides of the wok.  The end product should not be dry but somewhat sticky.
Rava kesari is ready!

Serving suggestions:

Serve as dessert along with breakfast or evening tea and spicy snacks.

Serves 6 people.

சக்கரைப்பொங்கல் Fast and Tasty Chakkara Pongal

Dear friends, Wishing all a happy and prosperous Pongal , Ingredients: Raw rice - 200 gm Moong dal - 2 Tbsp Water - 3 cups Milk - 1 to 1.5 c...