Wednesday, May 5, 2010

Bread omelet

Omelet sandwiched between two slices of bread and flavored with sauces and chutneys.

This is my hubby's most favorite breakfast to pack for office. I am sure many know to make it, but posting it for his friend who wanted to know the recipe for this unique 'Indian egg sandwich'.


The procedure is of two fold. First toasting the bread and then preparing the omelet. Arrange it according to taste.

To toast the bread:
Bread - 4 slices
(Any bread works fine, but I prefer the fluffy 'old fashioned white bread' always).

Toast them in a bread toaster. Otherwise heat a griddle with a 1/4 tsp butter. Pan roast the bread both sides till we a get a beautiful red color.
Repeat for the remaining slices too. Keep aside.

The red chutney:
Tomato ketchup - 2 tbsp

The green chutney:
Mint leaf - 1 cup
cilantro leaves - 3 cups
vinegar - 1/4 cup
salt - 1/4 tsp
green chilly - 4

Wash and clean the leaves.
Grind all the above to a fine paste and keep refrigerated. We can make a lot of chutney and store for at least 2-3 weeks.

To make omelet:

Ingredients:
Egg - 3
Red onion (finely chopped) - 1
green chilly (finely chopped)- 3
coconut oil - 1 tbsp (any oil)
salt- 1/8 tsp for each egg added.
cumin seeds - 1/2 tsp
Cheese - 2 tbsp (optional)

Method:
Break and pour the egg in to a mixing bowl.
Chop the onion and green chilly very finely.
Add salt and cumin seeds to the egg and beat well.
Now add the chopped onion and chilly. Using a fork , beat till the egg doubles its volume.
Heat a tbsp of coconut oil in a dosa griddle .
Pour the well beaten egg, reduce heat. Flip the omelet. Cook both sides completely and keep aside.

Arranging:
Take two toasted bread slices. Spread a little unsalted butter if we have used a bread toaster.
Coat the top of one bread with 1 tbsp tomato ketchup and the next slice with 1 tbsp green chutney.
Cut the omelet into two and place a 1/2 inside and close the breads.
Make a diagonal cut and serve.

Like wise do for the next pair of bread slices.

Bread omelet is ready!

Serving suggestions:
Serve as a breakfast or evening snack.

Monday, May 3, 2010

Beetroot greens poriyal

Some years back, when I saw these fresh bunches of beets for the first time in a farmers' market, it became my center of attraction. Personally I think this beetroot is a gorgeous vegetable and I like all those who say 'YES' to this cutie. Mostly no one in my dad's house likes it , except for my Annapazham paatti, who was a great story teller in our native village. Rarely she visits our home and I would be eagerly waiting for her timeless tales. Whenever we start having this fry, she would say the same like me 'Most gorgeous vegetable in the world' and no wonder all the kids would start finishing that fry in no time.

Ok, we all know to cook a beetroot in our own way. But I have never used its greens till I landed in this country. My hometown which was known for its hot weather even in the winters could not supply me the beetroot with its leaves . But except for these fancy vegetables (English vegetables we say), that region is blessed with a lot of vegetation like brinjal, tiny tomatoes, chillies, turmeric,dhal, paddy fields and all the native Indian vegetables can be got fresh there.
(Yeah, I can never call it heat and dust. Such is the power of your home..right!)

So coming back to the fry. Without knowing the recipe , I had many doubts on that taste. Even I sent queries to my favorite cookery show hostess , Mrs. Revathy Shanmugam , if it is edible:) May be she was busy, so couldn't get the reply till my greens were fresh. So I just prepared a stir fry of its leaves (leaves alone, not the stem) along with a small beetroot. (Look at that cute bunch!).

It was amazing and I served it to my hubby saying the same words of that granny. No wonder he too started liking the beetroot. Touch of an Angel..huh:)


Fresh bunch of beetroot with greens.
Beetroot greens stir fried with a beetroot.

Ingredients: (for two people)
Beetroot greens - 1 bunch (15 leaves)
Beetroot - 1 (150 gm)
Shallot / red onion (chopped) - 1/2 cup
garlic - 5 cloves
shredded coconut - 1/4 cup
mustard - 1/2 tsp
oil (sesame / coconut oil) - 1 tbsp
cumin - 1/2 tsp
dry red chilly - 2

Method:
Pluck the leaves and young stem alone. Discard the tougher stalk. Remove the skin of beetroot.

Wash and clean the greens, beetroot. Chop them separately.
(Beets should be chopped into small cubes of 1/2 inch).

Heat oil / ghee in a wok. Add the mustard seeds and let it splutter.
Chop the onion, garlic, chillies, curry leaf (optional) finely and add to the wok.
Stir till onion turns soft.

Add the finely chopped beetroot and cook closed with a handful of water for 5 minutes.
Open the lid. Let all the moisture dries up.

Now add the finely chopped greens and stir fry till the greens get cooked.

Add salt, cumin and fry a bit. After the poriyal looks very loose without any moisture, switch off.
Then put the freshly shredded coconut.

Beetroot keerai poriyal is ready!

Serving suggestions:
The perfect combination can be with sambar rice ,vatral kuzhambu rice etc.

Thursday, April 29, 2010

Thengai bun ( Coconut bun)

Thengai means Coconut. A popular stuffed bread available in the bakeries of Tirunelveli , Tuticorin (TN, India) and other places South to it. Usually they stuff the bread with sweetened coconut, raisins, cashews, cherries and left over fruit cake some times.

This is one of the snacks we usually buy in my father's house for evening tea. I love the way my mother used to keep a snack every evening while we return home from school. She was so dedicated and caring in such a way that at least she would buy some goodies from the nearby bakery for us:) When I told my hubby of those fond memories after marriage, he started bringing me my sweet breads when he comes to pick me up from the University, so that I won't starve till I reach home...hi..hi. Those were the touching moments , he waiting to pick me up after work and myself feeling embarrassed to do so. That was the most sweet bread any one can get..right!

So whenever we talk of our home town's specialties , this bun will make a great topic for us. We both are crazy for this but I never know a recipe to try it. So I tried a version myself with the pizza base and it came out fantastic. May be a bread dough can also work here. I don't know the exact recipe for that bread, but this gives me the exact taste and no wonder we enjoyed it to the core:)

Here is that special thengai bun for you all!

Thengai bun before slicing.


Sliced thengai bun , ready to eat:)

Ingredients:
Pizza base (or) bread dough - enough to make a medium size pizza.
butter - 1 tsp
egg white - 1 tbsp
water - 1 tsp

For stuffing:
Sweetened coconut - 1 1/2 cup
(I used store bought one. But we can make it at home by stirring 1 1/4 cup coconut with 1/4 cup sugar till it becomes dry).
raisins - 10
cashew - 10
cherry - 5 (halved)
cardamom powder - 1/8 tsp

Method:
Preheat the oven to 425 deg F.

Divide the dough into two equal portions.
Line a cookie sheet with aluminum foil. Grease it with butter (1/2 tsp).

Mix all the stuffing items. Let them cool, if we prepared the sweetened coconut at home.

Take one ball of the dough. Flatten it a circle of 1 inch thickness and almost 1/2 feet dia.
Place it on the sheet. Spread the stuffing uniformly.

Make a similar circle with the other half and cover the stuffing.
Gently fold the edges without any opening there.
Coat a 1/2 tsp butter over the top.

Make a few slits at the top to make vent.

Mix the egg with water and coat the top (Egg wash).
Egg wash makes the bread shiny and more brown and it is purely optional.

Place it in oven and bake for 12 to 15 minutes or till the top starts turning red.

Take out and slice it (into 4 or 5 pieces) after cooling a little.

Thengai bun is ready!

Serving suggestions:
Serve as dessert or snack.
I like it instead of regular pizza for dinner:)

Variations:
I won't use egg wash (don't wanna waste that yellow portion...hi..hi). A coat of butter / ghee will give a shiny brown top. Broiling will make it more gorgeous.
Some bakeries add scrambled fruit cake (that goes as waste or less priced snack), to this stuffing and make it like a less coconuty bun. That will also be tasty.

Wednesday, April 28, 2010

Idly Podi (flavorful version)

Idly podi - A kind of 'spicy hot' powder prepared in South Indian house hold and stocked up for a quick side dish for Idly. Usually it is mixed with sesame oil while serving. Otherwise, the host will serve the podi along with idly. The guest is expected to make a small indentation in the center of the (heaped) podi to allow the host to pour some sesame oil in it. Then the guest can mix it with the oil using the index finger and start tasting the idly by dipping it in 'podi ennai' (podi mixed with oil).

I have seen many people mixing the oil and podi in a separate bowl before serving. This too holds good.

There are many ways to prepare a Idly podi. I am describing a more flavorful method adopted in my house. This is my mom's version. But after marriage I started adding tamarind to it as per my hubby's grandma's method. I think adding tamarind is a deep South trend and it makes the podi more tasty and versatile (see my tips below for other uses of podi).


The ingredients for 'Idly podi' dry roasted and kept to cool.

Idly podi stocked up and presented along with sesame oil.

To make 1/4 kg Idly podi (approx):
Ingredients:
Channa dhal (Kadalai paruppu)- 100 gm (1/2 cup)
Urad dhal (black gram) - 100 gm (1/2 cup)
Dry red chilly - approximately 20 to 25 numbers
(I used Indian long dry red chillies )
(Reduce chillies if you need a lesser spicy version)
Curry leaf - 2 sprig
Tamarind - 2 inch (optional)
salt - to taste (untreated sea salt is best here)
garlic - 4 cloves
Asafoetida (hing / Perunkaayam) - 2 pinch

Method:
Heat a wok and dry roast the curry leaves till they turn crispy. Keep aside.

Again heat the wok. Add the urad dhal and dry roast till we get a nice aroma with the dhal turning mild red. Take it out immediately.

Now start roasting the channa dhal, garlic, tamarind and take it out as the dhal turns mild red.

Now add the salt, red chillies. Dry roast till the chillies loose all the moisture and becomes crispy. Add the hing and switch off immediately.
(Adding the salt with red chillies prevent us to get the hot flavors. Otherwise we may start sneezing. So roast the chillies at the end along with salt).

Put the roasted chillies along with the others above and let them cool completely.

After they get cooled, grind them to a medium fine powder using a coffee grinder / mixer. Store in air tight container (even at room temperature). Holds good for more than a month or two.

Idly podi is ready!

Serving suggestions / tips:
Take a tbsp of podi, mix well with enough sesame oil / ghee and serve as side dish with Idly or dosai.
The fresh podi tastes more always. So prepare them in small batches according to need.
Idly coated with this 'podi-ennai' (podi+oil) tastes great and makes a good packed lunch for long journey. It won't get spoiled for a day.
The podi can also be mixed with cooked rice and a drop of ghee as main course meal.
We can use this podi in making side dishes like poriyal also.

Monday, April 26, 2010

Mutton kheema curry

I am sure many of you will love to get a grand breakfast on festive days or Sundays. In my hometown, they prepare many delicacies like liver curry (eeral kuzhambu), mutton kuruma , paya (goat leg kuruma) etc along with idly / dosa to honor the guests. I have seen the grannies starting to slow cook the goat leg even before the dawn. Mostly the Sons in law are always lucky there to enjoy such a nice feast. Anyway we ladies have to struggle in the kitchen even on the festivals.

Though I prefer to make a mutton kuruma for idly for my guests, I don't like the long hours, the mutton takes to get cooked. So I prefer to make liver kuzhambu or the mutton kheema, which gets cooked in 30 minutes (without pressure cooking).

So here is that simple , yet delicious mutton kheema curry.

Ingredients:
Minced mutton (kheema)- 1 lb
onion - 1 big (or) shallot - 15
curry leaf - 2 sprig
ginger garlic paste - 2 tbsp
Tomato - 2 (big)
mint, cilantro - a handful each
coconut milk - 2 cup (from 1/2 coconut)
Turmeric powder - 1/4 tsp
cumin powder - 1/2 tsp
garam masal powder - 1 tbsp
red chilly powder - 1 tbsp
coriander powder - 3 tsp
Sesame oil - 1/4 cup
Fennel seed - 1 tsp
cinnamon - 2 inch

Method:
Buy a well minced mutton kheema. Wash and clean once. Remove the sediments , if present.(If we cannot get the minced meat, then we can grind the boneless mutton in a mixer instead).

Heat oil in a wok. Add the fennel, cinnamon and let it get red.

Then add the finely chopped onion, curry leaf and fry till the onion becomes golden brown.

Next put the ginger garlic paste and cook till raw smell vanishes (30 seconds).

Then add the finely chopped tomato and saute till oil separates.

Add the cleaned minced meat fry for some time, till we see the fat changes color. Add all the powders said above, add some water to cover the meat.

Cover and cook till the meat gets cooked. Wait till we see oil starts separating, if we need a thick curry. (we can use it as such if needed).

Pour the coconut milk and adjust the salt, water .

Switch off. Mutton kheema curry is ready!

Serving suggestions:
Serve as side dish with idly, dosa, chapathi, ghee rice, biryani etc.
Serves 5 people.

Friday, April 23, 2010

Porikadalai laddu

Here is a sweet that we can prepare in a jiffy!

Other names: Pottu kadalai ladoo, maladu, nei laddu, nei urundai, dalia ladoo.


Ingredients:
Puffed channa dhal - 1 cup
sugar - 1 cup
(sugar : dhal = 1:1 ratio)
ghee - 1 cup
cardamom powder - 1/4 tsp
cashew nut - 10
raisin - 10

Method:
Dry grind the puffed channa dhal and sugar to a fine powder.
Mix the cardamom powder with it.

Heat a tsp of ghee and fry the cashews, raisins. Mix it with the powdered dhal.

Melt the ghee.

Mix it with the powdered dhal little by little and make small key-lime size balls while it is hot. (Melt the ghee then and there while preparing the ladoo).

Pottu kadalai ladoo is ready!

Serving suggestions:
Serve as snack.
It can be stored in air tight container for a week.
Makes 12 ladoos (approx).

Alternative method:
I made this ladoo for a quick snack and changed the recipe by reducing the ghee. But the traditional method explained above tastes better than my healthy version. Anyway if you need some snack with less ghee follow mine:).

Here I have added only 1 tbsp ghee. Replaced the ghee by very little milk, as the addition of milk with sugar makes it easy.

But this ladoo won't last long in room temperature, because of the addition of milk.

Wednesday, April 21, 2010

Ulunthu vadai

When I was searching something else in my blog I found out that I am missing one of the most cherished delicacies of India, the 'Ulunthu Vadai'. Then only I realized the old picture remaining in my draft for a very long time.

Ulunthu vadai is a kind of spicy snack available in India along with hot tea or coffee.

Now it is the time to recollect something behind this recipe for my younger brother, who always looks for my nostalgic anecdotes:) It is my mom's most favorite snack and she used to prepare it along with coffee whenever we have a guest. She used to cut a small piece of banana leaf from our garden and use it as the surface to flatten the vadai. Very rarely I have seen her using a well washed empty milk sachet (Aavin milk cover) to flatten the vadai. But vadai made over a banana leaf is always a pleasant sight to me:)

My grandmas' cousin (Sulochana Achi) taught me to do it with just one hand, without any base to flatten the dough. I find it much useful after practice and thanks to her, everyone in my family loves my vadai. I love the way my father in law appreciates my vadai. After marriage I planted some plantain trees in our backyard just for leaves and tried my best to serve the meals over banana leaf for my in laws, who absolutely love the native food.

Along with the most favored food comes the best memories too. Right!

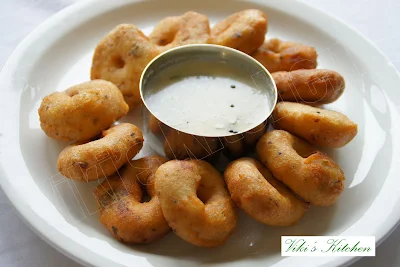
Hot crispy urid dal vadai served with chutney. Save some for thayir vadai:)


Vadai mavu (batter)
Vadai batter - Urid dhal soaked and ground to a fine paste.

Ingredients: (For 12 small size vadai)
Urid dhal - 1 cup (200 gm)
Oil (peanut oil / corn oil) - 200 ml
Shallot / red onion (chopped) - 1/2 cup
green chilly - 2 (finely chopped)
cumin - 1/4 tsp
whole black pepper - 1 tbsp + 1 tsp
curry leaf - 1 sprig
Ginger - 1 tsp (finely chopped) -> (I don't add it)

Method:
Wash the urid dhal twice thoroughly. Soak the urid dhal in cold water for 1 to 1 1/2  hours. Grind it to a fine paste with very little water. The final consistency should be like the above photo. Imagine the consistency of soften butter to get the correct batter(vadai mavu).

Add the required salt + 1 tsp black pepper and grind again for a while.

Pour the batter to a mixing bowl. Taste and adjust the salt now.
Mix the finely chopped onion, green chilly, curry leaf , whole pepper, cumin with the batter.

Heat the oil in a wok. Wait till it reaches the hottest point. Reduce the flame to medium.

Wet a plastic sheet or banana leaf (small square). Take a small ball of batter , place it on the sheet, gently flatten it and make a small hole at the center.

Deep fry the vadai in medium heat till it gets the golden red color.

Drain the oil , take out and place on kitchen towel / multi holed basin to drain excess oil.

Ulunthu vadai is ready!

Serving suggestions;
Serve with coconut chutney along with hot coffee or tea in the evening.
Also makes a good side dish with Idly, Venn pongal, sarkarai pongal etc.

Tips for a perfect ulunthu vadai:
Making ulunthu vadai is always a challenge for many. So I insist on the following points whenever any one asks me.

1.Always use unsplit, whole skinless urid dhal for making vada and idly. (If we are using split dhal with skin then increase the amount of dhal while soaking. But we can't get more fluffy batter with them).

2.It is better to soak the dhal inside fridge. The purpose is to prevent fermentation of urid dhal, as leaving the batter in hot weather results in little fermentation, which makes the vadai absorb more oil while frying. So I always soak it inside fridge.

3.The batter can be prepared 2 days earlier, but should be kept inside fridge till we add onion and fry.

4.Never add more water to grind the batter. The vadai batter made using Indian grinder yields more number of vadai than that of the Indian mixer made. Most days I use mixie to prepare my batter, sometimes my Ultra grinder (after 2014).

5.If the vadai batter becomes little watery,add a tbsp or more of rice flour. But it will reduce the taste. So leave the watery batter overnight in fridge to remove the excess water.

6.The vadai should be crispy in the outer layer and soft at the inside. So fry it in medium heat. Never allow the oil till smoking point.

7. Always use a thick iron wok to deep fry the vadai, it helps in uniform cooking . This is done to avoid the batter uncooked in the center of the vadai.

Carrot Paruppu koottu

Carrot with moong dal stir fry / carrot stir fry.  Click to my video on making carrot paruppu koottu. Ingredients: Carrot - 3 (300 gm) Moong...