Tuesday, August 24, 2010

keerai molagootal

Keerai mulakootal is a Kerala based recipe with all the goodness of dhal and greens. It can be served as a curry over rice or a great side dish with roti.


Ingredients:
spinach (pasali keerai) - 25 leaves
(or) any greens like amaranth / ponnanganni - 1 cup (chopped)
Thoor dhal (red gram) - 1/4 cup
shredded coconut - 2 tbsp
urid dhal (black gram) - 1 tsp
dry red chillies - 2
cumin - 1/4 tsp
salt - to taste
coconut oil - 1 tsp
mustard - 1/4 tsp
shallot (chopped) - 1 tbsp (optional)
curry leaf - few

Method:
Wash and clean the dhal and keerai separately. Chop the greens finely.

Cook the dhal with 1 cup water, turmeric - a pinch and asafoetida - a pinch. Pressure cooking the dhal is more convenient. We can cook the dhal in advance and freeze for future use too. This saves a lot of time.

Fry the urid dhal , red chillies and cumin in a drop of oil. Grind them coarsely along with coconut to a fine paste.

Now pour the excess water from cooked dhal and cook the spinach. Mash the greens coarsely. Add the masala paste, mashed dhal to the cooked greens and put salt to taste.

Heat the coconut oil in the pan, add the mustard and let it crackle. Slightly fry the onion, curry leaves and run it over the greens. Mix well.

Switch off as it comes to a boil.

Keerai mulagootal is ready!

Serving suggestions:
The above said quantity is for 2 people.
Serve as curry over rice. Paruppu thogayal (dhal chutney) and fried appalam are the traditional side dishes for this.
Another way is to serve as side dish with rasam+rice.
Pairs well with roti also.

Tuesday, August 17, 2010

Turnip kuruma

'Noolkol'or 'nookkal' is the Tamil word for Turnip or Kohlrabi. It can be used instead of potato in curries. The health benefits are many. It is good for potassium deficient days.

This curry is just another version of kuruma with whole garam masal made into a fine paste. There is no masal powder here except the turmeric. Shallot (sinna vengayam)adds a lot of flavor to this curry. It is a general practice to add potatoes and peas also along with this vegetable. Potatoes give a good flavor and texture to the kuruma.

I try to make something special for Friday nights and the ready made parathas come handy at that time.Parathas with this spicy turnip kuruma tasted wonderful:)
Noolkol korma is my mom's favorite too. As it was a rare vegetable in my home town at that time, mom used to buy this and would fondly tell us how she devoured this vegetable in Madurai, her home town....now I am recollecting hers:)

Turnip kuruma served with paratha.

Ingredients:
Turnip / noolkol / kohlrabi - 1 (250 gm)
Potato - 1 (optional)
Turmeric powder - a pinch
oil - 1 tsp
fennel - 1/2 tsp
cinnamon - 1/2 inch
curry leaf - 1 sprig
ginger garlic paste - 1 tsp
cilantro + mint leaf - a handful (grind)
tomato - 1 (big)

To fry and grind:
Dry red chillies - 4
green chillies - 2
cinnamon - 1/2 inch
cloves - 2
cardamom - 2
black cumin - 1/8 tsp
fennel (sombu) - 1/2 tsp
shallot - 4 (1/2 cup chopped)
shredded coconut - 2 tbsp
coriander seeds - 1 tbsp
cumin - 1/2 tsp
cashew nut - 4
poppy seed - 1/2 tsp
oil - 1 tbsp

Method:
Wash the turnip, potato and remove the skin. Chop them finely into small cubes.
Cook it in a cup of water along with finely chopped tomato and turmeric powder.

Fry the above said ingredients in a tbsp of oil together. They need not be fried till brown, but we just need a good aroma. Let it cool completely and grind it to a fine paste along with mint + cilantro.

Heat 1 tsp oil in a wok. Add the fennel and cinnamon, let them get red. Put the curry leaves and fry a little. Immediately add the ginger garlic paste and fry till the raw smell vanishes. Now add the cooked vegetables along with the masala paste and bring them to a boil. Add salt, reduce the flame and cook in low flame for 10 minutes (till we get a nice kuruma flavor) and switch off.

Noolkol kuruma is ready!

Serving suggestions:
The above said quantity will yield a large amount of kuruma, sufficient for 6 people. Turnip is good at yielding good amount of curry. So reduce the vegetable quantity as per requirement.
Serve with paratha, poori, ghee rice, chapathi, roti, dosa etc.

Sunday, August 15, 2010

Murugal dosai

I didn't realize the need for this post, until one of our friends asked . Dosa is the staple food for any South Indian family .  Just like many of you , the very sight of the dosa batter-container in my refrigerator always gives me a feeling of relief. It is the best friend at supper time, if I can't think much. So I always make a big batch of batter on Fridays, so that the weekends go smoothly :)

The paper roast dosai we get in restaurants is the yummiest version of all dosais. Mom used to call it as 'murugal dosai' (Murugal - crispy) and I like that name very much. Amma's kaipakkuvam (mom's touch) and the 'kalchekku' nallennai (Extra virgin sesame / gingelly oil) along with that perfectly fermented batter would make the house smell heavenly. Even now the same kind of flavor floating from some unknown chimney lifts up my spirit.

How to choose a dosa tawa and maintain it?
Many people add a teaspoon of channa dhal to get the golden brown colored dosa. Below ratio is the one we use. No harm in using whatever works out the best for you. But the real secret lies in the selection of the dosa tawa (dosa girdle).
Indian grocery stores or Indian vessel stores are the best places to get one. Buy an iron dosa girdle of at least 10 mm thickness and as large as 1 feet diameter. The thickness helps in uniform heating, which results in very thin crispy dosas. I am not good at non stick dosa tawas. But the non sticks are great for making soft doas (like pancakes).
Ok, as soon as we buy that thick dosa tawa, immerse it in a solution of rice washed water or water strained out while cooking for 24 hours. After that wash it and heat once uniformly apply a coating of sesame oil over it and put a lid on it. Switch off flame and  let it remain over night. The next morning, gently wipe off the oil and start making dosas.
The rule number one is never use that precious dosa tawa for making chapathi / roti or any other purpose like dhum biryani making etc:) This will spoil fine layers (at molecular level) of the dosa tawa and it will take a lot of time to get rectified.
Keep your dosa-turning spatula clean and sharp. Try to use an ever-silver spatula to turn the dosa, as they are always sharp.  Wipe off the excess batter after every use.

Dosa batter uniformly spread on the conventional dosa tawa.
Golden brown dosa after flipping.
Crispy Murugal dosai served with Coconut chutney.

Ingredients:
Idly rice - 3 cups
black gram dhal - 1 cup
(In India the urad dhal is very fresh so 1:4 ratio is enough. Other than that 1:3 works the best while using an aged dhal or Indian mixie. If using an Indian grinder the ratio can be 1: 3 1/2)
fenugreek seeds - 1 tsp
salt - 3 1/2 tsp (1 tsp for each cup of rice and 1/2 tsp for a cup of black gram)
Sesame oil - 50 ml

Batter preparation:
Soak rice separately for 5 hours. Dhal and fenugreek seeds need to be soaked together for about 3 hours. After that grind dhal till it becomes very smooth and fluffy. The batter should be thick like softened butter. Transfer it to a big bowl. Then grind the rice to a very smooth texture.Do not add lot of water. Add salt and by giving several strokes.
Store this in a large vessel so that there is enough space for batter to rise. Grinding and storing of batter should be done the previous day, preferably in the night so that the batter would be ready the next day. The batter should be allowed to ferment for about 15 – 18 hours.
(If the outside temperature is below 85 deg C, then keep it inside a mildly warmed oven to get warmth). The next day, mix the batter well and it can be used to make idly or dosa.
Generally people prepare Idly with the first day batter and the remaining batter can be used to make dosa. Moreover dosa comes out very well if the batter is more fermented. we can add a dash of yeast to the freshly ground batter to enhance fermentation of the batter.The remaining batter can be preserved in tight containers in refrigerator.
A well prepared batter can remain good for almost a week.

Dosa preparation:
Heat a dosa tawa. Check the heat by sprinkling a drop of water. It should be sizzling hot. For the first dosa, Spread the sesame oil uniformly using the special wooden tool we use for spreading oil or a piece of fresh cloth. Wipe off excess oil. There should be almost no oil now.

Take a ladle of batter and pour it gently over the tawa and spread it to get crepe.
Keep the heat in maximum. Drizzle a tsp of sesame oil over the dosa. After it starts turning red, flip and take out immediately.

From the next dosa, start pouring the batter directly. No need to brush oil at first. But feed the dosa with generous quantity of sesame oil. Serve immediately, as it becomes soggy with time.

Murugal dosai is ready!

Serving suggestions:
Serve hot with sambar, chutney.
Makes 40 dosa.

Approximate calories:
(Click to see source)
1 large home made murugal dosai (10 inch dia)
From batter - 80 to 100 Kcal
from sesame oil (1 tsp) - 40 Kcal
Total 140 Kcal.

Friday, August 13, 2010

Strawberry Ice cream

This is an eggless version of ice cream. There are many methods to prepare an ice cream , such as by boiling milk with custard powder, using eggs, using flourn etc. The packaged ice creams we buy in the stores are made by any one of the methods above.
But the No-cooking ice cream or an ice cream made with condensed milk is more famous among American households. This recipe is known for its lesser number of ingredients and the simplicity. The interesting facts are the lesser calories involved and the health benefits we get from a real fruit.

Here is a strawberry Ice cream I made for hubby and his friends. Inspired by cooks.com website.

Ingredients:
sweetened Condensed milk - 1 can (14 oz) (400 gm)
whipped topping - 8 oz container (250 gm)
strawberry - 20 number (see measurement *)
strawberry (finely chopped) - 2 tbsp


The whipped cream, condensed milk and strawberries.
Method:

All the ingredients mixed before freezing.

Wash and clean the strawberries. Remove the bracts / leaves.
Grind the fruits to get a smooth puree. Reserve 2 fruits for garnishing.

In a mixing bowl add the condensed milk and fold in the strawberry puree.
*(After pouring the condensed milk, measure the fruit puree in the same can. It should be almost 1.5 to 1.75 times that of that can).

Add the whipped topping and mix gently. Add the chopped strawberries. The fruits should be chopped finely, otherwise they taste like ice crystals.

Transfer to a container, close and keep frozen for nearly 4 hours.

Strawberry ice cream served with sliced strawberries and blue berries.


Strawberry ice cream is ready!

Serving suggestions:
Makes nearly 15 big scoops.
Place the ice cream outside for 5 minutes for easy handling.
An ice cream scoop dipped in water makes the job easy.

Approximate calorie calculation:
From fat-free condensed milk - 1300 Kcal
Whipped topping - 100 Kcal
Strawberry (8 fruits = 45) - 120 Kcal

Total calories in the whole batch = 1520 Kcal (approx)
1/15 of the above said will yield 100 Kcal. So it can be had as a safe and satisfying dessert.

Wednesday, August 11, 2010

Pani Poori

In Madras, we belong to an area famous for its Gulfi ice,  paani poori manufacturers with the walk ways surrounded by 'chaat item' (a kind of Indian salad mixed with crispies) vendors. You may need a strong willpower to pass these shops without buying one plate of some snack:) Recently we enjoyed this delicacy once again in one of the parties held by hubby's colleague A. After that our trips to Indian grocery stores won't be complete without getting a chaat item.

What is Paani poori?
Paani poori : Small cute fluffy pooris stuffed with lentil, mashed potatoes, salads and filled with hot chutneys as well as sweet tangy tamarind water.

Paani poori is a great fun food when we have some family get-together or friends coming over unexpectedly. It is a very filling snack / starter / a complete meal without much preparation time or skills. There are 'n' number of variations for the stuffing and chutneys. I prepared it by remembering that Madras paani poori stalls' version and their clay-pots filled with those paanis and chutneys.

All we need is just to poke the poori with our thumb, fill the stuffing, pour the chutneys and munch ....munch...munch:) I love the way it is gobbled in one gulp with lots of laughter:) Nothing can beat the different tastes.... spicy to sweet and tangy mixing up in our mouth while our hands uncontrollably stretching for the next poori....unexplainable joy. Isn't it!

Paani poori along with the various stuffings and filling chutneys arranged.
Paani poori stuffed.
Ready to use paani pooris.

Ingredients:
Pani poori - 1 pack
I used the ready to use paani poori available in Indian grocery stores. Preparing the poori needs a lot of patience and skill. The end product should be a very stiff and hole-less pooris. Still I assure you, the home made ones are the best, if we can make them perfectly. You can see the procedure for making them in

Stuffing:
(The following are the popular stuffing, but we can vary them according to availability)
1.Potato - 3
2.Freshly chopped onion - 1 cup
3.channa dhal / whole green gram (cooked)- 2 cup
4.oma podi (Indian mixture snack) - 1/2 cup (optional)
*Cook the potato and remove the skin. Mash it gently along with some salt, cumin powder (1/4 tsp). Place it in a serving bowl.
*chop the onions finely and keep them for serving.
* cook the dhal and keep it in a bowl.

green chutney:
cilantro - 10 stems
mint leaf - 1/2 cup
green chilly - 2
salt - to taste
lemon - 1/8
wash and clean the leaves. Grind them finely together along with green chilly, salt and some water to get a cup of chutney. Squeeze the lemon to get a balanced chutney taste. Keep it in a serving bowl with a spoon.

Tamarind water:
tamarind - a small lemon size
Water - 2 cup
jaggery / sugar - 1 tsp
salt - 1/4 tsp
dry ginger powder - 1/2 tsp
chaat masala - 1/4 tsp
cilantro - a few leaves
dates / raisin - 1/2 cup
Soak the tamarind and extract the juice. Puree the dates / raisin and mix all the above to get a sweetish tangy water. Transfer it to a serving bowl with a spoon.

How to devour it ?
Take a poori. Hold it in your left hand, in the same time make a small opening at the top (by using your thumb), just like we shell the hard boiled eggs.

Put a small scoop of mashed potatoes, cooked dhal, chopped onion one over the other.Sprinkle the oma podi.
Top it with 1/2 a tsp of spicy green chutney. Fill the remaining space with the tamarind sweet chutney.

Immediately gulp it and enjoy:)

Serving suggestions:
The above said quantity is enough to fill almost 40 paani pooris. Increase the tamarind water quantity if necessary. Create your own stuffing to suit your palettes.
This makes a great starter or an early supper.

Tuesday, August 10, 2010

Hi !

Hello friends,
Hope you are doing great. Due to some unavoidable circumstances I was not blogging or visiting you all for a month. Now I am doing great. Thanks for all your mails, well wishes and comments. Missed a lot of fun in the blogosphere, trying to visit each and every one of your posts now:)

I will resume shortly with your favorite recipes.

Happy blogging!
Love,
Viki.

Thursday, July 1, 2010

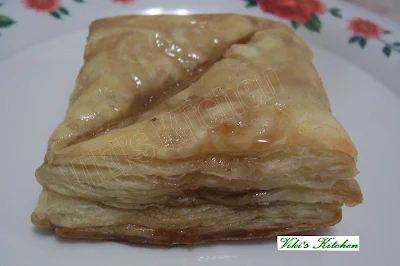
Baklava

Baklava is a sweet pastry made using phyllo dough or puff pastry sheets.

Hubby and myself tasted this crunchy dessert for the first time in an Afghan restaurant in Long Island, NY. At that time I couldn't remember the name or believe if I could do it myself in some point of time. But slowly Baklava started getting much closer to us after he joined this new office and I started trying several ways to get his favorite. The only thing I knew was the taste and invented some recipes of my own. First I tried from scratch, i.e., using All purpose flour, that was a good one. (If you can't find the pastry sheets and want a recipe from scratch, just ask for one through the comment and I will be more than happy to publish that too). But the process was enormous and I couldn't prepare many. So searched the web and got some ideas. Faiza Ali has the best using phyllo.  Then I tried using the phyllo dough , which is claimed to be the most authentic way. But the process of separating the phyllo layers was much difficult and I ended up with a scrambled baklava :) .

Again I bought some puff pastry shells and it was super easy as well as perfect for a beginner like me. It was just removing the pastry top, fill the cavity with the sweet nut mix, close, bake and soak it in honey:) That gave me enough confidence to try it again. So if you want a very quick rich dessert, then buy some 'puff pastry shells' instead of 'sheets'.

While googling I got a perfect recipe from Baking bites and many others.Then prepared it using puff pastry sheets and all of our also friends like that.Nowadays if there comes a long weekend hubby never forgets to fill up the freezer with these pastry sheets:)

This recipe comes handy if we wish to prepare two or more desserts for a party , as this can be made in advance and stored. Here goes the recipe for the Baklava using puff pastry sheets.

Ingredients:
Puff pastry sheets - one box (16 oz)
Walnut (finely chopped) - 1 cup
cinnamon powder - 1/4 tsp
brown sugar - 1/2 + 1/4 cup
honey - 1/4 cup
butter - 1 tsp

Method:

Preheat oven to 375 deg F.

Bring the puff pastry sheet to room temperature as per direction.


Generally there will be two sheets. Take an aluminum foil and coat it with oil.
Place one sheet. Using a pizza cutter or knife divide it into 9 or more pieces. Similarly do the same for the other sheet also and keep aside.

Arrange them with a spacing of 1.5 inch in between.


Mix the finely chopped walnut with cinnamon powder, butter and 1/2 cup sugar.
Spread this mix over one set of squares.


Cover each square with an piece of pastry sheet and make a diagonal slit to facilitate baking.


Bake this in 375 deg F for 10 minutes and check if it is puffed up. Otherwise increase the timing by 5 minutes. (See instructions in the pack).
In the mean time bring to boil a 1/4 cup of brown sugar and 1/4 cup water. Let it achieve a syrup like consistency. Then add a pinch of cinnamon + vanilla essence to it. Let it cool.


Take the baked baklava out.


Pour the prepared syrup in a pan and place the baklava over it. Drizzle some honey over the baklava and we are all set now.


Serve the Baklava immediately or cool. Baklava is ready!

Serving suggestions:
Makes 9 Baklava.
Serve as dessert.

Thursday, June 24, 2010

Green Peas pulao

A very simple and mildly spiced pulao made as an alternative to the usual plain rice.

I make this green peas pulav as a quick dish for hubby's lunch pack. It won't consume much time or demand a great skill during the peak hour.


Ingredients:
Green peas (frozen or fresh) - 3/4 cup
(Don't use dry ones for this recipe)
Basmathi rice / raw rice (pacharise) - 1 cup
ghee - 1 tbsp
ginger - 1 inch
garlic - 2 pearls
green chillies - 2
onion (sliced thinly lengthwise) - 1/2 cup
lemon juice - 2 tbsp
cilantro + mint leaf (chopped) - 1/4 cup
bay leaf - 1
cloves (lavangam) - 2
cinnamon (pattai) - 1 inch
cashews - 10
salt - to taste

Method:
Wash and clean the rice. Soak it for 30 minutes.
Defreeze the peas by putting them in some water.
Grind the chillies, ginger, garlic together to a fine paste.

In the mean time, heat ghee in a wok. Fry the cashews to golden color and keep aside.
In the same wok add the bay leaf, cloves, cinnamon and fry for a few seconds.
Immediately add the sliced onion . Saute it till the onion wilts.
Now put the masala paste and fry till oil separates. Put the green peas and saute a little. Add salt to taste.

Add the soaked rice (remove the excess water by a colander) and fry for a minute. Pour water just enough to immerse the rice. Add the lemon juice (lemon and ghee keeps rice grains separate). Cover and cook in very low flame till done.(We can cook the rice separately and add at the end also). Remove from heat while the rice is almost cooked (but stiff) and serve hot.

Garnish with fried cashews and minced cilantro + mint leaf.

Green peas pulav is ready!

Serving suggestions:
Serves 2 people.
Pair this flavorful peas pulav with any spicy curry like Gobi manchurian or simply a mint chutney + raitha and enjoy!

Tuesday, June 22, 2010

Plain Vanilla cake

Nearly a month ago I wanted to make a plain vanilla cake. Though very long back I tried some method (before the blogging era) , I was not pleased with the outcome.So after a lot of googling and blog hopping, I got a solid idea and some confidence to make it from scratch. There were many recipes and I chose to try Cham's infallible Plain vanilla cake recipe and the result was amazing.

Thank you Cham!

The below recipe is from Cham of Spice club. I have halved the quantity to make one 8x8 inch cake. Click to see the original version.


Plain vanilla cake baked and allowed to cool before slicing.


Plain vanilla cake sliced and arranged.


Ingredients: 
(To make one 8x8 square cake)
All purpose flour (maida) -  1 cup
sugar- 3/4 cup
egg - 3 (medium size eggs)
butter (unsalted) - 1 stick (8 tbsp / 113 gms)
Salt - 1/8 tsp
Baking soda - 1/4 tsp
Baking powder - 1/2 tsp
Vanilla essence - 1 tsp

Method:
Bring the eggs and butter to room temperature , by keeping them outside the refrigerator.

Preheat the oven to 350 deg F. Grease the baking pan with 1/4 tsp butter.

Mix the dry ingredients like maida, baking soda, baking powder by sieving twice.
(This makes the cake spongy).

Add the egg, butter, sugar, vanilla essence , salt to a blender / mixie and beat till it turns fluffy.

Add the dry ingredients and beat well. we can mix the dry ingredients by using a fork / spatula also.

Pour the cake batter in to the greased pan and shake / tap it to release the air.

Place in the oven and bake for 30 to 35 minutes.
(Test the quality of baking by inserting a skewer and see if it comes out clear).

Plain vanilla cake is ready!

Serving suggestions:
Serve as dessert or tea time snack. Icing is optional.

Calorie calculation: (from main ingredients)
AP flour 1 cup = 400 kcal.
Sugar 3/4 cup = (1 tbsp = 45) = 45 x 12 = 540 Kcal
butter 1 stick = 100 x 8 tbsp = 800 Kcal
egg 3 = 70 x 3 = 210 Kcal
Total calories (approx) in this plain vanilla cake = 1950 kcal

(data courtesy : Livestrong.com)
---------------------------
Small 6 inch cake recipe
For a 6 x2 inch round cake: 

unsalted butter 5 tbsp, softened
sugar 1/2 cup
large egg 
vanilla extract 1 tbsp
all-purpose flour 3/4 cup +2tbsp
corn starch 2 tbsp
salt 1/8 tsp
baking powder 3/4 tsp
curd (plain yogurt) or milk - 4 tbsp

Preheat oven to 350 deg F.
Sift together flour, corn starch, salt, baking powder. Keep aside.
In a mixing bowl put butter, sugar - beat for 2 min using an electric beater.
Add milk, egg, vanilla, beat together for 2 mins.
Add the flour. Beat for 1 minute.
Prepare a baking pan by applying butter a coating and coat with 1 tsp four.
Bake for 30-35 mins. 


Thursday, June 17, 2010

Vengaya sambar

Vengayam (Naattu vengayam, ulli, chinna vengayam) - shallot / baby onion; Saambar - A dhal based curry served over plain rice.

Sambars are generally named after the vegetables added and by the variation in masala. e.g., Arachi vitta sambar, murungakkai sambar etc.
The most famous and easy to prepare is the onion sambar.

Though I make many varieties of sambar, this one is my family's  most favorite. Almost all my Fridays will begin with this flavorful sambar along with the potato curry . Moreover I always remember to save some sambar for the night to serve along with crispy paper roast dosas and we never get bored of that menu:)

I am narrating my mom's recipe, which I am following for years.


vengaya sambar served in a bowl.

Ingredients:

To pressure cook:
Toor dhal/red gram lentil - 1/2 cup (100 gms)
water- 2 cups
turmeric powder - 1/4 tsp
asafoetida - 1 pinch
sesame oil- 1 drop
Wash and clean the lentil. Pressure cook the dhal with the above said ingredients for a whistle. Then reduce flame and cook for 10 minutes. Let it cool. Open the lid and add some fresh cumin seeds .Mash well using a spatula. Keep aside.
(we can cook the dhal in stove top also. But we may need to soak it first for 30 minutes or more and cook for 30 minutes).

Other ingredients:
Shallot (sambar vengayam) - 15
(choose small variety. Remove the skin, wash and clean. Don't chop).
Tomato - 1
Tamarind - amla (gooseberry /  nellikkai) size ball
cumin seeds- 1/2 tsp
cooking oil / ghee - 2 tbsp
(Try to use ghee, as it renders more taste to the sambar).
curry leaves- 1 sprig
cilantro/ coriander leaves (chopped)- 1 tbsp
mustard seeds-1/2 tsp
fenugreek -1/2 tsp
jaggery- 1 tsp (optional)
salt - to taste
Red chilly powder - 1 tsp
coriander powder - 2 tsp
Sambar powder - 1/2 tsp

Method:
Soak the tamarind in 2 cups of hot water and extract the juice by squeezing.
Add the red chilly powder, coriander powder, salt and bring it to a boil. Let it boil till the raw smell vanishes.

In the same time heat oil or ghee in a separate wok. Add the mustard seeds, fenugreek seeds and let the mustard splutter. Before they get black, immediately add the shallots, curry leaf and saute well. Continue frying till the shallot starts getting a golden color (not red). Then add the finely chopped tomato and saute till oil separates.

Pour this hot mixture over the boiling tamarind paste. Add the mashed dhal, sambar powder and bring it to a boil. As it starts boiling, put the crushed jaggery, chopped cilantro and switch off.

Vengaya sambar is ready!

Serving suggestions:
Serve hot over plain cooked rice.
The best side dish would be a spicy potato curry and appalam (pappad).
Reserve some sambar for dinner and serve along with paper roast dosas.

Thengai saatham

Thengai - coconut ; saatham - rice.
Kalantha saatham (variety rice or rice mixed with some spices/ masala) is an indispensable one in any South Indian home. The best part in kalantha saatham is that they would be prepared to accompany any long journey and they should withstand the time. For example in olden days they packed the tamarind rice or lemon rice in such a hygienic way that they last for at least 3 days.

But this coconut rice should be consumed within 12 hours because of the addition of coconut. Anyways this rice is loved by all for its nice flavor and taste.


Thengai saatham served with masala egg and bottle-gourd dhal curry.

Ingredients:
Rice (pacharisi / Basmathi) - 1 cup
Shredded coconut - 1/2 cup
moong dhal (split green gram lentil / paasi paruppu) - 2 tsp
mustard - 1/2 tsp
curry leaf - 1 sprig
cilantro - a handful (chopped)
dry red chilly - 2
oil - 1 tsp

cooking the rice:
(I prefer stove top method for pulao and 'variety rices'. we can microwave also. But the pressure cooker method makes the rice mushy. Rice cooker can also be used to prepare the rice).

Wash and soak the rice for 30 minutes or lesser.
Bring to boil some 3 cups of water along with 1/2 tsp salt.
Add the soaked , drained rice and reduce heat. Cook covered till almost done.
Switch off and pour it over a colander and remove the water completely.
Keep the rice open to maintain it as separate grains. Let it cool for sometime.

Method:
Heat 1 tsp oil in a wok and add mustard seeds. As they start to crackle, slide in the moong dhal, red chillies (cut into small pieces), curry leaf, shredded coconut , chopped cilantro, in the same order and fry till the coconut starts smelling great. Switch off immediately before they get red (maintain the white color of coconut).
Add some salt to taste (little only). Switch off heat.

Gently mix the rice with the prepared coconut mixture without breaking the rice grains.

Coconut rice is ready!

Serving suggestions:
Good for a quick packed lunch.
It can also be served as starter rice before serving the sambar over plain rice in an elaborate lunch.
Serve with paruppu thogaiyal (fried dhal chutbney), potato chips etc.

Thursday, June 10, 2010

Bisibelebath

Bisibelebath means Hot lentil rice. It is very famous in Karnataka, India and has become the favorite of all others too.

This is my most favorite lentil rice and I always look for an opportunity to insert it in our menu:) Narrating this one for you all and especially for my friend Pushpa. Enjoy!


Ingredients:
Rice - 3/4 cup
Red gram (Thuvar dhal) - 1/2 cup
Turmeric powder - 1/8 tsp
salt - to taste
Bisibelebath powder - 3 tsp

Vegetables: (Usual combination)
Beans - 20
carrot - 1
fresh green peas - 1/2 cup
potato - 1
Tomato - 1 (optional)
(I added some cherry tomatoes for fun, but the authentic recipe does not call for tomatoes)
Lemon - 1/4 (or) tamarind extract - from 2 inch tamarind

Tempering:
ghee - 3 tbsp
mustard (kadugu) - 1/2 tsp
finelly chopped onion - 1 tbsp (optional)
curry leaf - 1 sprig
channa dhal - 1 tsp
Asafoetida (hing / perungaayam) - a pinch

Method:
Wash and soak the dhal for at least 10 minutes. In the mean time chop the vegetables into small pieces.

Start cooking the dhal with a drop of oil, turmeric and 3 cups of water. I prefer doing it 'stove top' to get the native touch. We can pressure cook also.

When the dhal is 75% done add the rice and cook almost completely.

Now add the chopped vegetables and continue cooking. Add water now and then accordingly. The final product should be of very loose consistency, otherwise the bisibelebath gets solidified after cooling.

When the whole mixture is well cooked (almost 45 minutes), take 3 tsp of the bisibelebath powder, mix with a 1/4 cup of water and add to the rice. Bring it to a boil.

Mean while, heat the ghee in a wok and splutter the mustard seeds. Immediately add channa dhal, curry leaf, onion and saute well.

Pour this over the prepared bisibelebath and take off heat. Add lime juice and serve very hot.

Serving suggestions:
The above said quantity would be enoug for 2 adults and a child.
Always use 3 tsp of the bisibelebath powder for the above said quantity.
Always serve BBB very hot with lots of ghee.
Boondhi raitha or potato chips or pappad are best combinations with BBB.
Some people strew some karaa boondhi over the bisibelebath and enjoy.
I usually prepare Arbi yam (seppan kilangu) fry along with this.

Bisibelebath powder

This is the masala powder used  in  preparing Bisibelebath.


Ingredients
Bengal gram (channa dhal / kadalai paruppu) - 3 tsp
Black gram (urad dhal) - 3 tsp
Poppy seed - 1 tsp
fenugreek (methi seed) - 5 seeds
dry coconut (kopparai thengai) - 3 tbsp
Dry red chilly - 5
Whole black pepper - 10
cumin - 1/2 tsp
coriander seed - 3 tsp
cloves, caradamon - 2
cinnamon - 2 inch piece

Method:
Dry roast the dhals separately (if in large quantity) and keep them aside. Put all the other items together and dry roast till the coconut smells good. Let it cool.
Grind them together to a fine powder. Keep the powder in freezer for further use. We can use this powder for making bisbelebath as well as vangi bath.

Tuesday, June 8, 2010

Banana Walnut cake

Hi friends!
Happy to meet you all after a gap.Thanks for all your encouraging comments and mails that keep me going. Sorry, I missed many of your delicious posts and trying to catch up now:) The summer and the vacations made me quite busy and tired. The heat is horrible here, but couldn't stop us from roaming around and swimming (Don't imagine me with a lot of swimming skills, I am a learner for a long time).Moreover I tried a lot of recipes and waiting to share them with you all.

Let's start with something sweet. Here is a version of a very moist, spongy banana walnut cake. I got the recipe from this website. It is a very successful one and the best cake I have ever tasted. Try and let me know:)

Cake batter prepared without any lumps.


The Banana walnut cake is baked.


Banana walnut cake sliced and served.

Ingredients:
All purpose flour - 2 1/2 cup
Baking soda - 1 tbsp
salt - 1/8 tsp
butter - 1/2 cup (8 tbsp or 1 stick)
(don't use oil here, as I am calculating the moisture from butter too. Otherwise we may need to add some water also)
White sugar - 1 cup
Brown sugar - 3/4 cup
egg - 2
Ripe banana - 4 (long ones)
butter milk - 2/3 cup
(2/3 cup milk + 1 tsp vinegar can be substituted here)
walnut (chopped)- 1/2 cup
vanilla essence - 1 tsp

Method:
Preheat the oven to 350 deg F (175 deg C). Grease two (8"x8" square) cake pans with 1/4 tsp butter (each).

Chop the walnuts into small pieces and mix a tsp of all purpose flour with it.

Add the egg, butter, both sugars,salt,vanilla essence, buttermilk to a mixer / blender and beat till it turns fluffy.

Pour it to a broad mixing bowl.

Then put the bananas in the mixer and slightly mash them (two or three pulse is enough). Add it to the mixing bowl. Mix well.

Now sift the flour with baking soda twice (to make the cake fluffy) and put it in the mixing bowl. Beat and mix the batter very well using a fork or whisk (not a blender, as the bananas will get over mushy).
In between, if you see some lumps, then leave the batter for a 5 minutes and then start beating. This helps in soaking and a smooth batter without any lumps.

Stir in half the chopped nuts.

Pour the prepared batter in the pans for two inches height and spread the walnuts over the batter. Bake the cake for 35 to 40 minutes.

Insert a skewer to check if the cake is completely baked.

Take out and place on a damp towel to cool (This generates much steam and makes the cake moist). Then carefully remove from the pan and cool completely (for an hour or more).

Then slice and serve with or without frosting.

Tips:
Don't open the oven for the first 35 minutes.
The cake will be fluffy as soon as we take out of the oven, but after a few minutes it will loose the bump in the top.Don't panic, this will not affect the texture of the cake.
Always use the well ripened (skin turned black) banana for making a cake.
We can freeze and store the bananas that turn black and of no further use. Remove the skin and store them in zip lock covers in freezer. Just bring them to room temperature and blend in the liquid that oozes out also.
Cream cheese frosting is the usual one.

Wednesday, June 2, 2010

Its award time!

Two lovely bloggers, Gayathri of Heaven on a spoon and Suja of Kitchen corner have passed me the following awards.

Gayathri has a very nice space with interesting articles, anecdotes and I like the energy in her words. I am attracted a lot by her simple sweets and elaborate recipes.

Suja's recipes from Kerala are very authentic.Don't miss her sea food section and I am addicted to it:) Thank you friends! You both made my day.

Visit these enthusiastic bloggers and have a great time.


The rule of the award is to post some of our favorite pictures. The list is endless and here are two of them to enjoy:)


Photo courtesy: ICD parish.

This is the Immaculate Conception church in O'Fallon,Missouri, which we used to attend regularly on Sundays. O'Fallon is a very small town in mid west part of USA. It is full of woods and beautiful rivers. I associate this place with so many pleasant memories and it is my most favorite place to live. I wish to live again in O'Fallon , Missouri forever, if Xavier gets a job there. (Anyways I love my NJ also very much).What a thought..huh!
No wonder, the pictures from there fascinates me very much).

The next one is from St.Louis,MO.


St.Louis Arch in St.Louis. Other names of St.Louis are 'The gateway of the west or Rome of the West'.

Wish you all a beautiful month ahead!

Thursday, May 27, 2010

Poom paruppu Sundal

Sundal (Tamil) is a kind of spicy snack made of lentils. It is often considered a very healthy snack to have with evening tea or munch throughout the day. Also it is served during important Hindu functions as offering to God (Prasadam).

Poom paruppu is a regional name given for the most renowned kadalai paruppu sundal. The meaning is poo - flower ; paruppu - lentil. More specifically, 'A sundal made with the lentils cooked till they bloom like a tender flower'. Isn't it attractive?

So, enjoy the summer evenings with this beautiful sundal along with a cup of tea:)


Ingredients:
Bengal gram (channa dhal / kadalai paruppu) - 1 cup
mustard seeds - 1/2 tsp
coconut oil - 1 tsp
dry red chillies - 2
curry leaf - few
salt - to taste (little only)
shredded coconut - 1/4 cup

Method:
Wash and clean the dhal twice.
Soak the dhal for 30 minutes and cook it over stove till it becomes tender (not mushy).
If we don't have time to soak, then we can pressure cook it to 2 whistles with water just to immerse the dhal (not more than that).

Remove the excess water. Mix some salt to taste. Keep aside.

Heat oil in a wok. Add the mustard seeds and let it splutter.
Then add the dry red chillies (broken), curry leaves and stir for a few seconds till the chilly swells.

Immediately add the cooked dhal, shredded coconut and stir well.

Put off fire.
Poom paruppu sundal is ready!

Serving suggestions:
Serves three.
Serve as snack with tea or coffee in the evening.
Sometimes I make it as side dish for puli saatham / lemon rice etc.

Sunday, May 23, 2010

Keerai thoran (Red Swiss Chard)

"Keerai (Tamil) - Any kind of spinach; Thoran (Malayalam) / thuvaran or thuvaram (Tamil) - A dry side dish prepared with any spinach or vegetable and lot of coconut masala".

I got this 'Kerala style preparation of Spinach' from a best friend of mine. Though her blog is not visible now, some of her recipes always have a permanent position in my memory. I tried my best to do it her way. Thanks Ann!

The traditional recipe insists in using an Indian spinach (cheera or the red spinach) . I  prepared this 'keerai thoran' using Red swiss chard leaves. Though these swiss chard leaves resembled an Indian palak, I would like to use the 'chen cheera' (red spinach) next time. 


'Thoran' made of Red Swiss chard leaves.

Ingredients:
Any greens (spinach) - 1 lb
(I used Swiss chad leaves here)
Red onion - 1 (or) shallot - 5
mustard - 1/2 tsp
coconut oil - 1 tbsp
salt - to taste (very little only) 

To grind coarsely:
coconut (shredded) - 1/2  cup
garlic cloves - 3
green chillies  -  2 or 3
cumin - 1/2 tsp

Method:
Wash and clean the spinach / any greens.Chop it finely.

Heat oil in a wok. Splutter the mustard seeds.
Add onion and saute till it wilts.

Now put the chopped spinach and saute for a few minutes.

Make a well in the center and remove all the moisture (as much as possible).

Put the coarsely ground paste to the center and bury it with spinach.

cover and cook for few minutes. Add salt and saute till the greens loose all the moisture and we get a very loose texture.Switch off.

Keerai thoran is ready!

Serving suggestions:
Serve hot as side dish with sambar rice or curd rice.
Also can be served as 'curry over plain rice' with a tsp of ghee.
As this preparation contains more coconut, it may get spoiled in hot weather. So consume / refrigerate immediately.

Thursday, May 20, 2010

Mango Pickle


"A variety of mango pickle prepared by seasoning the grated unripe mango with sesame oil and spices "


This is my most favorite pickle and I am narrating my mom's recipe here.


A dollop of mango pickle waiting to accompany the curd rice:)

Ingredients:
Unripe mango - 1 big (1/2 kg)
(Grate and measure it)
Sesame oil - 1/4 of the quantity of mango
(we can reduce the oil , if we are refrigerating the pickle)
Red chilly powder - 3 tbsp
fenugreek (methi / venthayam) - 1 tsp
mustard seeds - 1 tsp
hing (asafoetida) - 1/8 tsp
salt - to taste (approx 1.5 tbsp)

Method:
wash and clean the mangoes. Wipe with a clean cloth and dry it in open air to remove any moisture for an hour or more.

Now we should keep our hand clean and dry. Grate the mango using a carrot grater (bigger hole). Measure the amount of mango.

Heat the above said quantity of sesame oil in a kadai (wok). Add the mustard seeds and let them start to crackle. At the same time add hing , fenugreek seeds and wait till it gets red. Immediately add the mangoes and saute till they loose the moisture.

When the oil starts showing off the edges, add the red chilly powder and salt. Stir well till the raw smell of red chilly powder goes.
(we can add the red chilly powder in the beginning also, but it will emit a lot of hot fumes that no one can stand. So better add it this way).

Switch off the flame and let the pickle get cool.
Mango pickle is ready!

Mangai thokku stored in air tight container.

This will last for a week or more if prepared with 1/2 a cm of oil floating above the pickle. Otherwise we can refrigerate for further use.
(I generally prepare with lesser oil and refrigerate it).

Serving suggestions:
Serve as side dish with curd rice.
We can  mix some of this pickle with white rice to prepare a quick mango rice for lunch pack.

Wednesday, May 19, 2010

Chicken Seekh kebab

"A kind of kebab, that is prepared with minced chicken or lamb . This is more common in Pakistani cuisine".

I tasted it in some  nearby restaurants (Shaalimar and Biryani house) and tried my best to get that taste.

Actually they make the shape of the kebab by pressing the minced meat over metal skewers and cook them in open fired and again the fire cooked kebabs are shallow fried. This is the basic procedure in one line. But it involves some techniques too. As my knowledge on these kebabs are very little, the shape didn't come out well. But recording this anyway :)

Here is the complete version to make  kebab similar to an authentic Chicken Sheekh kebab. I formulated this version by myself, by reading the food cultures and history of Afghanistan and Pakistan people. Please make a comment, if I need to improvise this recipe, as it is not my regional cuisine. Thanks!

Ingredients:
minced chicken - 1 lb
Onions - 1
green chillies - 2
lettuce -  2 leaves (optional)
cilantro - a handful
mint leaf - a handful
minced garlic - 1 tbsp
dry ginger powder - 1 tsp
turmeric powder - 1/2 tsp
Puffed channa dhal (dalia) - 1 cup
(powder the puffed channa dhal)
bread slices - 2 (only if needed)
Salt to taste
Oil - 4 tbsp

To powder:
dry red chilly - 2
coriander seeds - 2 tbsp
Black pepper- 1/2 tsp
fennel seed, kali jeera - 1 tsp each
cloves, cardamom - 2
cinnamon - 1 inch 
cumin - 1 tsp
garam masal powder - 1 tsp (optional)

How to get minced chicken?
option 1. We can buy the minced chicken at any halal shop. Some times they may sell a variety called masala minced chicken. That will make the job easy, as we can straightly add masal powders, bread crumbs and start doing it.


This is the minced masala chicken I bought from a halal shop.

option 2.Otherwise buy the minced chicken and mix all masala powders, salt and finely minced onion , cilantro, mint, green chillies etc (except bread, oil and flour).

option 3.Buy boneless chicken pieces  (red  meat is the best for juicy kebabs) and grind it coarsely.

Method:
While the mixer / blender is dry, powder the bread. keep aside. Separately , powder the puffed channa dhal (dhalia)and keep aside.

Select boneless chicken pieces from thigh (red meat is best here). Breast is also ok, but it won't give a juicy finish.

Grind the boneless chicken meat along with red chilly powder, garam masal,spices, salt.

Finely chop the onion, chilly, cilantro, mint and mix with the minced meat.
Add ginger garlic paste to it.

Add the bread crumbs and powdered dhal to get a thick minced meat dough.(we can use the bread crumbs alone, without any dhal powder or vice versa).

Make seekh kabab by pressing the minced meat around a skewer for about 4-5 inches in length.


This is how I shaped the kebab.


Bake it at 350 deg F and 15 mins both sides.


Serving suggestions:
Serve as starter with lemon wedges, tamarind sweet chutney, raitha etc.
Goes fine as side dish with biryani.

Note:
If we cannot make a correct shape, then add more bread crumbs or dhalia powder.

I add 4 tbsp Extra virgin olive oil or butter per lb and it won't need frying. Moreover all the oil will be evaporated while baking.
The baked ones can be cut into small pieces to make a kofta curry.
For baking : Soak the wooden skewers  in water overnight to avoid burning of the sticks.
If we cook the kebab over gas stove, then use metal skewers.
Dont try to rinse the kheema we buy from shop, as they already prepare kheema after washing and patting the extra moisture. If we wash again, it will get more watery and our koftas won't stick to sticks:)

An update:
Now I corrected my previous mistakes and prepared a good looking(!) kebab. I added more puffed channa dhal powder (pori kadalai mavu) , that made the kebab easy to handle.
Minced chicken with masala


Baked 'chicken sheekh kebab'.


Tips:
1.If there is no time to prepare puffed channa dhal powder, then dry roast a cup of channa dhal flour (besan flour/ kadalai mavu) till it turns mild red and use instead.
I microwave the besan flour for 5 minutes. If microwaving, then do it for a minute , take out stir well and then repeat till it gets a nice aroma and very mild red color.

2. Adding a cup of finely chopped lettuce and some more extra virgin olive oil will yield a very juicy kebab. Adding oil while baking is the best alternative to avoid frying the kebab.

3. Number of kababs from 1 lb  meat: One pound of chicken kheema will yield 8-10 kebabs.

Tuesday, May 18, 2010

Keppai Kali (sweet)

A kid friendly healthy breakfast for summer.

Other names: Sweetened ragi pudding , இனிப்பு கேப்பை களி, 'Finger millet' porridge.

In my home town , our Summer mornings would start with a pleasant voice of a tender coconut / Palmyra juice vendor (pathaneer-the toddy before fermentation) or Indian Ice-apple (nungu) selling lady. As the summer approaches, my mom would change our food habits to suit the weather. Some items like ghee roast dosa , poori and almost all the fried items would be replaced by the simple food like keppai kali, ulunthu kali, venthaya kali,curd rice, ragi dosa, kambu kool(zh), neeragaram, buttermilk, greens etc .The evening snacks like bajji, vadai and desserts would be changed to sundal (lentils), fruits and kolukkattai. By an endless supply of buttermilk to her daily visitors like the spinach vendor, vegetable seller, fish sales man. etc., she would often appear as a cool Goddess to me now:)

Life is changing and our needs too. But that craze for those simple foods never cease to amaze me. So I tried to create her special kali made of keppai and karuppatti (palm jaggery). Hope you all like it.

Ingredients:
Ragi flour - 1/2 cup
palm jaggery - 1 cup (or) brown sugar - 3/4 cup
(cane sugar jaggery or white sugar won't yield a good taste here)
coconut - 1/4 cup shredded (optional)
Water
garlic - 6 pearls
sesame oil - 2 tbsp (to serve)

Method:
Mix water to the palm jaggery and bring it to a boil. As it dissolves , filter and remove all the sediments and froth.Keep aside. (Avoid this step if we use brown sugar).

Mix water to the flour little by little to get a free flowing consistency like that of dosa batter (pancake mixture).

Heat slowly the pure palm jaggery solution along with the flour, finely sliced garlic, coconut in a thick bottom vessel. Stir continuously.

After a few minutes the solution will get thick. Reduce flame and stir well till the garlic and the flour are cooked. If the flour is not cooked properly, then add some water and continue cooking in low heat.

Switch off when the kali becomes thick.

Keppai inippu kali is ready!

Serving suggestions:
Serve hot as breakfast or snack along with a tsp of sesame oil on the top.

Medicinal value:
1.Ragi (red millet) is a whole grain rich in fiber, protein, vitamins and minerals. It helps in weight loss.
2.Ayurveda recommends Palm jaggery for diabetic patients as an alternative sugar.
3.Garlic is believed to get rid of bad cholesterol.
4.Sesame oil has innumerable health benefits : in treating hypertension, BMI control,hormone regulation, cholesteral reduction etc.

Foodista:
http://www.foodista.com/recipe/JH4R7777/indian-foodstuffs/widgets

Monday, May 17, 2010

Keerai masiyal

"A favorite dish, where the greens are steamed, and mashed, with light seasoning of salt, red chillis and cumin. It is called keerai masial (கீரை மசியல்)." - Wikipedia

This is another comfort food from the basic Indian cooking. The greens are indispensable in a well balanced Indian menu and much praised for the health benefits.

In Chennai I used to blend the keerai, using a small rough clay vessel and a wooden pestle ( In Tamil - keerai kadaiyum mann pathiramum , mathum). That traditional clay vessel imparts an earthen flavor to the simple keerai and would lift up our spirits:)

Generally the arai keerai and siru keerai (smaller leaved amaranth) are good for this blending recipe.As I could not find them here, I have used the amaranth (thandan keerai). This recipe calls for total simplicity , so we can't see any tomato, turmeric or oil. Adding oil, tomato or tamarind also holds good, but this one is my most favorite recipe. In my native place we used to add a pinch of lime (calcium oxide / sunnambu , additive to pan leaves) along with this masiyal. I don't know the correct purpose of it. But they say the 'sunnambu' helps in absorption of some vitamins in the greens. That's totally optional.

Ingredients:
Greens (spinach / amaranth) - 1 lb (4 handful)
water - 1/4 cup
shallot - 4
green chilly - 2
garlic - 4 pearls
cumin seed - 1/4 tsp
salt - to taste (very little only)
Lime (sunnambu) - a very small pinch (optional)

Method:
Pluck the leaves and young stems only. Discard the hard stems or reserve them for making sambar. Wash and clean the leaves well.

Take a wok and bring to boil 1/4 cup water. Remove the skin of shallot and garlic. Add them to the boiling water along with the chillies. After a minute (the onion and garlic should be half cooked), add the cleaned greens and cook them without closing the lid. Some people believe that cooking the greens with lids will spoil the nutrients.

After a few minutes, gently turn the whole lot and cook the other side too.

Check the stems if they are cooked. Wait till all the moisture is gone and put off fire.

Let it cool completely. Now add cumin, salt and blend in a mixer to a coarse paste.
(Just two or three pulse is enough).

If you want an authentic flavor try to use an earthenware to blend the greens.

Serving suggestions:
Serve as side dish with rice or as a curry over rice.
We generally prepare this masiyal along with fish curry and rice.

Note:
In my native place , they add a pinch of lime (calcium oxide , that we use along with pan leaves)while blending to get some medicinal value out of it. Its purely optional here.
No tadka / tempering is necessary.

Some folklore from my native place (arai keerai / small amaranth):
This masiyal can be prepared with black pepper instead of green chillies and consumed daily to reduce the obesity.
This masiyal without any tadka helps people to regain strength after some disease and also as a natural bowel healer.

Aval Pazham

 If there is one easiest breakfast recipe in Indian, then it should be this one. LOL. Because all other recipes in India requires lot of ing...