Thursday, July 18, 2013

Besan Dhokla

Dhokla is one of the snacks I learned from my neighborhood aunty from Gujarat.  Last week we were busy celebrating their daughter's engagement party and I think I should publish this recipe at least now. My hearty wishes and congrats to the couple!

Every evening I would crave for something spicy, easy to make and light as air. Having some dhokla in fridge is my comfort zone, so sometimes I make it in a batch and keep in fridge for a week. Hubby presented me this dhokla stand (plates) almost 6 months back during New year, on seeing me making dhokla in cake pans. Since then it became my pet among my vessels.

Dhokla is a less oily, protein rich , spicy snack popular among Gujarat people. We can see this Indian snack in many restaurants, grocery stores etc. This would resemble the idly of Tamilnadu in texture, but spicy and easy to prepare. Though people make it authentically by fermentation like idly batter, I was suggested to use a fruit salt called ENO fruit salt. Try this and enjoy!
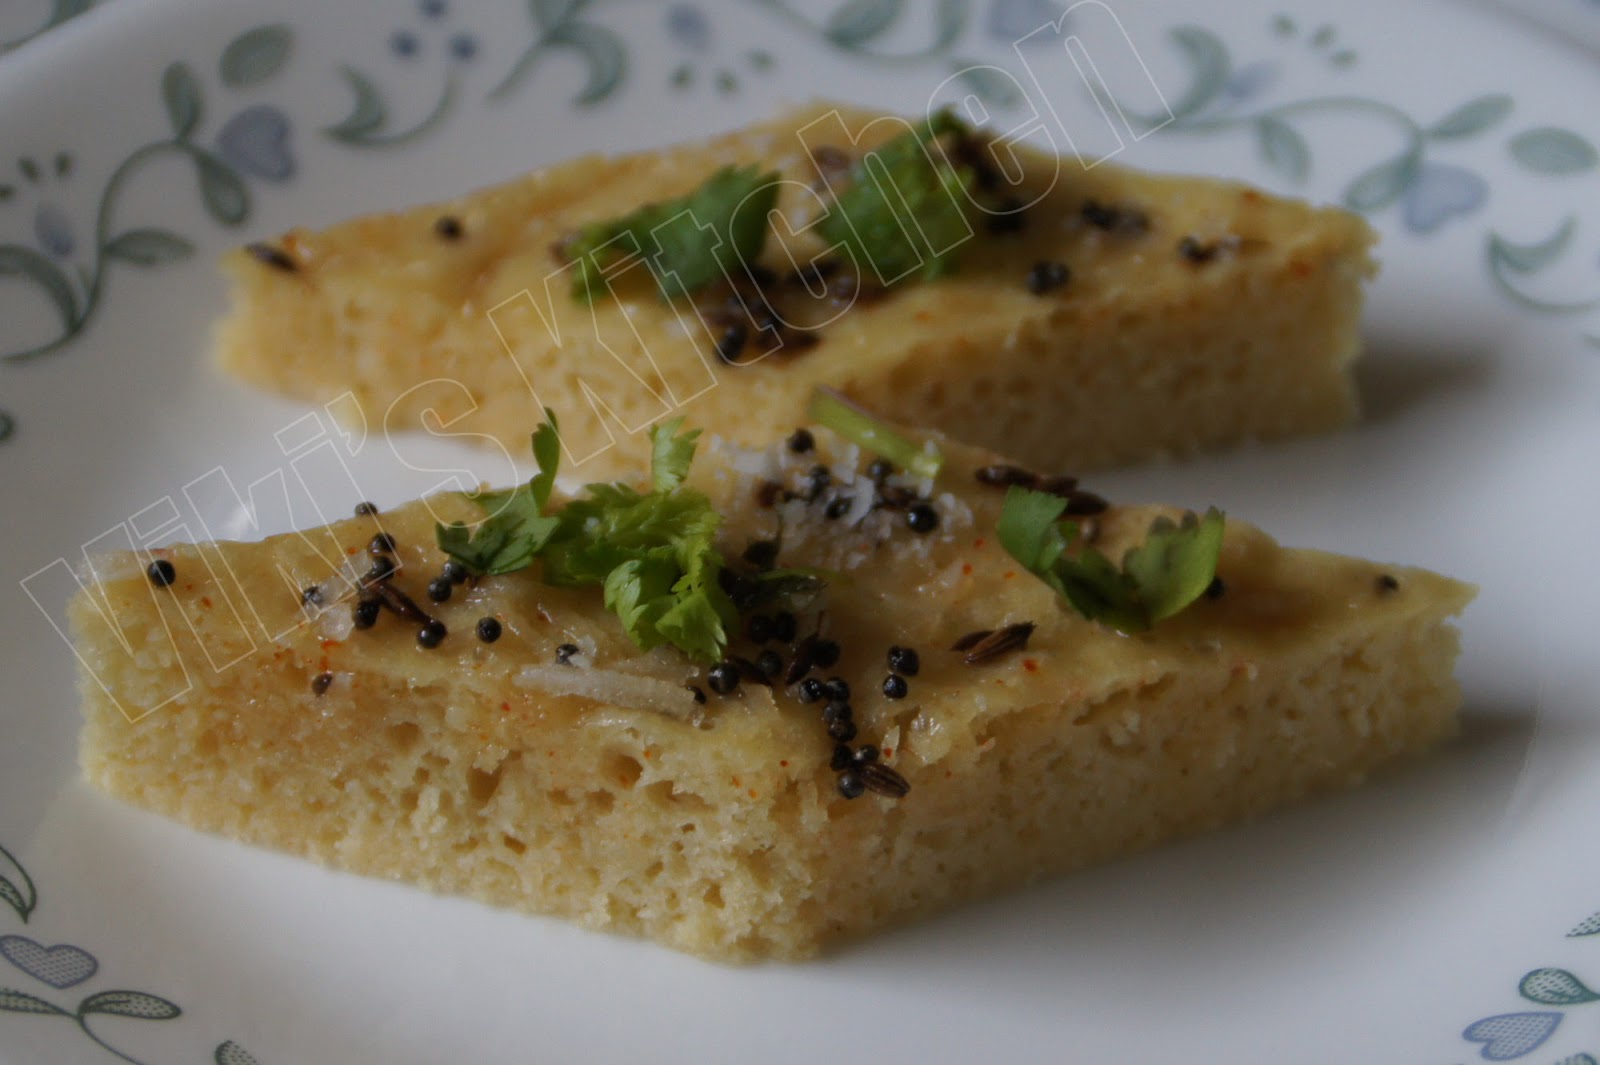
Instant Besan flour dhokla.

My dhokla stand:)

This is the fruit salt I got for dhokla.
For making 2 plates of dhokla:

Main ingredient:
Besan flour (kadalai mavu) - 1 1/2 cup
sooji (ravai) - 2 tsp
water - 1/4 cup
curd - 1/2 cup
turmeric - 1/4 tsp
sugar - 1 tsp
salt - 1/2 tsp
green chilly -2
ginger - 1 inch
ENO fruit salt - 1 1/2 tsp
baking soda - 1/4 tsp

Tempering:
oil - 2 tbsp
hing - a pinch
mustard - 1 tsp
curry leaf - 1 sprig
green chilly - 1 (finely chopped)

Topping:
lemon - 1/4
sugar - 2 tsp
salt - a pinch
water - 1/2 cup
coconut - 2 tbsp
cilantro - few

Method:
Grind green chilly and ginger to a coarse mixture.
Put everything under main ingredients in a mixing bowl except ENO.
Grease the dhokla plates with oil.
Mix ENO to the besan mixture and mix gently without lumps.
We  can see the batter rising immediately.
Immediately pour the mixture to the plates till half way (as dhokla will rise like idly).
Keep this arrangement inside an idly cooker or ordinary cooker without weight or in a closed vessel with some water. Steam cook the dhokla for 15 minutes or till an inserted tooth-pick comes clean.
Let it cool for a while, cut into desired shapes while it is in the plates itself.

Heat oil in a separate vessel, add mustard and after it crackles add hing, curry leaves, finely chopped chilly and pour over the dhoklas.

In the same tempering vessel, now add 1/2 cup water. Bring to a boil. Switch off. Add sugar, salt, lemon. Mix well and pour over the dhoklas. Some people pour this to the tray on which we are going to arrange the dhoklas. But I pour it over.
Sprinkle finely chopped cilantro and shredded dried  coconut.

Besan dhokla is ready!

Serving suggestion:
Serve warm as tea time snack with Indian green chutney.

Note:
We can see instant dhokla mixes in Indian grocery stores, which would be great for starters. But making it from scratch is economical and free of any preservatives.
Also readymade dhoklas are also available in freezer sections of Indian stores.
I would suggest making it from scratch.
Homemade dhoklas stays good for a week in airtight containers in fridge. We can microwave the required pieces as per need.

Tuesday, July 16, 2013

Beetroot juice

Beetroot is one of my most favorite vegetables.I look for many ways to include it in our meal. I got this recipe long back from my dad's dietician. Hope you all enjoy this beetroot juice !
Beetroot juice along with bread omelet.

Freshly picked mint leaves.

Ingredients:
Beetroot - 1 large
brown sugar - 2 tsp
water - 1 1/2 cup
lemon - 1/4 fruit
ginger - 1 inch
fresh turmeric - 1/8 inch (optional)
mint leaf - few

Method:
Peel the beetroot and chop it coarsely.
In a blender / mixie grind it with 1/2 cup water, sugar, ginger, mint and thin slice of turmeric.
Extract juice by pouring over a colander. Squeeze, add more water to pulp and extract as much juice as possible.
Mix with fresh lemon juice.
Serve immediately.

Serving suggestions:
This is a heavy side of juice and so consume it during day time.
Makes a nice drink along with breakfast.
Use this juice immediately to ensure the freshness or  safer within 2 days (inside fridge).

Note:
The left over pulp after extracting the juice can be dried and used in making desserts and glue art works :)
Fresh turmeric looks like ginger and available in any Indian or Asian vegetable market.

Wednesday, July 10, 2013

Sweet potato chips

Whenever we go to the nearby beach, the first thing we would do is buy some funnel cake and sweet potato fries, stand in the boardwalk and devour the snacks till the twilight comes. That enormous energy is definitely necessary to enjoy the rest of the day in the shore :) Though we buy fried sweet potato chips for fun, I like baked versions as they are less oily and won't be stuffy, if we are serving this at home:) Hope you all try this and enjoy!
Baked sweet potato fries.

Sweet potato in a bag and thin strips of it.
Beach snacks: Funnel cake and sweet potato fries. Hubby clicked this snap for me, as I started eating :)

Ingredients:
Sweet potato - 2
salt - 3/4 tsp
red chilly powder - 1/2 tsp
cumin - 1/2 tsp
turmeric powder - 1/4 tsp
pepper powder - 1/2 tsp
Extra virgin olive oil - 2 to 3 tbsp

Method:
Scrub and peel the sweet potatoes. Rinse and wash thoroughly to remove any dirt.
Cut it into  thick strips (thinner ones get brown and charred easily).
Add all the other ingredients in a large mixing bowl, mix well.
Then put the sweet potato wedges and mix well.
Spread them on a cookie sheet without touching each other. I needed 2 trays.
Heat oven to  350 deg and bake for 20 minutes. Take out, check , toss using a spoon and bake again for nearly 10 minutes. Broil for 1 minute.
Be careful throughout the process, as the sugar in sweet potato makes it char quickly.
Take out.
Baked sweet potato fries is ready!

Serving suggestion:
Serve with tomato ketchup as snack or side dish.

Note:
Sweet potato fries or baked fries would never taste like potato French fries.  So don't set the expectations like that.
This is a softer version of chips, tastes unique, sweeter and good.

Sunday, July 7, 2013

Crab kulambu

For a long time I was looking for a homely recipe for crab curry that is made in ordinary households of Tamil Nadu. I grew up eating this simple kulambu made by my mom, but eventually we all got used to restaurant versions and totally got diverted from the homely nandu kulambu. However good I make my crab curry I had always felt nostalgic for this mom's recipe. The main features of this curry is that it is a soupy version of crab curry, more watery, less spicy still flavorful and easy to make. Then one day while talking with my mom's sister, my J chithi, I got some non veg recipes of Tuticorin ..... I tried this and I could definitely say that I got my mom's recipe back. Thanks Chithi:)

Recipe source: My talented and always helpful Jeyasri chithi.  
Fish for hubby and crab for me:)


Ingredients:
Crab - 4
Onion - 1
oil - 1 tbsp
tomato - 2
curry leaf - 2 sprig
green chilly - 2 slit
mustard - 1 tsp
fennel - 1 tsp
red chilly powder - 1 tsp
turmeric powder - 1/2 tsp
coriander powder - 3 tsp
sea salt - to taste

Masala to grind:
shredded coconut - 1 cup
cumin - 1 tsp
garlic - 1 whole
shallot - 4

Method:
Heat oil in a deep wok.
Add mustard, fennel.
After mustard gets cracked, add finely chopped onion.
After sauteing it for a minute, add chopped tomato and saute till it gets mushy.
Cook this closed with 1/4 cup water.
Peel the garlic, shallot and grind the masala together to a fine paste.
Add chilly powder, turmeric powder, coriander powder,salt, prepared masala, green chilly, curry leaf and bring it to a boil.
Then add crab, cook covered in low heat for 10 - 15 minutes, switch off.
Nandu kulambu is ready!

Serving suggestions:
Serve this curry over rice as main course.

Saturday, July 6, 2013

Ulunthu Payasam

Whole urad dal / ulunthu payaru kheer (payasam) is one more delicacy from Tamilnadu. This payasam is not a modern day food but the ingredients will tell the heritage of Indian cooking. Hope it is liked by all!
Ingredients:
Whole urad dal - 1/2 cup
raw rice - 2 tbsp
garlic - 4 cloves
dry ginger powder - 1 tsp
jaggery (Indian brown sugar) - 1/2 cup
To grind:
coconut - 3 tbsp
cardamom - 3

Method:
Soak urad dal overnight. Pressure cook the soaked dal with rice and peeled garlic (wait for 1 whistle, reduce flame and cook in low heat for 10 minutes). Mash it gently without breaking too much.
Dissolve jaggery in boiling water, remove any sediments.
Bring to boil the mashed urid dal with jaggery solution.
Coarsely grind coconut with cardamom and add it to the boiling kheer.
Put the dry ginger powder and switch off.
Uluntham payasam is ready!

Serving suggestion:
Serve warm as dessert or breakfast.

Thursday, July 4, 2013

Happy Independence day !

image courtesy: click here

Fruits for July 4 th, Happy Independence day !
We have planned to celebrate our July 4 th weekend in and around our city as hubby has some work, calls and schedules to meet. But he wants to make the holidays happy for us by taking me to my favorite places around.I have made some beetroot halwa for him as a surprise dessert, though I wanted to stick with healthy choices more:) To begin with, on July 3 rd (yesterday night) hubby took me to Apple-bee's restaurant (our favorite place) . The serving portions are very generous there and so we ordered one platter of appetizer, main course and dessert, so that we could share. We had onion rings,diet Pepsi, 4 cheese grille sandwich,Tomato basil soup, Apple Chimicheesecake with ice cream. The people there were partying for July 4 th and we could see the happy faces awaiting to celebrate the Independence day. we enjoyed the atmosphere very much:) Hoping to tell you all more :) Happy Independence day!

Tuesday, July 2, 2013

Chicken Shish kebab

Grilled foods like kebabs are popular in Middle East countries. Among them, Shish kebab is very easy to make and cherished by people of America also. My first authentic kebab tasting experience happened after coming to US only. I started making them after tasting the kebabs of  New york street vendors, which is one of the most sought experiences one should have there. Middle East kebab made in NYC would be served as 'chicken over rice' or as kebab stuffed flat breads with a creamy white sauce.  According to my knowledge, this shish kebab is a colorful kebab with many vegetables likes bellpepper, tomato, onion , pineapple etc skewered together with meat pieces and grilled.
I made this Shish kebab with boneless chicken thigh , green bellpeper and onion and Indian touch. Instead of grilling I baked and broiled them (which is also equally delicious). Any Halal shop can cut this kind of pieces if requested.  I am narrating a baked kebab version with Indian spices and a juicy marination method which I learned through foodnetwork channel.
Enjoy the Independence day with these healthy colorful kebabs !
Baked chicken shish kebab

Kebab before baking.
Ingredients:
Chicken - 1.5 lb
ginger garlic paste - 1 tbsp
turmeric - 1 tsp
red chilly powder - 2 tsp
black pepper powder - 1 tsp
cumin powder - 1 tsp
curry masala powder - 1 tsp
vinegar - 1/4 cup
Indian yogurt - 1/4 cup
Extra virgin olive oil / butter - 2 tbsp + 1 tbsp
all purpose flour - 1 tbsp
salt - to taste ( 2 tsp)
Vegetables like mushroom, bell pepper, pineapple, cherry tomato, onion, zucchini can be skewered along with meat.
lemon - 1 (to garnish)

Method:
Rinse the meat and cut it into 2 inch size cubes (approx).
Mix salt 1 tsp, red chilly powder, 1 cup water and vinegar and marinate the  chicken pieces in this solution overnight or 2 - 6 hours inside refrigerator. This step makes the chicken juicy and tender and a must if using chicken breast (white meat).
Take out the chicken pieces by draining the marination completely. Pat dry if possible.
In a mixing bowl add ginger garlic paste, curd (yogurt), red chilly powder 1 tsp,  salt , pepper powder, curry masala powder, cumin powder, oil / butter and All purpose flour. Mix this into a thick paste and marinate the chicken pieces for 1 hour in this paste or longer inside fridge. (we can prepare this paste ahead and save it in fridge till marination).
In the mean time soak the skewers in water.
Thread the chicken pieces in the skewer in the following fashion or any thing as we wish....chicken piece ..1/2 inch gap... chicken piece 1 ..gap.... bell pepper square ...gap...2 chicken pieces... gap ...onion wedge ...gap...2 chicken pieces ....like this.
The 1/2 inch gap is necessary to save the kebab from getting soggy.
Heat oven to 350 deg . Line a  baking tray with Aluminum foil. Coat it with 1 tbsp oil / butter.
Arrange the skewers without touching each other.
Bake for 20 minutes on one side, flip and bake for 10 minutes the other side.
Broil for 2 minutes. Take out and enjoy!
(The above can be made in a  grill also).
Chicken shish kebab is ready!

Serving suggestion:
Squeeze lemon above ( if needed) before serving.
Serve over any rice like briyani or ghee rice.
Serve as appetizer or main course.

Note:
Here is one more marination recipe with Americanized kebab flavor, which is easy to follow and an alternative to Indian marination.
Do the first marination if using white meat and use the below for marination for 1 hour:. or simply marinate in the below for 1-2 hours before grilling.
chicken - 1 lb,  salt - as per need, pepper powder - 1/2 tsp, turmeric - 1/2 tsp, cumin - 1/2 tsp, dry powdered oregano - 1 tsp, basil powder - 1/2 tsp,  dry garlic powder - 1 tsp, cayenne pepper - 1/2 tsp, vinegar - 2 tsp, butter / EVOO - 2 tbsp
Serve with white sauce or ranch dressing.

Potato fry (Urulaikilangu varuval)

Potato fry (urulaikilangu varuval) is a famous but simple side dish in Indian cuisine. This can be prepared in a jiffy and a staple in many ...