Wednesday, September 4, 2013

Peach cobbler

Last month when peaches were at their peak season (mid July- August) in our local markets we bought pounds of them. After eating a few as fresh I wanted some new ways to utilize them all, as they can stay good for a week or so. Then I looked through my bookmarks and found this delicious peach cobbler by Paula deen . When I made it the first time, hubby dear got very excited and it became his new favorite. I don't know why, but all the desserts becomes his favorite:) Then he brought home more peaches , as he wanted to host a party for our friend Raynor's family and another party for my friends. I made this dessert during two consecutive weekends and enjoyed this dessert with our friends.
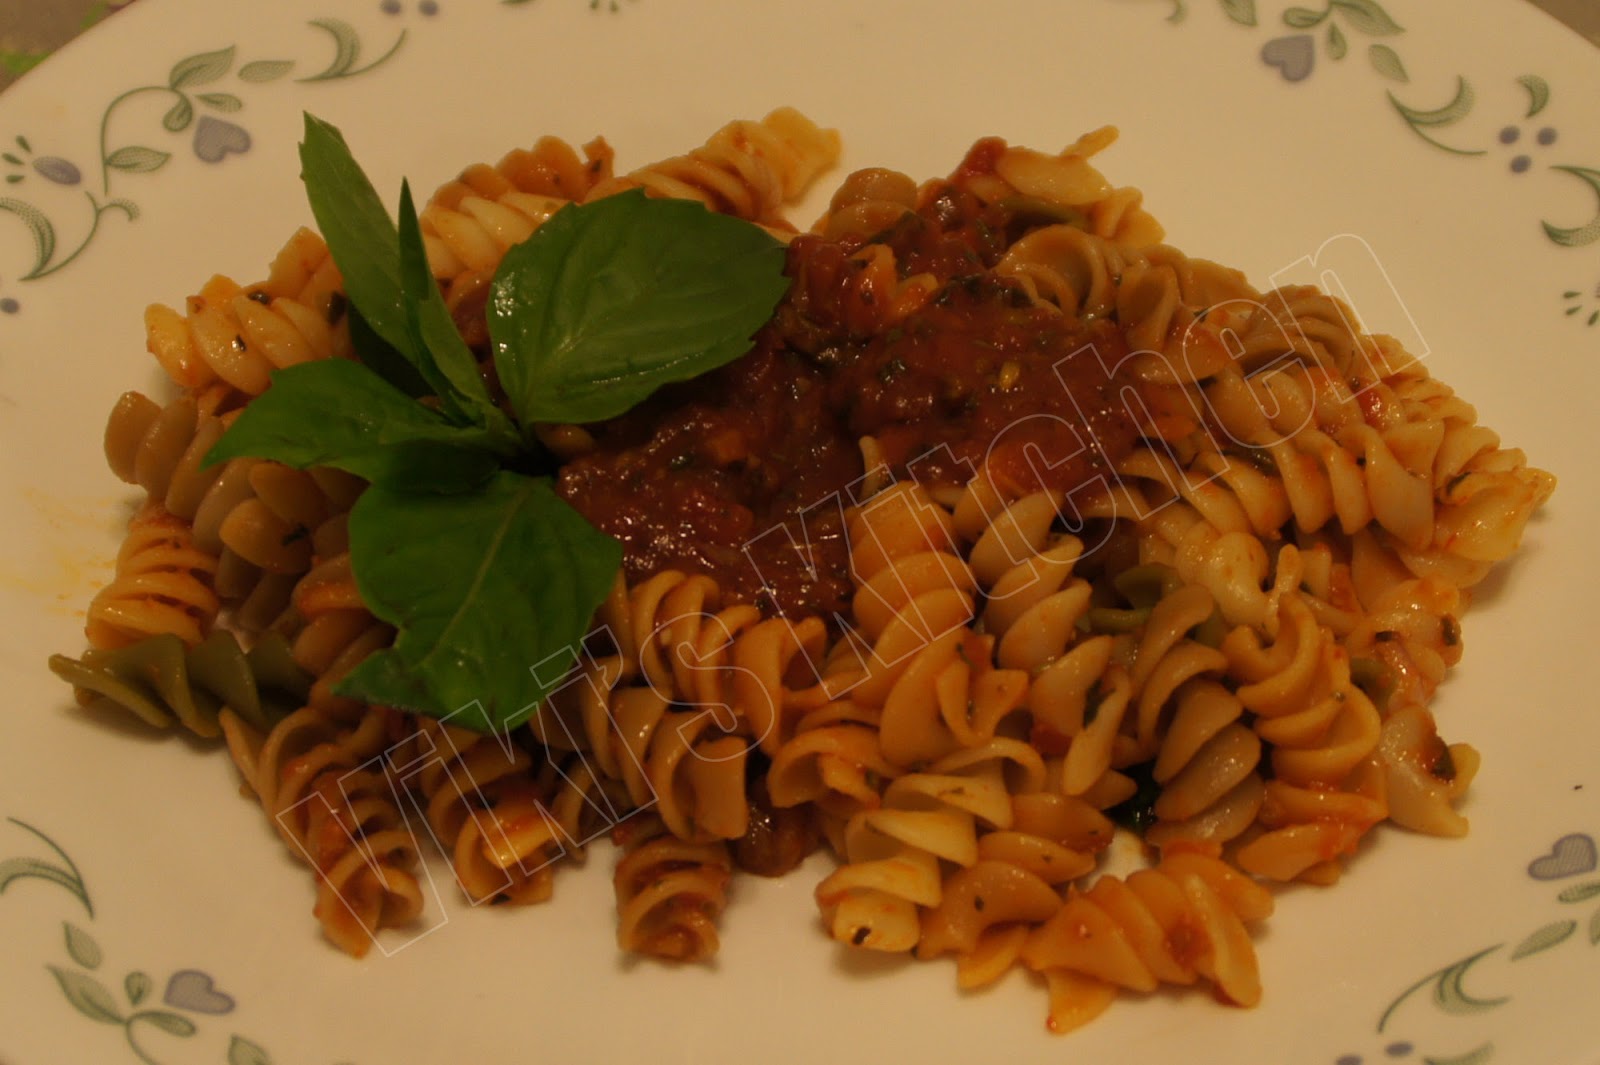
Peach cobbler with almond kulfi ice cream
.

Peaches.

I have added a few strawberries too.

cook the fruits with sugar.

Flour mixture over molten butter.

Then pour the hot fruit sauce.

baked peach cobbler.


Peach cobbler with ice cream.....an yummy treat!

(I have altered Paula's recipe to suit my 9 x 13"glass baking dish)
Southern ladies call this ingredients list as cuppa , cuppa , cuppa , which means 1 cup flour, 1 cup sugar, 1 cup milk. Easy way to remember, but I have added little more flour (like Paula) to get a thicker crust.

Ingredients: 
for fruit sauce:
Peaches - 3 to 4
sugar - 1 cup
water - 1/2 cup
cinnamon powder - 1/2 tsp
for crust:
sugar - 1 cup
butter - 1 stick (8 tbsp)
self rising flour - 1 1/2 cup
milk - 1 cup
cinnamon powder - 1/4 tsp

Method:
Preheat oven to 350 degrees F (for metallic baking pan) and 325 def F (for glass baking dish). I used pyrex baking dish and it should not be heated above 325 deg.

Peel the peaches and remove the seed. Slice them thinly. If using strawberries, then chop them too. Put the sliced fruits, 1 cup sugar, 1/2 cup water , 1/2 tsp cinnamon powder in a pan and bring to a boil. Simmer and cook for 10 minutes. Keep aside.

Put the butter in the baking dish and place in oven and let it melt.
In a separate mixing bowl , add 1 cup sugar, 1 cup milk, 1 1/2 cup self rising flour and mix to a fine batter.  Take out the hot baking dish and pour this flour mixture over the hot butter. DO NOT STIR.
Slowly spoon the hot fruit mixture over top, DO NOT STIR.
Sprinkle some more cinnamon powder on top.
Bake for 30 to 45 minutes. The batter will rise up and cover the fruits. Check by inserting a toothpick.
Serving suggestions:
Serve warm as dessert along with a scoop of ice cream or with whipped cream.
Note:
Use self rising flour only or prepare one using AP flour and right proportions  of other ingredients.
Follow the instructions carefully, as each and every step is important in this recipe.
This is a very easy dessert recipe and can be prepared days ahead. Keep it refrigerated if prepared ahead.
The cobbler should rest for 15 minutes immediately after baking, to soak up the juices.
Always serve this warm to enjoy the flavor of butter and fruits.

Tuesday, August 27, 2013

Thattai

Thattai is a popular south Indian snack. Other names are thattu vadai, thattai murukku. I just love this snack very much and will try to buy a pack whenever I see it anywhere. But hubby dear likes this snack only if I make it at home, as he thinks store bought thattai have a harder texture and unbreakable:) There are various thattai recipes but the core ingredient is rice flour. I usually make thattai using murukku flour (with thattai ingredients) also, but there is a separate recipe for the thattai that melts in mouth and here is my recipe after many permutation combinations:). I add more pottukadalai mavu (puffed channa dal flour) to get a crispy wafer like texture but we can halve it too.

Happy Krishna Jeyanthi!

thattai

pressing thattai.

thattai dough for 30 numbers.
Ingredients:
Rice flour - 2 cup
urid dal - 2 tbsp
pottu kadalai (puffed channa dal) - 3/4 cup
curry leaf - 2 sprig
shredded coconut - 2 tbsp
sesame - 2 tbsp
channa dal - 2 tbsp
red chilly powder - 2 tsp
hing (asafoetida) - 1/4 tsp
salt - to taste (3 tsp)
butter - 2 tbsp
oil - for deep frying

Method:
Soak the channa dal in water for 1 hour. Keep aside.

Dry roast the rice flour for few minutes till it looses moisture. I use store-bought rice flour and it takes 2-3 minutes per cup of flour to get that loose texture.
Dry roast the urid dal till it smells good (not red), let cool and powder it.
Powder the puffed channa dal (dalia flour).

Put the flours in a large mixing bowl. Add butter, curry leaf, soaked channa dal, sesame, red chilly powder, shredded coconut, hing. Mix salt with a cup of water and use this to knead the flour.
Knead the dough to a very soft stage (like chapati dough). Apply some oil over it.

Make small lemon size balls (approx 30 numbers).
Take a  ziplock cover and open three sides with one side closed. Or simply fold a plastic sheet and use it to press thattai.

Place one ball inside the opened ziplock cover , close and press using a flat cup(as shown in photo). Prick a few holes using a fork or toothpick (to avoid thattai puffing up). But I didn't prick all the thattais (as mine are thin only).

In the mean time start heating the oil in a frying pan. As it gets maximum heat, put the pressed thattai and reduce flame to medium. After a few seconds flip and cook till bubbles settle. Take out , drain excess oil and keep on paper towels. Just like this fry the thattai one by one. The whole process may take 45 minutes.

Store in airtight containers and enjoy!

Serving suggestion:
Serve as snack with tea or coffee.

Thursday, August 22, 2013

Kadanja Kathirikkai and my kitchen garden

I prepared this side dish with homegrown eggplant and tomato. Here are some pictures of my kitchen garden. I love gardening, especially kitchen gardening is always rewarding. This year we planted 6 burpee brand eggplant plants and we are blessed with loads of harvest and I thank God for this happiness. I cooked a lot of dishes with eggplant. Also the homegrown  tomato, basil, spinach gives us immense pleasure. I shared the eggplants with few of my neighborhood friends and still waiting to harvest more:)

Kadanja kathirikkai - Mashed brinjal in tangy tamarind and tomato sauce.


Bought them on May 20, 2013 from stop and shop.
One Tomato plant for  $3.99
This 6 eggplants pack is for $ 3.99 only....eggplants always comes in deal.
Our garden space.


First harvest
I got this recipe idea from Ms. Manohari of Arusuvai.com. Thanks dear, now I have learned another yummy Indian brinjal recipe.

Ingredients:
Eggplant / brinjal - 1/2 kg
unripe tomato - 1 or 2
tamarind - small lemon size
green chilly - 5
red onion - 1
turmeric powder - a pinch
asafoetida (hing) - a pinch
garlic - 5 cloves

To Temper:
coconut oil - 1 tbsp
curry leaf - 1 sprig
dry red chilly - 2
mustard - 1/2 tsp
urad dal - 1/2 tsp
cumin - 1/2 tsp

Method:
Extract the tamarind juice. Keep aside.
In a pressure cooker vessel add 1 cup water, finely chopped onion, chopped brinjal, finely chopped tomato, slit green chillies, peeled garlic, turmeric , hing, tamarind juice .
Bring to three whistles and switch off.

Add required salt and mash this using a spatula to a coarse state.
DO NOT mash in a blender.
Keep aside.
In a tempering wok, heat oil, add mustard and as it starts cracking, add cumin, urad dal, curry leaf, dry red chilly. Pour this over the mashed eggplant.
Kadanja kathirikkai is ready!

Serving suggestion:
Serve as side dish with dal rice, curd rice,roti,  idly dosa.

Monday, August 12, 2013

Ripe mango pickle

Recently hubby brought a pack of sweet mangoes from Asian stores and I prepared a sweet pickle using a few fruits. Cooking with fruits is very rare for my style as we like to eat them fresh. But during this Summer I wanted to preserve a few mangoes to get the taste of them for a few more months:) . I made this pickle just like raw mango pickle but added some more ingredients to intensify the sweetness and longevity.  The pickle has become our new favorite and it makes every meal more mouthwatering:) I shared this with some of my friends and they also appreciate the taste and this makes me more glad !
Sweet mango pickle

mambala urukai

mango slices

Champagne variety Mexican ripe mangoes.

Ingredients:
Ripe mango - 3
sesame oil - 2 tbsp
any oil - 4 tbsp
lemon - 1
vinegar - 1 tbsp
red chilly powder - 1 tbsp
jaggery (brown sugar) - 1 tbsp
mustard - 1 tsp
fenugreek - 1 tsp
sea salt - 2 tbsp (or more)

To fry and grind:
mustard - 1 tsp
fenugreek (methi seed) - 1/2 tsp
hing -a tiny piece

Method: 
Wash the mango, wipe and clean without any moisture. Peel the mango if it is very ripe. Otherwise cut it with skin. (I used very ripe mangoes, so I peeled them off). slice it into small cubes and keep aside.

Heat a drop of oil in a wok. Fry the mustard, methi and hing till mustard pops. Powder these together.

Now heat the 6 tbsp of oil in a wok. I mixed sesame oil with corn oil, but South Indian pickles are generally prepared with pure sesame oil only. Add mustard, fenugreek and let the mustard crackle.
Put the chopped mangoes and stir well. Then add the dry chilly powder, salt and saute till mango seems cooked (mushy). Put jaggery, prepared powder, juice of 1 lemon and mix well. Bring it to a boil and switch off. After few seconds add the vinegar and mix well. Check for salt and store in clean bottles. Let cool completely, secure with a lid and store for a month or two in room temperature.

Serving suggestion:
Serve as side dish with curd rice or any rice or roti.

Note:
Adding vinegar increases the longevity and shelf-life at room temperature.
If lesser oil is used or vinegar is not used, then keep it in fridge.
Sweet and sour mangoes make a very good quality sweet pickle (for example kili mooku/ parrot beak long mango variety). This is a good way of preserving ripe mango during season.

Thursday, August 8, 2013

Wednesday, August 7, 2013

Milk popsicle

This Popsicle mold  was lying around in my kitchen for many years till I found a lot of interesting popsicles via  pinterest this summer. I thought I should make a nostalgic post if I can prepare a milk popsicle, popularly known as paal ice while I was growing up. I just love this ice very much and hubby too wanted me to re-create one for us:)  I am not sure if my recipe is the original one, as I have never asked anyone about this. But I assumed that this humble pal ice would have been made of lesser expensive ingredients as it was sold for fairly a lesser price at that time (this would be the least expensive one in that icecream cart and every kid could afford this in their pocket money). So I prepared a leaner version using cornstarch to give the creamy texture and it was successful. The popsicle tasted almost similar to the good old days and we enjoyed every lick:) If needed anyone can replace cornstarch with condensed milk and nuts to get a kulfi texture.
My cute little popsicle molds.

Pinky popsicle is always mine:)

Ingredients: (four Popsicle)
Milk - 1 cup
water - 1/2 cup
sugar - 6 tsp
corn starch - 1 tsp
water - 1/4 cup

Method:
Mix corn starch with water and cook it in 1/4 cup water. Stir continuously till it starts forming a thick mass. It should look very creamy.
Boil the milk with 1/2 cup water. Switch off.
Add the corn starch, sugar to milk and dissolve thoroughly.
After cooling completely pour in popsicle molds, freeze for 6-8 hours.
To take the ice out: Keep the popsicle mold upside down in warm water for few seconds and take out.

Serve as dessert.

Some more ideas:
I used some small dessert cups to make popsicles.
Pour the popsicle liquid in the cups, cover them with aluminum foil and insert an icecream stick through it. Freeze as usual. I used a kebab skewer as I didn't have icecream stick at that time. I cut it into 3 and it worked fine for me:)


Saturday, August 3, 2013

Pasta with tomato basil sauce

A basic tomato sauce with rotini pasta. I have used fresh basil leaves from my garden here. Growing basil from seeds is very exciting and a nice way to make our own sauces. Tukmaria / sabja / pachilai thulasi is the name of basil in India. Grow this fragrant herb in your garden and have fun.

Ingredients:
Pasta - 3 handful
Tomato -  3 ( 4 tbsp puree)
garlic - 2 cloves
salt - as per need
shallot - 2
black pepper - 1tsp
basil leaves -10
butter - 1 tbsp
EVOO - 1 tbsp
All purpose flour - 1 tbsp
water - 1/2 cup
brown sugar - 1 tsp

Method:
Bring water to boil. Add the pasta and cook as per direction (little firm - Al dente).
Drain and add cold water. Drain again and keep aside.
 
In a separate wok, heat butter. Put the minced garlic+shallot and fry for a few seconds. Then add AP flour and fry for few seconds till raw smell goes. Now add the finely chopped tomato or tomato puree, olive oil and cook till it seems mashed. Then add pepper powder, salt, 1/2 cup water, chopped basil leaves, brown sugar (sugar) and cook for a minute.

Mix this with pasta or serve over it.

Pasta with tomato basil sauce is ready!

Note:
Serve this pasta as main course meal.
This sauce can be stored in fridge for a month.
It can be kept frozen also.
I use this basic sauce in making pasta, pizza, enchilada etc.
If needed add dried Italian seasoning powder along with other ingredients to get a more fragrant version.

Potato fry (Urulaikilangu varuval)

Potato fry (urulaikilangu varuval) is a famous but simple side dish in Indian cuisine. This can be prepared in a jiffy and a staple in many ...