Friday, April 30, 2021

Rava Upma in Instantpot

Upma is a basic tiffin item of Tamilnadu. While saying this, all South Indians love dosa idli better. Upma is a kind of handy dish only. Dosa maavu can never run out of our houses as if it is kept in some 'Akshaya patram'. Some people make fun of upma as it is commonly made in college hostels. But hubby and me love upma very much. This upma used to come handy during some rare occasions.  I know nowadays we are all blessed with the privilege of cereal or bread, but before this era, our moms used to trust in this humble upma. Still I love upma better than many readymade boxed breakfasts. I remember how amma used to whip out some upma , the minute we landed  after some vacation. 

I started preparing most basic dishes in instantpot in a simplified manner and am recording them for my family and friends. I have done this recipe in 3qt duo IP. You can try in any electric cooker. 

Hope this recipe comes handy !


Upma with sugar and tomato pickle

Ingredients: (for 2 adults)
Rava (semolina) - 1 1/4 cup
water - 2 1/2 cup
(water = number of cups of ravai x 2) 
salt - 1/4 tsp  
onion - 1 (small)
green chilly - 2
ginger - 1 inch
curry leaf - 1 sprig
channa dhal - 1 tbsp
mustard - 1/2 tsp
sesame oil - 3 tbsp.

Method:
Switch on the IP and choose saute mode. 
Add the rava and roast for 3 minutes. (We can skip this by pre-roasting the rava or by buying double roasted rava). 
Dry roast the rava till it smells good (not red, just white only).
Transfer it to a plate .

Chop the onion, curry leaf, ginger, green chilly finely.

Now press cancel.

Press saute. 
Heat 3 tbsp oil in the same wok.
Add mustard seed, channa dhal and let mustard crackle. Add  all the chopped ingredients along with it. Put a pinch of salt to fasten the process. Saute 3 minutes till onion starts to become transparent, 

Press cancel. 
Then change to pressure cook mode in high pressure setting for 3 minutes.
Add the water, Salt and rava.

Close the lid. Put the pressure valve.
Sometimes the pressure safety valve may not rise. Still the rava gets cooked well.
If the pressure valve is on, then wait 5 minutes and release the pressure naturally.


Open the lid , sprinkle some chopped cilantro if needed. 
Rava upma is ready !

Serving suggestions:
Serve as breakfast or dinner along with coconut chutney or sugar.
The above said quantity is for two adults.

Note: 3/4 cup rava for 1 adult. If we are adding some vegetables like carrot, peas, then reduce the rava to 1/2 cup per person.


Wednesday, April 28, 2021

Basic rasam

Here is a basic rasam recipe for everyday cooking. 


Ingredients:
Tamarind - Amla size (key lime size)
tomato - 1
Turmeric powder - a pinch
water - 3 cups
sesame oil - 2 tbsp
curry leaf - 1 sprig
mustard (kaduku)- 1/2 tsp
fenugreek (venthayam) - 1/4 tsp
asafoetida (hing) - a pinch
garlic - 1 whole (small)
cumin - 1 tsp
whole black pepper - 1 tbsp
salt - to taste

Directions:
Microwave tamarind + 3/4 cup water for 1 minute. Let cool. 
Extract juice from tamarind by adding 1 cup water each time and repeat thrice or till water runs almost clear.  
Add chopped tomato. (or add 2 tbsp pureed tomato).
Add turmeric powder, salt. Keep aside.

Peel garlic. Grind the garlic, pepper, curry leaf, hing and cumin coarsely without water.

Heat oil in a wok.
Add the fenugreek and mustard . After the mustard gets splutter , put the garlic pepper mixture.
Saute few seconds (30 seconds).

Now pour the tamarind extract and let it boil till the raw smell vanishes. Add chopped cilantro (optional).
Then switch off the flame  

Serving suggestions:
Makes 500 ml of clear rasam.
Let the rasam settle down first and just serve the top layer of rasam.
Serve over hot rice along with appalam or thogaiyal .
If preferred serve as a soup , but after meals.
Cooking time: 10 minutes.

Sunday, April 4, 2021

Happy Easter

 🌷🌷🌷🎂Wishing all a happy and blessed Easter 🎂🌷🌷🌷


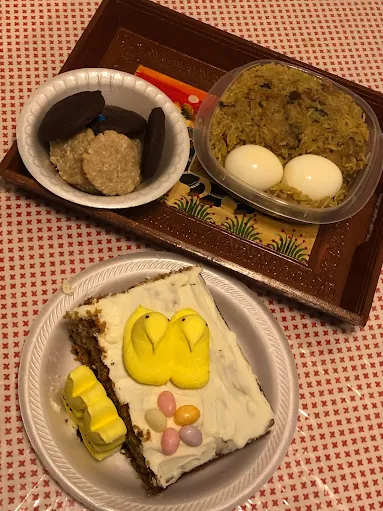
Treats for friends.....Chicken briyani, coconut cookies, chocolate cookies, carrot cake I prepared for Easter.


My 'Rabbit Rabbit' painting, March 2021


Wednesday, January 20, 2021

Millet adai

 Adai is a kind of spicy dosai (Tamil cuisine). If you want to read more please click to see my usual adai recipe, nine grain adai. I prepared a newer kind of adai this week using millet along with other ingredients. This tastes more similar to the original adai, but this feels lighter.  This is my own version of a millet adai, hope you all try this and enjoy !

Millet adai with kara kulambu and sugar
Millet Adai with karakulambu and sugar

Thinai millet 


To grind:
Idly rice / any rice - 1/2 cup
Foxtail millet (thinai) - 1 cup
Channa dhal (Kadalai paruppu) - 1/2 cup
green gram (whole) - 1/2 cup
urid dhal (Uluntham paruppu) - 1 tbsp
ginger - 1 inch
whole black pepper - 2 tbsp
cumin - 1 tsp
Dry red chilli - 5
Asafoetida powder (hing) - 1 tsp
turmeric powder - 1 tsp
salt - 2 tsp (to taste)

To add before making adai:
onion - 2 cup
cilantro - a handful
curry leaf - 1 sprig
cumin - 1 tsp

Method:
Wash and soak together everything given 'to grind'  for 4-5 hours (except ginger, salt, turmeric, hing).
I soaked it by 6 Am and prepared the batter by noon and made this adai for dinner.
(If you plan to make adai for a special breakfast, then soak all the items told and keep it inside fridge overnight.
Otherwise soak the rice overnight and soak the dhals for just 2 hours in the norning.
Because while making adai , the dals should not ferment).
Grind all soaked items together to a medium coarse dosa batter .
Finely chop the onion, cilantro , curry leaf and add this to adai dosa batter.
Heat a thick cast iron dosa pan and coat it with a little sesame oil. Drizzle water and wipe clean.
(Thick traditional dosa tawas make crispy adais than the non stick tawas)
Then pour a ladle of batter and make thick dosas.
Flip it. wait to get adai cooked on both sides.
It will take around 3 - 5 minutes for each adai to be cooked completely.
Like wise make as many as required.
If you need to prepare it faster, use two dosa tawas, as this helps better to serve a hot crispy adai.
Adai dosai is ready!
Makes nearly 15 adai.

Serving suggestion:
Serve adai hot with coconut chutney , sugar or aviyal or onion chutney.
Sometimes we enjoy this with kara kulambu too. 
Do not prepare it in batches before serving. Because adai tastes better when served hot.
So start making adai , as soon as your loving family sits in front of the dinner plate😍 

Note:  
The taste will be enhanced if we add a handful of drumstick leaves to the batter before making adai.


Friday, January 1, 2021

Thursday, December 24, 2020

Wednesday, December 16, 2020

Double chocolate m&m cookies


If you are a chocolate fan, then this chocolate cookie will definitely become your most favorite cookie if you taste it one time. Cookies are my favorites to make, but I bake special desserts like this only during Christmas, Easter or for some church functions, festivals, or for my niece. I think this is the first dish that made her fall in love with my cooking. Chocolate is not my hubby's  favorite flavor. So I won't make anything with chocolate unless I find a reason (still I crave for chocolate).  For the first time I made this cookie while we went to meet my niece in her dorm, after that this has became a regular code for her and me to say our love for each other ☺️Also these 'chocolate chip m&m cookies' tastes  extremely delicious and 'rich' and definitely a 'crowd pleaser' for all festivals.

Double chocolate chip m&m cookies

Double chocolate chip m&m cookies


Ingredients:
Dry ingredients:
All purpose flour - 2 cup
Coco powder - 2/3 cup 
Baking soda - 3/4 tsp
Salt - 1/4 tsp
Creaming wet ingredients:
Butter - 1 cup (2 stick)
White sugar - 3/4 cup
Brown sugar - 3/4 cup
Egg - 2 (large)
Vanilla extract - 2 tsp
Lemon juice - 1 tbsp
Others:
M&M- 3/4  cup + 1/4 cup (or lesser as per need)
Chocolate chip - 1 cup

Method:
First the wet ingredients: Melt the butter (microwave for 30 seconds). Pour it into a large mixing bowl (or kitchenaid stand mixer bowl).
Mix the butter , sugar manually by using a whisk or by using stand mixer whisk attachment or a hand mixer.
Add egg, vanilla, lemon juice and mix well till sugar is dissolved.
Next comes the dry ingredients:
Sift the flour into the mixing bowl. 
Add coco powder (I use Hershey's brand), baking soda, salt , Mix well at high speed for 1-2  minutes until everything becomes a dough.
Then add 3/4 cup M&M chocolates, chocolate chips(Hershey's or Ghirardelli brand) and mix them for 30 seconds (or just mix with hands). 
Take out this dough and wrap using a plastic wrap. Keep in fridge (upto 30 minutes or until needed). 
Baking:
Preheat the oven to 350°F .
Before baking take the dough out and keep in room temperature for 10 minutes.
Take out small balls using a cookie scoop or hands.
Roll to balls. Flatten a little and place in baking sheets.
Bake for 8-10 minutes. 
Take out carefully using a spatula and let them cool over wire racks. 
Decorate:
If desired press some M&M on freshly baked cookies (instead of adding to dough) while they are still soft or just before baking. 
Double chocolate m&m cookies is ready !

FYI:
This cookie dough should be kept in fridge for atleast 1-2 hours before baking. Dough stays safe in fridge up to a week or in freezer for longer time (say a month or more). 
This cookie dough should be rolled to small balls and flattened a bit while arranging on baking tray. Don't try scoop and drop style.

Serving suggestion:
Serve as dessert or snack.
These cookies tastes extremely delicious and intoxicating, so consume in moderation 😀

Happy Cooking !

Friday, September 18, 2020

Instantpot Sambar

I specifically prepared this post for my hubby dear, as he wanted to cook sambar on a special day using Instant pot (electric pressure cooker). He made sambar using white pumpkin (200 gm) and tomato (2 nos). 

This is a step by step procedure and sure it will help anyone to cook sambar easily. 

Mixed vegetable sambar in Instant pot I made earlier 


My hubby's White pumpkin sambar in Instant pot

1. To pressure cook first:

Toor dal (Thuvaram paruppu) - 3/4 cup. Wash 3 times

sesame oil - 1 tsp

turmeric powder - 1/2 tsp

hing (Asafetida)- 1/8 tsp

small garlic - peeled handful (optional)

See that the water stands 1 inch above dal.

Mode : Pressure cooking, high pressure.

Time : 10 minutes

Set it to pressure cooking high and 10 minutes. After it switches off, release pressure manually after 5 minutes or immediately .


2. To pressure cook next:

drumstick - 1 

Thai eggplant (round white or green with seeds) - 3

tomato - 2

green chili - 2

Tamarind - small gooseberry size

raw mango - 1/2 cup sliced

salt - to taste

sambar powder (2 tsp)- sakthi or achi brand or homemade (dissolved in 1/2 cup water or tamarind juice)


To temper:

Shallot -2 

curry leaf - few

ghee - 1 tbsp

mustard - 1 tsp

cumin - 1 tsp

fenugreek (methi seeds) - 1/2 tsp

dry red chilly -2


To garnish:

Jaggery / brown sugar - 1 tsp

cilantro - few


Method:

1.First pressure cook the dal to 10 mins in instantpot. (Oil is added for uniform cooking of dal. I suggest adding garlic in every food we cook, but it is optional only).


2.In the meantime, prepare the vegetables and cut them.

Extract juice from tamarind.

Soak the cut vegetables in tamarind juice and keep aside. (especially for brinjal (egg plant))


3.After the dal is cooked and the pressure subsides, open the cooker lid. (or release manually after 5 mins)

Using a spatula, mash the dal.


4.Start pressure cook setting (high pressure , 3 min). Lid should be open.

Add the items mentioned under part 2 (vegetables and tamarind).

Add sambar powder, salt to dal in cooker.


5.In the meantime prepare the tadka (tempering). Heat 1 tbsp ghee in a small wok.

Add mustard, cumin, methi seeds and wait till mustard crackles.

Then add the slit shallots, / onion , curry leaf.  Saute till shallot gets mild red.

Add to cooker.

Close the lid. Let it cook.


After it switches off itself, release pressure manually after 5 mins or naturally.

After opening, check salt, add jaggery, cilantro, add if required chili powder 1/2 tsp.


Instantpot sambar is ready


Note: other vegetable combinations suitable for sambar are 

white pumpkin  200 gm + tomato 2

Beans 10 + carrot 1 + potato 1 + tomato 1

okra  15 + tomato 2 (little different - saute the okra and do not pressure cook it)

Shallot  15 + tomato 2 (onion sambar)

brinjal 4 + mango 1/2 + drumstick 1+ tomato 2

broad beans (avarakkai)  20 + tomato 2

yellow pumpkin and all native Indian vegetables together 300 gm (Kalyana sambar)

fried vadai sambar

Mullangi (radish 200 gm) sambar 

Spinach (small bunch / 2 cups chopped) sambar 

Bottle gourd 1/2 + tomato 1

Tuesday, September 8, 2020

Mother Mary's Birthday

 Happy Birthday dear Mother Mary ! Your guidance and blessings are what we seek everyday ! And with your blessings and protection we prosper !

May God bless us all !


Tuesday, August 18, 2020

Ragi upma

Upma / uppuma (uppu + ma meaning salted + flour) is a popular Indian dish . I think upma got its popularity status because of its versatility and omnipresence.  It used to be one of the top  quick to make Indian foods, before the noodles entered our houses via TV.  After the arrival of noodles, it kinda became a status symbol in the 90s.  Kids started preferring noodles and upma started to become a joke for many. Though the twitter world makes a lot of jokes about it, still it remains as one of the favorites for me and my hubby. People who have spent lot of time growing up in hostels in India would confuse the 'mass production upma' with the 'mother-touch homemade upma' and would laugh at it. But upma is a delicious food if it is prepared with love and care, just like any other food in the world 😍

Usually upma is made with sooji (semolina - the hard grains left after milling the flour) or wheat / rice / any carbohydrate and served as breakfast or evening snack or dinner. Ravai is one of the basic less expensive grocery in India. Ravai can be used in preparing dosai, kichidi , kesari a dessert and options are endless. So it would be always included in our monthly grocery list. 
Even though a upma is meant to be a simple dish, some wise people jazz it up with cashews, veggies, ghee and upgrade it to the next level. 

I usually make sooji upma or wheat upma only. Very rarely I make this idiyappam upma nowadays as my hubby likes the sweet idiyappam better than this spicy version. While making ragi idiyappam , I reserve some idiyappam for dinner and will make this dish. But that requires lot of effort. Buying a pack of instant idiyappam is the easiest way.  Before marriage, I used to make this ragi upma for my appa as I tried to include more ragi based foods for him instead of usual carbohydrates.  
I have always used Anil brand ragi vermicelli. This product is easily available in most Indian grocery stores. So try and fall in love with this recipe 😍


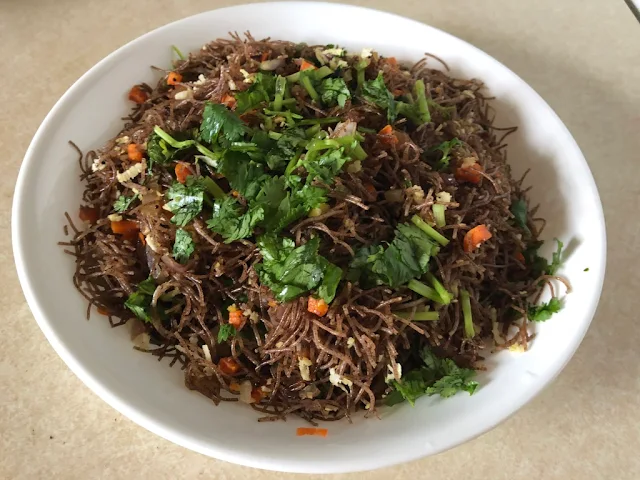
Ragi Upma
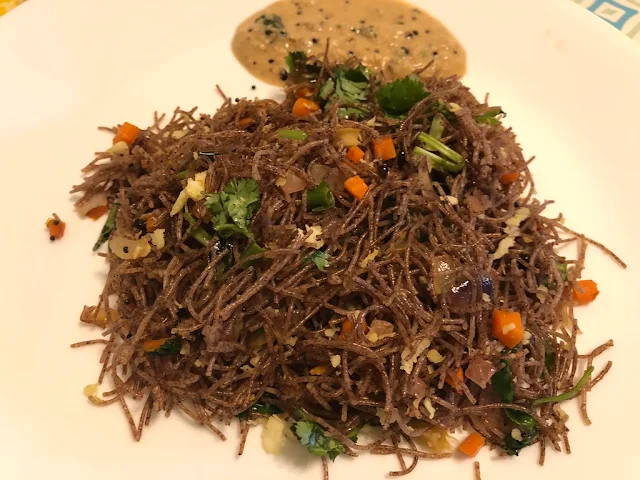
Ragi upma with coconut chutney
Anil Ragi semiya 


soak it for only one minute  and drain water immediately 

Steam cook the soaked / drained idiyappam


Prepare tempering while steam cooking is being done


I use the same steaming wok for sauté too

Add lemon juice after switching off 


Ragi umma with spicy coconut chutney

Enjoy this with sugar or chutney 

One of the best umma ever !


Ingredients: (for 2 adults)
Instant dry Ragi idiyappam - 200 gm
water - as per need

Tempering:
Peanut oil - 1 1/2  tbsp
channa dal - 1 tbsp
mustard seed - 1/2 tsp
onion - 1/2 cup 
green chilly - 2
ginger - small piece (1/2 inch)
curry leaf - few
cilantro - few
salt - to taste
carrot - 1
green peas - handful (optional)
lemon - 1/4
grated coconut - 2 tbsp
  
Method: 
Put the instant ragi idiyapam in a bow. Pour room temperature water up to the semiya is covered. 
Let it stand for a minute,  immediately drain water completely using a colander. (See image) . Don't soak it more than 3 minutes. I just rinse it for a minute and beyond that will dissolve the ragi idiayppam. 

Bring a steaming pot to boil with 2 cups of water.
Place the ragi semiya on a idli plate or a steamer plate. (I bought my steaming plate through amazon. com).
Close the lid and steam it for 10 minutes.
Take it out and keep aside. 

In the meantime start preparing the tempering.

Heat 2 tbsp oil in a wok.
Add mustard seed. let it start to crackle. Then add the channa dhal. Wait till it gets pink. Then add chopped onion, curry leaf, cilantro, ginger, green chilly. As the onion starts to get soft, add chopped carrot, peas and stir for a minute. Add required salt.

Add the cooked ragi idiyappam.
Stir well. Add the shredded coconut.
Squeeze the lemon (taste and add the required amount).
Cover tightly with a lid. 
Switch off. 

Ragi semiya upma is ready!

Serving suggestions:

Serve as breakfast or snack or dinner along with a spicy coconut chutney or sugar.


Bakery soft Vanilla cake, Butter cream icing

Bakery soft Vanilla cake, Butter cream icing -  For a detailed explanation pls click to see my video on making vanilla cake, icing rose tech...