Monday, May 30, 2016

Shrimp head curry

Era meen thalai kulambu / prawn head curry / shrimp shell curry.

My mom used to do this more often, whenever she had bought shrimp. Shrimp is usually made into a thick stir-fry in Tamilnadu cuisine, but that won't be enough for a large family , even if we buy a kg (which is way too expensive).The person in-charge of the kitchen should be clever enough to satisfy everyone (!). So ladies in my mom's generation could have invented curries like this :)
Optimistically  I guess this shrimp head curry is a way to utilize the shrimp completely. After observing many cuisines of the globe, I assume that this is not an unusual way to extract juices from shell fish.  I am sure this is a more economical as well as delicious way to get the nutrients from shrimp. Here in my house, I make this curry sometimes, as it can be used as a side dish for idli, the next morning.

I had this recipe in my draft for a very long time, since 2010. Hope you all love this flavorful shrimp curry in coconut sauce.
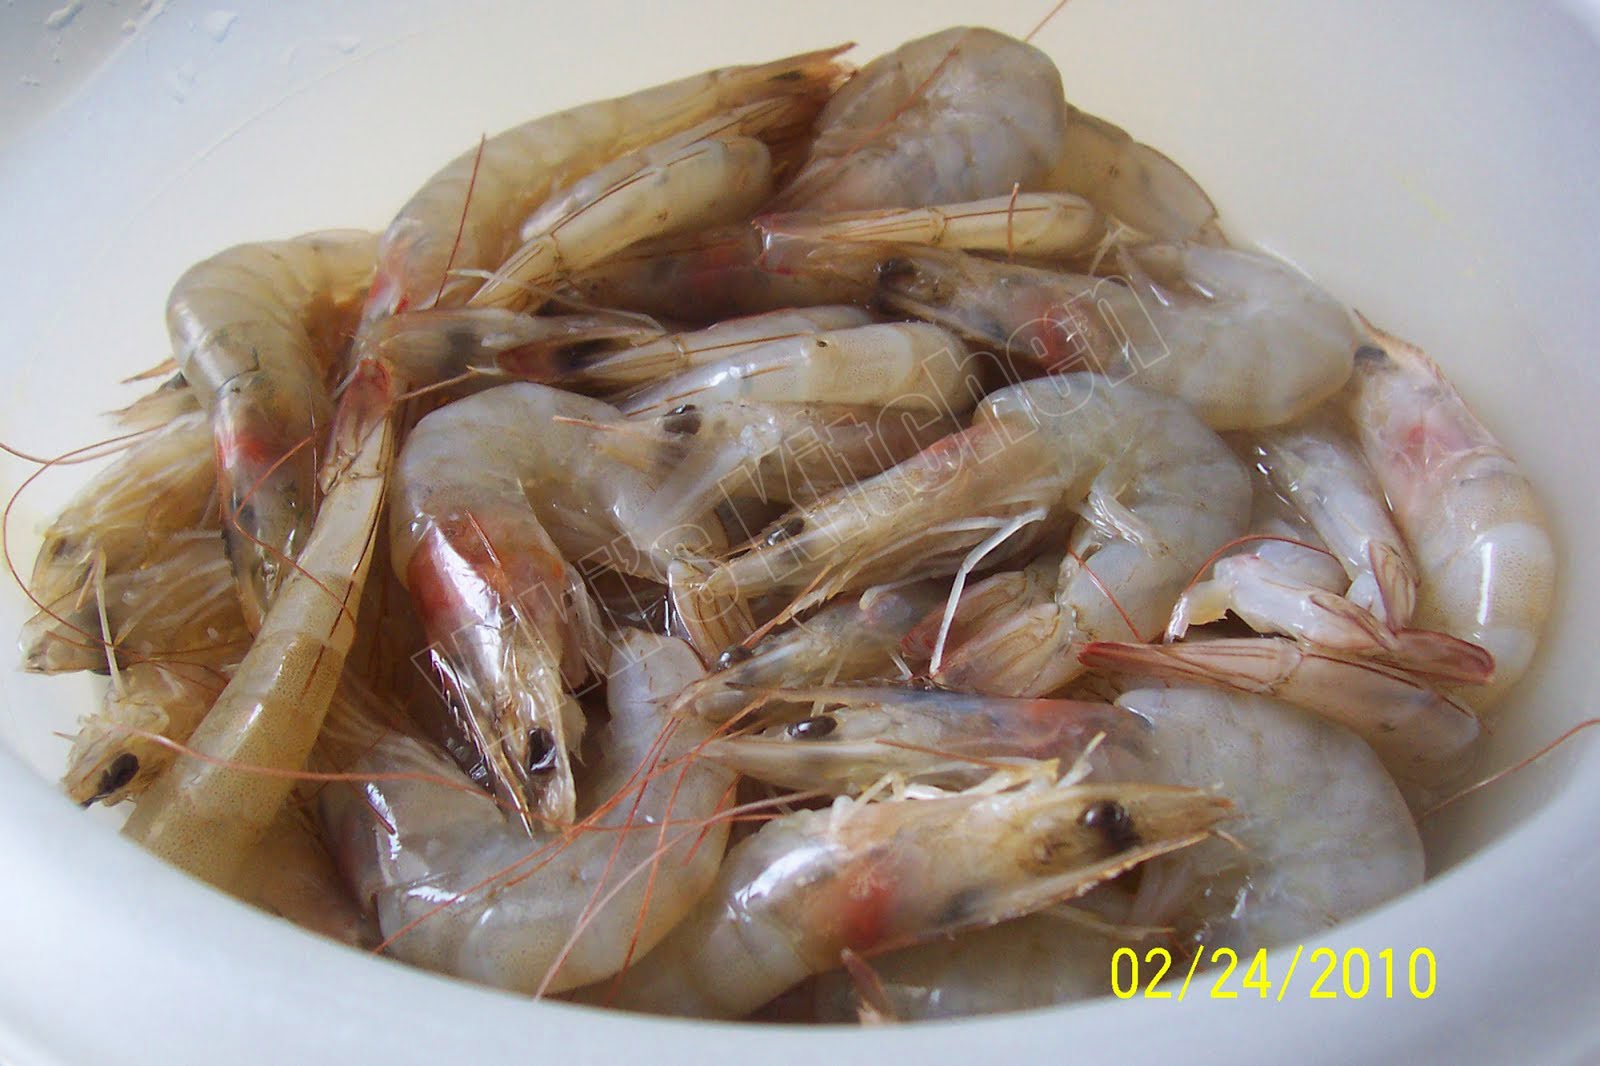
Fresh whole shrimp
                             

Shrimp taken out of shell
Shrimp head curry with potatoes.

Ingredients:
Shrimp - 1/2 kg
Onion - 1
oil - 1 tbsp
tomato - 2
curry leaf - 2 sprig
green chilly - 2 slit
mustard - 1 tsp
sea salt - to taste 
chopped potato - 2

Masala to grind:
shredded coconut - 1/2 cup
cumin - 1 tsp
shallot - 4
fennel - 1 tsp
red chilly powder - 1 tsp
turmeric powder - 1/2 tsp
coriander powder - 3 tsp

Preparation:
Buy fresh small or medium size shrimp. (Larger variety prawn / shrimp may taste bland - my opinion only). Separate the head portion and keep aside. This head part has some juicy fleshy parts too. 
 Remove the shell , keep it separate. 
Remove and throw away the intestines (green stuff seen at back of shrimp). 
Now we got our usable portion of shell and flesh of shrimp separated.
Keep the shrimp for further cooking separately
Now rinse the shrimp head and keep it for kulambu.
Rinse the remaining shell with legs and put in a mixie jar. Pulse it few times and crush it. Extract juice out of it using a cup of water.Repeat it twice to get the most of the juices. Discard the crushed shell.  Keep aside.

Method: 
Heat oil in a deep wok.
Add mustard.
After mustard gets cracked, add finely chopped onion, curry leaf.
After sauteing it for a minute, add chopped tomato and saute till it gets mushy and caramelized.  Add potato cubes.
Cook this closed with  1 cup water.
Peel the garlic, shallot and grind the masala together to a fine paste with some water. 
Add  prepared masala, green chilly, curry leaf and bring it to a boil.
Then add the cleaned shrimp head and the extracted shrimp juice.
Boil it for 5 minutes and see that the raw smell goes off. 
The curry would have started to smell very delicious now. Then switch off.
Shrimp head curry / era thalai kulambu is ready! 

Serving suggestions:
Serve this curry over rice as main course along with  shrimp pepper fry or shrimp thokku or shrimp roast or shrimp kebab.

Saturday, May 21, 2016

Cool salad

All salads are supposed to be easy to cook and cool to consume. But somehow they start getting more makeovers with store bought dressings and toppings. Though I like all kinds of dressings, I make the below version of salad more often as it needs only a few ingredients.
Enjoy !

Cool cool salad

Salad dressing : Olive oil, lemon juice, honey, salt, pepper

Red / purple cabbage.


Ingredients:
Chopped purple cabbage -  1 cup
lettuce - 3 leaf
onion - 1/2
tomato - 1
canned olives - few
cucumber - 1
cilantro - few

dressing:
Lemon - 1/4
honey - 1 tbsp
salt - to taste
extra virgin olive oil - 1 tbsp
pepper powder - to taste.
Mix everything in a bowl and keep aside. we can keep this handy in fridge and it would be much helpful, if we have to pack this for lunch.

Method:
Rinse the vegetables and remove the water completely. Chop the tomato, cucumber, cabbage , onion and lettuce into bite size pieces. Keep them in a bowl inside fridge or in a serving container. Before serving add the salad dressing, minced cilantro.  Toss well.

Serving suggestion:
Serves 3 to 4 people.
I use the leftover salad as sandwich-stuffing.

Sunday, May 8, 2016

Wheat paniyaram (baked)

When I saw this cake pop maker in Aldi and the first thing that came to my mind was kuzhi paniyaram. It was almost sold out as USA's cake pops are popular. The nice cashier lady asked me if I am going to try any Indian recipes using that and also told me that her mom has started making spicy paniyarams. I told her that that's the idea :)
That weekend I made a  'whole wheat paniyaram' (just like  unniappam). It took only 5 minutes to prepare the batter. By that time I started preheating and poured the paniyarams and baked everything within 30 minutes.
Now I am pretty sure that this cake pop maker can be used to make any kind of paniyaram by baking and the best part is this baking needs very little oil only. 
This is not an ad for cake pop maker machine but I tell you all how much this equipment is useful in creating Indian dishes too :)  So, what is the difference between baked paniyaram and one that is cooked in a non stick pan ? Almost the same..... if we are using the usual rice batter, but this baking process helps us make our own version of paniyarams using various healthy ingredients.


Here is the 'baked kuli paniyaram' for you all !

Ingredients:
Whole wheat flour - 1 cup
ravai (sooji / semolina) - 1/4 cup
Indian brown sugar (jaggery / vellam) - 3/4 cup 
ripe banana - 1 
salt - 1/4 tsp
baking soda - 1/4 tsp
oil - few drops

Method:
Mash the banana in a wide mixing bowl. To the same bowl, add wheat flour, semolina, jaggery, salt, baking soda,  fruit salt or orange juice or curd 1 tbsp, 
Grease the non stick paniyaram pan or electric cake pop maker with one or two drops of ghee or oil.
I used an electric cake pop maker. If you are using a stove top paniyaram pan, the click to see 'how to make kuli paniyaram'.

The following instructions are for electric cake pop maker. 
Grease the lower plate of the pan. The upper plate may not need any greasing.
Switch ON the cake pop maker and preheat for 5 minutes.
Then using a spoon carefully fill the bottom holes upto 3/4 th. 
Close it. Let it cook for 6-7 minutes.  Insert a toothpick and see if it comes out clean. The paniyaram would be baked perfectly. No need to flip. Just take out using a wooden skewer or plastic fork (no metals).
Whole wheat sweet paniyaram is ready !

Serving suggestions:
Time taken less than 30 minutes.
Number of paniyaram : 30 (tiny size)

Thursday, March 10, 2016

Bok choy stir fry

Bok choy also known as Chinese cabbage belongs to the cabbage family. Unlike cabbage , the greener leaf tastes mildly like kale or drumstick leaf (my view) and the white stems taste like lettuce. This is one vegetable that is always sold in the nearby Asian store. So I buy this and simply make a stir fry by water-saute method. It can be enjoyed as a side dish or added to cooked noodles too.

The recipe is very straight forward and even a child can do this :) I hesitated to write it as a post, but still wanted to show how cooking can be done quicker and healthier too.


Ingredients:
Bok choy - 4
water / olive oil- 1 tbsp
salt and pepper - to taste
lime / lemon - 1/8 of  a fruit.

Method:
Rinse the bok choy thoroughly (no need to separate the stems).
Chop to 1 inch pieces.
Heat water or oil in a wok.
Add the bok choy and saute without closing the lid for 2 minutes.
Switch off.
Add lemon juice , salt, pepper.
Bok choy stir fry is ready !

Serving suggestion:
Serve as side dish.
Add to noodles or pasta, just like spinach.

Sunday, February 14, 2016

Protein rich laddu

This is my own version of a homemade protein bar (say protein ball) / சத்து மாவு உருண்டை , which I prepare whenever we need to buy a snack bar. Hope my readers like it too.

Happy Valentines's day !
Snack balls.

keep it covered to prevent drying.

Ingredients:
Almond - 10
green gram - 1 cup
puffed channa dal - 1/4 cup
peanut  - 1/2 cup
brown sugar - 3/4 cup
ghee / coconut oil - 2 tsp
coconut - 1 tbsp
salt - 1/4 tsp
cardamom powder  - 1/4 tsp
dry ginger powder - 1 tsp

Method:
Dry roast the almond in a frying pan (or microwave 1 minute) and let it cool.
Dry roast the green gram in a frying pan in low heat till it smells good (takes nearly 5 minutes).
Then take it out and let cool.
In the same pan, dry roast the shredded coconut, peanut separately.
Let everything cool.
Grind together everything to a fine powder except sugar and butter.
In the same pan add the brown sugar, heat at low with 2 tbsp water and dissolve. Switch off.
Add the powder , cardamom powder, ginger powder and mix with a spatula. If needed add few drops of coconut oil and mix well. Let cool.
Make lime size balls. Apply little ghee or oil in palm to get a smooth ball.

Serving suggestion:
Serve as snack or dessert.
We can use honey instead of brown sugar too.
It can be kept at room temperature for up to 2 days and after that keep refrigerated up to a month or more.
Makes nearly 20 balls.

Wednesday, February 3, 2016

Aloha bread

It has been my long time wish to bake some soft buns like the sweet buns of India. Then I got this interesting recipe that uses pineapple juice. I think the pineapple is the reason behind the name Aloha bread.  Recipe coutesy: Lovefoodies.com. My sincere thanks to the author. Now I have learned 'how to make a soft bun that melts in mouth'.
I have modified the original recipe a little bit.
While making these buns, I took out some of the dough and stuffed it with coconut +sugar +cardamon and some dry fruits, so that it tastes like coconut bun (thengai bun) for snack.
 Here goes the recipe
Aloha bread


I suggest using this yeast for soft breads.


Proof the yeast.

Butter (melted), milk, pineapple juice, eggs, salt, sugar, vanilla


Add the flours , yeast solution, milk mixture to mixer

Mix at speed 2-3 with dough hook for 5 minutes

keep it covered with cling wrap and let the dough rise in  mild warm place

The dough is risen after 1 hour
Divide it into small balls and place on baking tray

Cover with a wet clean towel coated with AP flour

For our pleasure, I baked a coconut bun using 2 dough balls

coconut stuffed Aloha bun

After 30 minutes, the buns would double in size (second rising)

Bake at 350 for 20- 25 min

Aloha bread is ready

Coconut stuffed Aloha bread is also ready !

hubby dear clicked this photo for me...this is the best picture ever...love the way he care for my simple joys too ☺ 

So the first piece goes to ....my hubby dear ☺

This is Xav's most favorite ☺

Coconut Aloha bread
Aloha bread 

Ingredients:
Bread flour / All purpose flour - 4 cups + 2 tbsp
Wheat gluten (optional) - 1 tbsp
pineapple juice - 1/2 cup
vanilla essence - 1 tsp
milk - 1/2 cup
egg - 2
Sugar - 1/3 cup
butter - 1/4 cup
salt - 1/2 tsp

for yeast proofing:
yeast - 1 sachet (1.5 tbsp)
sugar - 2 tbsp
water - 1/4 cup
Bring water to lukewarm temperature. Add sugar, salt, yeast mix well. Let it rise for 5 minutes. If it didn't rise in 5 minutes, then discard that solution and start again. Care should be taken in lukewarm temperature and freshness of yeast. That is the secret behind soft breads.


Method:
If using fresh pineapple (which I did), then crush it and make juice in a blender. I used 1/2 cup of pineapple pieces.
Add the yeast mixture, pineapple juice, egg, molten butter, milk, vanilla, salt, sugar in the bowl of stand mixer. Beat everything together (using a fork manually or beater).
Fix the dough hook to the mixer.
Add flour, gluten and knead at medium speed for 2 - 3 minutes. If needed add little flour or juice and knead again till the dough gets soft , little sticky at bottom. Add little butter and knead everything together to a ball.  Switch off.
Cover the bowl using a cling wrap. Keep for 1 hour in warm place to double in volume.
Divide into small balls (20). Place on baking pan. Cover with damp clean towel. (Keep some towels for baking alone)
Let it rise for 30 min.
Preheat oven to 350 deg F.
Place the baking trays. Spray the oven with some water.
Bake for 15 - 25 min.
Check after 15 min and if needed bake for 5 more min.
Brush with butter and keep for 5 min to get a gorgeous top.
Sweet Aloha bread is ready !

Serving suggestions:
Makes 24 buns.
We used it just like pav buns and it tastes delicious with pav bhaji.
Or serve as breakfast along with butter.

Thursday, January 28, 2016

Kappa kizhangu (Tapioca) chips

Kappa kilangu / Yucca root / Tapioca / Mara valli Kizhangu / Yezhu ilai kilangu fries.

Kappa kilangu chips or Kuchi kilangu chips is one of my most favorite snacks. In India it was not necessary to make this at home, as we could get it anywhere.  This is a popular street food in Tamilnadu and Kerala. There we can see guys frying these chips in the street corners along with plantain chips and selling in carts. Many years back I heard a few tips on this recipe from a friend. She was the one who told me that this chips should be made after parboiling the roots. Before that I tried peeling the raw yucca root and believe me,  it needs more energy. But parboiling makes the peeling so much easier. So I highly recommend doing that step before peeling the tapioca root.
We can buy this yucca root in all American grocery stores . Mostly it costs around 79 cents / lb . Few months back I made this 'kuchi chips' and it tasted extremely fresh , crispy and delicious. I love the way hubby dear enjoyed it ☺and I will say this is worth a try ☺
Kappa kuchi chips

Yucca root / Tapioca / Mara valli kilangu / Yelu ilai kilangu / kappa kilangu
Cut into 2 - 3 inch long pieces

Parboil the kappa kilangu

Remove the skin

Make very thin slices

kappa slices

Fry the kappa kilangu in small batches
Drain oil in a paper towel

Add salt, red chili powder and devour this crispy yucca fries.

Ingredients:
Yucca root (kappa kilangu) - 1 lb (1/2 kg)
Oil - for deep frying
Salt - to taste
red chili powder - 1/2 tsp

Method:
Cut the yucca root into 2 to 3 inch long pieces.
Bring a large pot of water to rolling boil.
Add the yucca root pieces. Keep boiling and cook for 2 - 3 minutes (so that peeling is easy).
Drain the hot water and add cold water (room temp).
Using a knife peel off the skin.
Cut it into small strips and then cut it into thin long pieces (thinner than French fries).
Heat oil in a frying pan.
Fry the yucca chips in small batches in medium heat.
Take out, keep in kitchen paper towels and drain oil.
Then put all the fries in a container. Add required salt, chili powder and shake well.
Let cool completely and keep in airtight container.
Kappa kilangu chips is ready!

Serving suggestion:
Serve as snack.

Tomato rice in Briyani Flavor

Tomato rice in home style was the first tomato rice we all used to take to school (in my childhood). Then afterwards it was jazzed up by our...