Monday, May 7, 2018

Kitchenaid hand blender and Keerai masiyal

"And sometimes we all say a million reasons why we cook an elegant meal....for the love of someone, for the kid, for charity, for a party , for testing a new gadget etc, but the real reason is we all  love cooking , cooking excites us, it cools the hunger and, in simple words....cooking makes us feel like an artist"

This is another comfort food from the basic Indian cooking. The greens are indispensable in a well balanced Indian menu and much praised for the health benefits.
Generally the arai keerai and siru keerai (smaller leaved amaranth) are good for this blending recipe. I have used spinach here.  

In this recipe I have used the kitchenaid hand blender to mash the 'hot spinach'. In Chennai I used to blend the keerai, using a small rough clay vessel and a wooden pestle ( In Tamil - keerai kadaiyum mann pathiramum , mathum). That traditional clay vessel imparts an earthen flavor to the simple keerai masiyal.
Nowadays Indian mixie is used to prepare this masiyal , palak paneer, pavbhaji masala, soups, dals and all those dishes that needed a good mashing. But the drawback is, everything we put in mixie should be cooled to room temperature to avoid them gushing out while grinding. So we have to wait till its cool. Then we have to heat it once again before serving. This multi heating and long hours of wait can be thwarted by using a hand blender.

A hand blender is handier than an ordinary mixie, as we can blend the hot contents right out of the stove and we can serve immediately without reheating. That's the best feature I like about hand blenders. 
I prepare keerai masiyal on almost all weekends along with fish curry or sambar rice and I palak panneer once a week. So this is one of my favorite gadgets.

I bought this some 2 years back from Kohl's in the Kitchenaid section. Since then I have been using it almost twice or thrice a week. I would say this is sturdy, pretty and useful.

 I am an avid fan of Kitchenaid equipments. Just like the old fashioned stand mixer (which I absolutely love), this blender is gorgeous and an useful tool for all who love to cook. 
Kitchenaid hand blender has been an all time  favorite among chefs and homecooks. Mostly it is used to prepare soups, mashed potatoes, mixing hot stuffs in the western world. Just like that the Indian kitchens also need a hand blender nowadays for those busy hands.

Hope you all fall in love with this pretty hand blender !
Vanjiram meen kulambu (king fish curry),  fish fry , rice, mango, spinach 


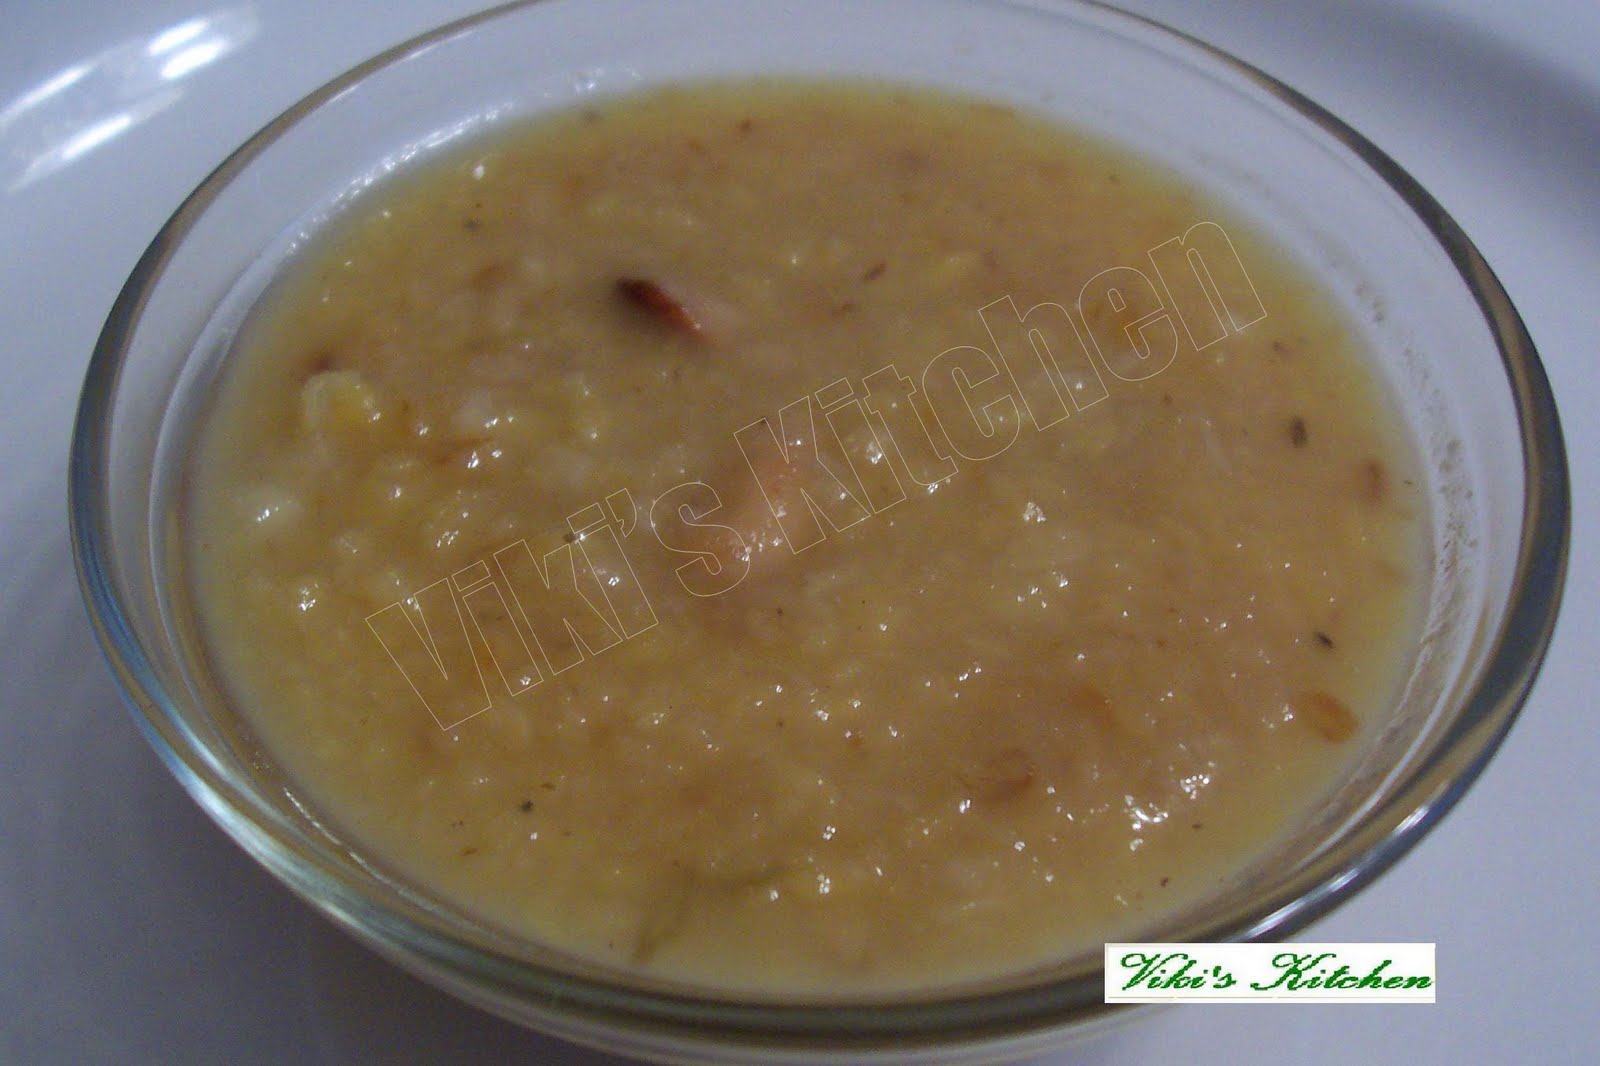
Keerai masiyal with rice, fish curry and fish fry

Using Kitchenaid hand blender for mashing pav bhaji masala.

Controlled mashing is a good feature of hand blenders.


Ingredients:
Spinach- 1 bunch (300 gm approx)
water - 1/4 cup
shallot - 2
green chilly - 2
garlic - 4 pearls
cumin seed - 1/4 tsp
salt - to taste (very little only)
Lime (sunnambu) - a very small pinch (optional)

Method:
While as a bunch, trim off the hard stem side and take the spinach leaves. Rinse thrice or more times and clean the leaves well.
Take a narrow wok and bring to boil 1/4 cup water. Remove the skin of shallot and garlic. Add them to the boiling water along with the chillies, cook till they get soft. Add the spinach and cook them without closing the lid. 
After a few minutes, gently turn the whole lot and cook the other side too.
Check the stems if they are cooked. Wait till all the moisture is gone and put off fire.
Add cumin, salt and blend in a mixer to a coarse paste using a hand blender.
(Just two or three pulse is enough).

Serving suggestions:
Serve as side dish with rice or as a curry over rice.
We generally prepare this masiyal along with fish curry and rice.

Note:
In my native place , they add a pinch of lime (calcium oxide , that we use along with pan leaves)while blending to get more nutrition. Its purely optional here.
No tadka / tempering is necessary.

Some folklore from my native place (arai keerai / small amaranth):
This masiyal can be prepared with black pepper instead of green chillies and consumed daily to reduce the obesity. 

Example of recipes that can be prepared quickly using a hand blender  in Indian cuisine:
Mashed dal, Soups, Pavbhaji masala, Kheers, Palak paneer, mashed spinach, mixing hot stuffs for samosa,  baby foods, pureeing etc.

Saturday, January 13, 2018

Happy Pongal

Wishing all a very happy and prosperous Pongal,


Pongal recipes:
Rich Sarkarai pongal
Sarkarai pongal
Pongal avial
Pongal puLi curry
Venn pongal 
Ketti paruppu 
Easy cooker Pongal


May this Pongal festival brings peace, good health, success, cheer, prosperity and every happiness
Happy Pongal! 
Love, 
Viki Xavier 

Wednesday, January 10, 2018

Mango custard fruit salad

Here is a very easy recipe to start the new year ....a new dessert !

Mango custard fruit salad is my newest innovation and I love it as a substitute for the original fruit custard salad.


Mango custard fruit salad


Ingredients:  (makes 8 - 10 servings)
Mango puree - 1 cup
Custard powder - 2 tbsp
milk - 1 cup
condensed milk - 2 tbsp (optional)
powdered sugar  or sugar - 4 tbsp (to taste)
mixed fruits - 2 cup 
(apple - 1/2 , pear - 1/2, banana - 1, seedless grapes - 10, pomegranate - 1/2 cup, dates - few)
cardamom powder - 3/4 tsp

Method:
Peel the apple, pears, pomegranate. Chop the apple, banana and pear into bite size cubes and keep aside. chop dates, grapes and keep aside.  Keep aside in fridge.
Bring milk  to boil  
Dissolve the custard powder in few tbsp of cold milk and add to the boiled milk. Start heating and cook for 2-3 minutes or till the custard gets thickened. Now add mango puree.
Add required sugar, condensed milk , cardamom powder.
Let cool completely.
Add chopped fruits and pomegranate arils. 
Keep refrigerated for 2-3 hours or till chilled.
Mango Fruit custard is ready!

Serving suggestions:
Serve chilled as dessert.

Note:
I am suggesting condensed milk, as we generally have fat-free milk only at home,  and adding condensed milk makes it rich.
Instead of fresh fruits, we can use canned fruits too, to save time.
Using a vegetable chopper to chop fruits will minimize the prep time.
This salad can stay  fresh for 3 days inside fridge.

Monday, January 1, 2018

Happy New year 2018

Wishing all a beautiful, happy , healthy, wealthy , Prosperous and peaceful , blessed New Year , May  God bless and protect us all.  
May goodness prevail all over.


Love,
Viki Xavier.

Wednesday, December 20, 2017

Christmas recipes

Hi friends,
I am sure everyone has great plans for Christmas. Along with the Christmas decorations, Church schedules,  and shopping comes the cooking plan. We all wonder and think of many many recipes, but still the family's vote goes for our usual successful recipes That too native recipes stay in our menu forever. As we both are from Tirunelveli, our town's recipes comes to our minds first. Every year Xavier gives me a long wish list Here is that list ! Enjoy !

Merry Christmas !

Christmas plum cake (Indian style)


Plain vanilla cake


 Butter biscuit (Sooji berry biscuit / benne biscuit) :


Gingerbread cookies:


Orange butter cookies:


Susiyam:


Athirasam:


 Munthiri kothu


Porikadalai laddu:


Pineapple Kesari


Spicy snacks:
Butter Murukku


Coconut milk murukku


Thattai


Oma podi (sev)


Kara sev:


Ulunthu vadai


Paruppu vadai


Breakfast:
Aappam (rice pancake)


Lunch:
Turkey biriyani


whole fried chicken


Dindigul chicken biriyani (in cooker)


Tirunelveli mutton varuval


Egg kuruma (Tirunelveli style)


Stuffed egg (keeru muttai)


Dessert : (Paruppu Payasam)


Merry Christmas !


Friday, December 8, 2017

How to make Roti dough in kitchenaid mixer ?


Ingredients:
Whole wheat flour - 3 cups
oil - 2 tbsp
salt - 1/2 tsp
water - almost 1 1/2 cup

Method:
Put flour and salt to the bowl of mixer.
Fix the bowl to the stand mixer.
Attach the dough hook to stand mixer.
My mixer is pro 600, so I lifted up the bowl and fixed it.
Now start in lowest speed to mix well for less than 30 seconds.
Add 1 cup water.
Slowly increase to 2 and 3 speeds.
Then I always set it in speed 4 or 5 for making the dough.
Add required water and let it run for 2  more minutes.
Almost within 3 minutes and 30 secs the dough will be ready.
The dough should be stiff enough to roll roti / chapati but soft and pliable (not sticky),
Then add oil and run for few seconds more.
The dough will be ready .
Switch off, take out and keep inside an airtight container. (or) we can start preparing roti right away.

Chapati / roti dough is ready !

Click to see chapati recipe.

Thursday, December 7, 2017

Pizza with perfect crust

Though I have posted few pizza recipes earlier, getting a perfect crust recipe  was always in my 'to learn' list.  My hubby is a person who will  eat only the best of the best and so his reviews have made me improve my cooking skills since the day we got married :) So I try, try and try, till I get the best version in all my recipes. If he has approved it then it becomes my 'blog worthy' recipe :)
I prepared this pizza last Friday evening for dinner. It resulted in a 'large size pizza'.  In my view , it would be more than enough for 2 people. As always we shared our weekend special meal with our neighbor aunty and we all loved it very much.  After many of my pizza attempts, this is the one, my  hubby dear love the best :) So I am sure this is recipe is a keeper. Anyways, after finishing that he said that, "next time just make a cheese pizza  ...ok :) too much veggies :) ". 😀😀😀😀😀 

I love this recipe very much. So I am narrating this post as a best medium-thick crust pizza (not too thin and not too thick, just like the way we love it).
Here in this recipe I have made the crust like a bread dough (rising the dough twice) and I think that's the secret behind the uniformly successful ones.
I prepared the dough using a 'kitchenaid stand mixer' and I am sure hand kneading also would bring closer results.
Also , always be careful on  the 'lukewarm water'  temperature. The yeast should froth within 10 minutes.  Keep in mind to use the yeast within 2  months after purchase and keep it refrigerated always. If the 'proofing of yeast' is successful, then the baking would be definitely successful.
Homemade pizza slice
Vegetable toppings 

Ingredients

Sauce I made for pizza

Before the yeast rises

After 10 minutes of yeast proofing.

Kneading the dough

The pizza dough 

After 1 hour of rising

After second rising

Flatten the dough to pizza shape

Bake for 5 minutes

Apply sauce

Add toppings

Add cheese

Baked pizza


Pizza crust:
lukewarm water  - 1/2 cup
olive oil  - 3 tbsp
1 sachet active dry yeast (1.5 tablespoon approximately) 
salt - 1 tsp
sugar - 2 tsp
All purpose flour - 2 1/2 to 2 3/4  cups
garlic powder - 1 tsp

Method:
Microwave the water for 10 seconds (0r) just get the warm water from tap.
Add the  oil, yeast, salt, sugar and keep it for 10 minutes.
It will become frothy.
Mix this with flour and garlic powder.
Knead to make a soft dough. We can knead the dough in a kitchenaid mixer. Use the dough hook and keep the speed at 4 or 5.
Coat the dough with little oil and cover with a damp cloth. Keep it in a tight vessel and keep it for 1 hour inside a warm place (I preheat oven to 150 F for 5 minutes).
Let it raise for 1 hour. After 1 hour , the dough will triple in volume.
Punch and knead again. Keep it to raise again for one more hour.
Now also the dough will raise.
This is the perfect pizza dough. We can prepare the dough and keep it in fridge for 1 or 2 days or we can use it immediately.

Sauce:
tomato puree (from can) - 1/4 cup
sugar - 1 tbsp
hot sauce - 1 tbsp
salt - to taste
Italian seasoning - 1 tbsp
garlic powder - 1 tsp
crushed red pepper - a pinch
fresh basil leaf - handful (chopped)

Mix this in a bowl and keep aside. Or just use a 1/2  cup of store bought sauce. My neighbor aunty would add tomato ketchup + hot sauce + seasonings only. 

Pizza topping:
Shredded mozzarella cheese - 1 /2cup
Parmesan cheese - 2 tbsp
red onion - 1/2 (sliced thinly)
red capsicum - 1/4 cut in to small pieces
Jalapeno pepper - 1/2
pickled yellow pepper - 1
olives - few
  
Slice and keep the vegetables ready.


How to bake a pizza?

Preheat the oven to 375 F for 10 minutes before we start baking.
Pizza chefs know a lot of skills to prepare a flat bread. But I have only one trick. I just place the dough on a pizza baking tray and flatten it using a rolling pin or by hand.
Then apply a little oil over the flattened dough., spread it. Using a fork prick a few times all around.
Bake it at 375 F for 5 minutes.
Take it out.
Spread the prepared pizza sauce.
Spread the prepared toppings and cheese.
Bake at 375 F for 12 - 15 minutes, until fully cooked,

Take out. Slice and enjoy while it is hot.

Potato fry (Urulaikilangu varuval)

Potato fry (urulaikilangu varuval) is a famous but simple side dish in Indian cuisine. This can be prepared in a jiffy and a staple in many ...