Wednesday, September 22, 2010

Malai kofta curry

'Malai kofta' means 'Indian cottage cheese balls (paneer) served with a rich creamy non spicy gravy'.

Some time ago I prepared this malai kofta curry with the help of Sanjeev kapoor's and Vah chef's recipes. I used Sanjeev kapoor's version as it involved lesser vegetables but followed vahchef's instructions. His videos made me understand the difficulties in keeping the koftas in shape while frying (yeah, that's a big challenge here!). Click here to see the Vahchef's video. Thanks to the two great chefs, I have learned to make a famous Indian gravy.

Malai kofta dough prepared.
Ingredients:
For kofta:
Paneer (shredded) - 1 cup (100 gm)
(I made it at home by using 4 cups of 2 % milk).
Potato (3 numbers,boiled, peeled and mashed) - 2 cups (200 gm)
green chillies -4
All purpose flour - 1/4 to 1/2 cup
cashew - 4
raisin - 20
salt -to taste
oil (to deep fry) - 1 cup

Pressure cook the potatoes, peel and mash them.
Mix the crumbled paneer, finely chopped green chillies, broken cashew, raisin, salt and mix well.
Add all purpose flour (maida) little by little to get a thick but soft dough.
Knead well and keep aside.

Koftas before frying.

Now keep 1/2 cup of all purpose flour in a separate dish.
Take a small (strawberry size to lemon size) ball of dough. Make a spherical shape and dip it in maida flour. Then carefully pat to get a bullet shape.
Keep aside.

Koftas are fried now . I made a big batch and froze 2/3 of the above for further use.

Heat a wok with 1 cup oil and deep fry the cheese koftas carefully in low fire. They may tend to break if the dough is not proper. Otherwise we will get the exact shape.
( Keep in mind how the cheese on pizza melts with temperature. Likewise paneer is nothing but a kind of Indian cheese and hence it will also tend to disintegrate while frying.  So flip very carefully. Fry only one and check for the consistency. If needed add more all purpose flour to get a very thick dough, like the chapathi dough. Moreover the whole frying process should be done in very low flame).

Fry all the paneer koftas and let them cool. While hot,  they will be soft and can be easily broken. So wait till they cool.

After cooling we can freeze the koftas and use whenever required.

Malai kofta curry with a dollop of cream.

For curry:
onion - 1 cup (chopped)
almond, cashew - 5 each
tomato - 2
cilantro , mint - handful,each.
garam masal powder - 1 tsp
red chilly powder - 1 tsp
ginger garlic paste - 1 tsp
salt - to taste
milk - 1/2 cup
butter - 1 tbsp
whipped cream - 2 tbsp

Method:
Microwave or cook the onion, tomato, cilantro, mint with 1/4 cup water, let cool and grind along with cashews, almonds to a fine paste.

Heat 1 tbsp butter in a wok. Put the bay leaf followed by the ginger garlic paste. Then add the puree and saute till raw smell vanishes.

Add masala powder, red chilly powder, milk, salt and bring it to a boil.

Check the taste and keep aside.

Before serving reheat the gravy and drop the prepared koftas. Top with the whipped cream.
Serve carefully without disturbing the koftas.

Serving suggestions:
Serve as side dish with any Indian bread like naan or roti.
Makes 25 small size koftas.

Tips:
Generally people add koftas to the curry just before serving, to avoid broken ones.
 I found that the koftas if prepared carefully stays in shape for 4 to 5 hours in the gravy, just like restaurant ones . But microwaving the whole dish may make the koftas crack, so if needed heat in stove top without stirring.
Do not defreeze them in microwave. Just leave them in room temperature or drop in hot gravy.

Monday, September 13, 2010

Sambar Podi (Tamilnadu style)

Sambar and Indian cuisine are inseparable. Sambar is a dhal based curry prepared with certain vegetables and poured over rice. The flavor and color of a typical sambar relies on the sambar podi (podi means powder). So it is a must to prepare a good quality sambar. In India the masala powders are normally ground in a dry mill. The house lady has to make several batches of the dry ingredients and pack them to the mill through some housemaid.

After marriage, I lost the interest to prepare the masala powders at home because of several reasons.  First I could not make our modern maid to carry all the containers to a grinding mill as we do in our parent's house and I too shied to carry them all along that streets:) Then our need was so small to imagine. So I started buying Sakthi masala powders in the beginning and somehow it became a habit of me. But recently I was forced to prepare this authentic sambar powder due to a misplaced shopping list and hence I prepared it in a small quantity (see below) for that month. It turned out much easier and I couldn't control my joy on tasting my mom's sambar after a very very long time. The flavor of the sambar powder not only filled our house but also our hearts too:) Nowadays home made sambar podi has totally replaced that convenient sachets in my house.

Here is that authentic sambar powder recipe.

Freshly prepared Sambar powder.

Ingredients:
coriander seed - 2 cup
dry red chilly - 2 cup
(or chilly powder - 3/4 cup)
cumin - 1/4 cup
black pepper - 1/4 cup
fenugreek (methi / venthayam) - 1 tbsp
mustard - 1 tbsp
turmeric - 1 tsp
asafoetida - 1 tsp
channa dhal - 3 tbsp
urad dhal - 3 tbsp

Method:
The red chilly I have mentioned here is for basic need only. Mostly I prepare my sambar podi without red chillies and add the red chilly powder while making sambar. By this we can avoid the hastle of powdering red chillies and also we can alter the chillies according to need every day.
Heat a wok and dry roast all the above separately (except turmeric, chilly and asafoetida powders). Dry roast the dry chilly in  batches at last , to avoid sneezing. Take out and keep them together in a broad plate (or muram , a very broad winnowing tool / basket).
After they cool completely, grind them to a fine powder. Then spread the powder in a broad paper and keep in room temperature to loose the heat generated during grinding, otherwise the powder may turn black. Store it in an air tight container.

How to use this powder?
Makes nearly 2 cups of powder. This powder can be used in making all kinds of sambar, vatha kulambu, idly sambar, poriyal etc. It will be enough for 2 adults for 2 months. If stored in freezer / fridge, this podi remains very fresh and fragrant.

To make sambar with 1/2 cup toor dhal, use 1.5 tbsp home made sambar powder.

---------------
சாம்பார் பொடி செய்ய தேவையான பொருள்:
கொத்தமல்லி விதை  - 2 கப்
காய்ந்த மிளகாய் - 2 கப்
(அல்லது மிளகாய் பொடி  - 3/4 கப்)
சீரகம்  - 1/4 கப்
மிளகு  - 1/4 கப்
வெந்தயம்  - 1 மேசைக்கரண்டி
கடுகு  - 1 மேசைக்கரண்டி 
மஞ்சள் தூள்  - 1 தேக்கரண்டி
பெருங்காயத்தூள்  - 1 தேக்கரண்டி
கடலை பருப்பு - 3 மேசைக்கரண்டி
உளுந்தம்பருப்பு - 3 மேசைக்கரண்டி

மேலே கொடுத்த அனைத்து பொருட்களையும் தனி தனியே வாணலியில் வாசம் வரும் வரை வறுத்து , ஒன்றாக சேர்த்து அரைக்கவும். காய்ந்த மிளகாய் உபயோகிக்காமல் மிளகாய் தூள் உபயோகிப்பது , நம் சுவாசத்துக்கு நல்லது. கார நெடி பிடிக்காதவர்கள் மிளகாயை வறுத்து  அரைப்பதை தவிர்த்து, மிளகாய் தூளை லேசாக சூடாக்கி , சாம்பார் பொடியில் சேர்த்தால் மிகவும் சுவையாகவும், செய்முறை  எளிதாகவும் இருக்கும். 

--------------
சாம்பார் செய்முறை:
1/2 கப் துவரம்பருப்புக்கு 1 1/2  தேக்கரண்டி சாம்பார் பொடி  சேர்த்தால் போதும் .
பருப்பு வெந்த பின் , காய்கறிகளை வேகவைத்து , இந்த சாம்பார் பொடி  சேர்த்து பருப்புடன் சேர்த்து கொதிக்க வைக்க வேண்டும்.
நெய் சேர்த்து தாளித்தால்  , சாம்பார் ரெடி.

Thursday, September 9, 2010

Malli Puthina thuvaiyal

(Malli - cilantro / coriander leaf; puthina - mint leaf; thovaiyal - chutney)

Malli Puthina thuvaiyal is a thick chutney, normally prepared using a hand mortar (ammi in Tamil). It is a very common chutney in Indian household. The mint leaf and cilantro (coriander leaf) are known for their medicinal values. This chutney combines both in a more delicious way.
There are so many variations in making this simple chutney. I am noting down my mom's version.

Malli Puthina thuvaiyal.

Ingredients:
Mint leaf - 20 branches (small bunch)
cilantro - 1/2 the quantity of mint leaf
green chillies - 5
tamarind - a blueberry size
garlic - 1 clove
cumin - 1/4 tsp
salt - to taste
To temper:
mustard seed - 1/2 tsp
black gram - 1/2 tsp
sesame oil - 2 tbsp + 1 tbsp
curry leaf - 1 sprig

Method:
Pick leaves and young stem from the cilantro bunch. Take the leaves alone from the mint bunch.
(Refrigerate and Store the mint stem for tea).
Wash and clean the leaves. Care should be taken to remove all the sand particles in the leaves.

Heat 1 tbsp oil in a wok. Add the black gram and let it get mild red color. Then add the cleaned leaves, green chilly, garlic, cumin and fry till the leaves wilt.
Switch off and let it cool. Add salt, tamarind and grind it to a fine paste with minimal water.

Now heat 2 tbsp oil in the same wok. Slide in the mustard and let it crackle. Put the curry leaves and the fry it. Then carefully slide in the chutney. Stir well till oil oozes out and reaches an almost thick stage (as shown in figure).

Malli puthina chutney is ready!

Serving suggestions:
Serve as side dish with chapathi, idly or dosai.
I prefer this chutney with most of the variety rices (chithrannam) like tamarind rice, lemon rice, curd rice etc.
If prepared with more oil and tamarind, this can be stored in room temperature for a week. Good for a packed food during long travels as this chutney won't get spoiled if handled with care.

Wednesday, September 8, 2010

Mutton dhalsa

Today we are celebrating Mother Mary's Birthday and I am busy baking a cake, at the same time I am so eager to post this dhalsa dish during Ramzan.

Dhalsa or dhal salna is a unique and tasty side dish served along with the fabulous biryani during Muslim festivals (in my home town). Dhalsa is a thick curry made of toor dhal and mutton. I have seen people using brinjal instead of meat too. That will also taste great.
I got introduced to this dhalsa recipe through my mom's friends. After that we too started making it at home:)

Happy Ramadan!

Mutton dhalsa served with chicken biryani and carrot raita.

Ingredients:
To pressure cook:
Toor dhal (red gram / thuvaram paruppu) - 3/4 cup
goat meat (with bones) - 100 gms
turmeric - 1/4 tsp
green chilly - 6
water - enough to cover
Vegetables:
unripe mango (chopped)- 1 small size
tomato - 2
brinjal - 6 (small)
other items:
shallot - 4
ginger garlic paste - 1 tbsp
mint leaf + cilantro - a handful
sesame oil - 1 tbsp
sambar powder - 1 tsp
shredded coconut - 1 tbsp
mustard seeds- 1/2 tsp
curry leaves - 1 brig
salt - to taste

Method:
Soak the toor dhal for 1/2 an hour.
Cook dhal and meat along with the items given to pressure cook in a pressure cooker with weight for 5 whistles. After the pressure gets released, mash the dhal and chillies gently without disturbing the meat. Add the sambar powder and keep aside.

In the mean time, wash and clean the vegetables. Cut them into big size pieces. In a separate vessel put the brinjal, mango, tomato, 1 cup water, salt and cook completely.

Now heat a wok with the oil. Let the mustard seeds splutter. Then goes the curry leaves, finely chopped shallot and fry till the onion gets a golden brown color.
Add the ginger garlic paste and fry till the raw smell vanishes.
Pour the cooked vegetables and mashed dhal + meat. Bring it to a boil. Add the shredded coconut, minced cilantro + mint leaf and switch off.

Mutton dhalsa is ready!

Serving suggestion:
Serve as side dish with biryani or pulao.
This curry should be thick.
Makes 6 to 8 servings.

Monday, September 6, 2010

Hyderabadi Vegetable Biryani

I prepared this Hyderabadi biryani for a weekend lunch. Hyderabadi biryanis are admired for their beautiful coloration and flavor. The ingredients and steps involved may look a bit complex but in reality it will be an easy breeze if we have around 3 hours of time. If prepared with care, this vegetarian version will be equally tasty like a non veg one.

Typically Hyderabadi biryanis are made with a slow cooking process called dhum cooking and I did my best to bring out the true flavors. Here goes the recipe.

Hyderabadi vegetable biryani served.

To cook rice:
Basmati rice - 2.5 cups (500 gm)
salt - 1 tsp
water - 6 cup
bay leaf - 3
star aniseed - 1
black cumin - 1/2 tsp
cinnamon - 1 inch
cardamom - 4
clove - 4
lemon juice- 1/4 of a fruit

Wash and clean the rice. Soak it for 30 minutes. Bring to boil some 6 cups of water.
Add the bay leaf, star anise, cinnamon, cardamom, clove, lemon juice salt, kali jeera (black cumin) and let the rice gets semi cooked. It should be very firm and almost raw. Drain the water using a colander and keep aside.

For garnishing and decoration:
Bread - 2 slices
(or) soya chunks - 10
cashews - 10
ghee - 2 tbsp
mint leaf , cilantro (chopped)- 2 tbsp
yellow or orange food color - 1 drop ea.
(we can use saffron instead)
cooking oil - 3 tbsp
Red onion - 1 cup (chopped lengthwise)

Heat oil in the same dhum vessel and fry the chopped onions to golden brown. Take it out and save for garnishing.
Cut the bread into 2 inch squares. Heat remaining oil + ghee in the same dhum vessel, fry and take out the cashews. Then carefully fry the bread squares / soya chunks and set aside.

For the masala:
cauliflower - 2 cup
carrot - 1
green peas - 3/4 cup
green beans - 10
raisins - 2 tbsp
red chilly powder - 1 tsp
salt - 1/2 tsp
ginger garlic paste - 2 tbsp
turmeric - 1/4 tsp
ghee - 1 tbsp
plain yogurt (from whole milk)- 1 cup

Now ,wash and clean the vegetables. chop the beans, carrot to long stripes. Branch out the cauliflower to some big chunks. Put all the vegetables with everything mentioned above in to the bottom of the dhum vessel. Mix and spread them uniformly.

For flavored water:
salt - 1/2 tsp
lemon - 1/2
sugar - 1 tsp
kewra water - 2 tbsp
(or, rose essence 2 drops + 2 tbsp water)
ghee - 2 tbsp
black pepper corn - 10
cinnamon - 1/2 inch
cardamom - 2
clove - 2
black cumin (kali jeera) - 1/2 tsp
green chilly - 2
Mace (javithri / jathipathiri) - 1 strand
nutmeg (jathikkai) - a small shaving

Run everything above in a mixer and make a fine liquid. If you don't have enough time then , omit the whole garam masalas and mix 2 tbsp of some good brand biryani masala powder with the other things mentioned above. (I will suggest shaan brand biryani masala powder).

For dhum process:
wide vessel with tight lid
A dosa tawa
chapathi dough using 1 cup wheat flour

Mix the wheat flour with water to get a bread dough consistency and keep aside.
We can use an aluminum foil also, if we do not want to waste the dough. But sealing with dough is the best method and it is called dum / dhum process, which means 'slow cooking with hot steam sealed inside'. I would suggest sealing with the dough for a tasty dhum biryani.

Arranging the layers:
Now spread the semi cooked rice uniformly over the raw vegetable layer.
Mix saffron with 1/4 cup warm milk (or) mix the food color with 2 tbsp water and sprinkle it over the rice. I used food color here.(Food color gives a beautiful look, whereas saffron is healthy).
Place a thick dosa tawa over stove and place the dhum vessel over the tawa.
Over the rice, spread the fried cashews, finely chopped cilantro , mint, friedonion and sprinkle the flavored water.
Place the fried bread / soya chunks and close the vessel with a tight lid.
Seal the edges with the prepared chapathi dough.
If possible add hot charcoal over the lid (I never get a chance to do this).
Start heating the arrangement. Keep the flame at high till the tawa gets heated and then reduce it to a minimum. Leave the whole set up for 2 hours.
After that discard the dough, open the lid carefully.

Hyderabadi vegetable kachchi biryani is ready!

Serving suggestions:
Serve the biryani like a layered rice, so that every plate gets a portion of rice, vegetable masala and colorful topping.The guest has to mix and devour:)
Serve with some spicy gravy  or  raitha of your choice.
I usually prepare some non veg gravies along with this biryani.
Serves 5 to 6 people.

Friday, September 3, 2010

Jangiri

Jangiri is a South Indian version of Jilebi. Jilebi is made of a sour batter, while jangiri is made with black gram without fermentation.


Recipe source for me:  Our beloved Jegatha achi , who was the binding factor of most us. I have never met anyone like her. She was the most dedicated and trustworthy lady for anyone who approach her. 
This is my mom's most favorite sweet.She got the recipe from her chithi, Jegatha achi  (we fondly call her thoothukudi achi).  I admire that grandma very much because of her  hospitality. She became my mom's mom and supported her, gave her a beautiful life and made all of our lives beautiful with her love and care. She used to buy clothes for us for all the Diwali and sometimes gold jewelry too. Her gift for my wedding is very special for me, a beautiful ring. Most of my happy memories include her and she is a proof that God created some special women resembling angels. 

  'According to aachi, this is a very simple sweet, that can be prepared without much grocery or special equipments'. After trying it my own, I too acknowledge her words:)

Happy Krishna Jeyanthi!

Ingredients:
Urad dhal - 1 1/2 cup
(whole black gram without skin)
Rice flour - 3 tbsp
(1 tbsp rice flour per 1/2 cup of urad dhal)
baking soda - a pinch
(very small pinch...too much will make jangiri puffy and oily)
orange food color - a pinch
(I mixed the red food color and yellow kesari powder to get this color)
salt - 1/4 tsp
oil(to deep fry) - 200 ml
sugar - 3 cup
water - 2 cup
rose essence - 3 drops
cardamom powder - 1/4 tsp

Method:
Soak urad dhal in water for 2 hours. If possible keep the soaking inside refrigerator to avoid jangiri drinking the oil.(Yes, sour urad dal batter may absorb more oil).
Grind the dhal with very little water to a thick batter. (The batter should be like a softened butter).
Mix the food color, rice flour, salt, a pinch of baking soda and run in mixer again.(Don't keep the batter for long time. Immediately start making jangiri, else it will absorb oil. The perfect jangiri should not be oily).

Fill a zip lock cover with this batter and cut a very small hole in a corner as shown in figure. The hole should be approximately of 4 mm diameter size and not more than that.

Jangiri batter filled in zip lock cover.

(The authentic procedure calls for making a jangiri cloth. For making that cloth, select a new cotton cloth (bigger than a men's kerchief) and make a small hole using a sharp skewer and do 'satin stitch' around the hole very tightly like a button hole. The hole should be  of 4 mm diameter).

In the mean time add sugar and water in a wide mouthed vessel and bring it to a boil. Heat the syrup till it reaches the single string consistency (oru kambi patham in Tamil). It means, if you pour the syrup using a spatula, the last drop should drip like a single string. If heated above that we will get double string and finally the crystallization will occur. So stop with the single thread consistency. Switch off and add the flavoring agents.

Now heat a wide wok with enough oil (1.5 cm high) and wait till its sizzling hot.
Now reduce the flame to minimum and squeeze the jangiri batter in the hot oil.

First make a two or three concentric circles in clockwise direction and then make swirls like petals in anticlockwise direction. (see the image below). Flip once and put the crispy jangiris in sugar syrup.

Let the jangiri soak for a minute or till the next batch is ready.

Take the soaked jangiri out and arrange in a plate.
Jangiri is ready!

Top and bottom views of jangiri, showing the pattern.


Jangiri served.
Diwali 2013

For Hubby's office party 2013

Note:
1)The jangiri should be stiff and not soggy. The rice flour helps in getting stiff jangiris. But the tubes of the jangiri should be filled with sugar syrup, just like a honey comb:)
2)Makes 20 to 25  palm size jangiris if we are grinding using an Indian mixie. If we are using an Indian wet grinder, then we will get 50 jangiris. It can stay good for almost 3 days in room temperature and can be stored for three weeks in fridge.
3)The jangiris are usually made during Deepavali or any Indian festival.
But they are mainly served as one of the desserts in Tamilnadu  marriages.
4)We can make a double layered jangiri also, by doing some circles over the swirls again. These mega jangiris are called 'kalyana jangiri', which are usually made in a bride's home to give to the bride groom's family as 'carry home gift' along with many other snacks and goodies:)

update:
I made this jangiri for a party in hubby's previous office on Dec 5 2012, as per his wish:)


Glad that it came up to my satisfaction and hubby kept a lion's share for himself:).
Notes: (For parties)
For making 80 - 85 big size standard jangiri , we may need the following proportion.
Urid dal - 3 1/4 cup
raw rice - 5 tbsp
Soak them together for 3 hours and grind with 1 tsp salt, food color, pinch of baking soda.

Sugar syrup:
sugar - 5 cup
water - 2 cup
consistency - till we see bubbles around sides , one string stage. Add cardamom powder - 1 tsp and rose essence - few drops.

For deep frying:
Use 2 cups of corn oil and 1 cup ghee.- in a shallow frying pan.

Don't let the fried jangiri soak for more time. Just dip, flip and let it soak less than a minute. Take out and let cool before storing.

Monday, August 30, 2010

Rava Pongal

This is a very quick method to prepare rava pongal. I don't remember where I saw this short cut.  Personally I like this method much better, as we can eliminate handling those heavy pressure cookers while using this recipe:)

Rava pongal served with sambar.

Ingredients:
Sooji / Ravai - 1 cup
moong dhal (green gram lentil) - 1/3 cup
Turmeric - a pinch
water - to cook moong dhal
(water should be approximately 2.5 times that of the dhal+rava)
salt to taste
To temper:
ghee  - 1 tbsp
Black pepper (whole) - 1 tbsp
cumin - 1/2 tsp
cashew nut - 10
hing (asafoetida) - a pinch
curry leaf - few
ginger - 1 tbsp (chopped)

Method:
Dry roast the moong dhal . Wash and coarsely grind it.
Dry roast the rava and keep aside.

Bring 3 cups of water to a boil
Add the dhal and cook well. Minimize heat and put turmeric, salt and roasted rava.
Stir fast otherwise  rava may  agglomerate.
Cover with a lid and cook in low flame till rava is done. Switch off.

In the mean time, heat the ghee in a wok and fry the items given for tempering.
Run the tempering over the pongal and mix well.

Rava pongal is ready!

Serving suggestions:
Serve with sambar and coconut chutney as breakfast or dinner.
Serves 2 adults.
Time taken : less than 20 minutes.

Tuesday, August 24, 2010

keerai molagootal

Keerai mulakootal is a Kerala based recipe with all the goodness of dhal and greens. It can be served as a curry over rice or a great side dish with roti.


Ingredients:
spinach (pasali keerai) - 25 leaves
(or) any greens like amaranth / ponnanganni - 1 cup (chopped)
Thoor dhal (red gram) - 1/4 cup
shredded coconut - 2 tbsp
urid dhal (black gram) - 1 tsp
dry red chillies - 2
cumin - 1/4 tsp
salt - to taste
coconut oil - 1 tsp
mustard - 1/4 tsp
shallot (chopped) - 1 tbsp (optional)
curry leaf - few

Method:
Wash and clean the dhal and keerai separately. Chop the greens finely.

Cook the dhal with 1 cup water, turmeric - a pinch and asafoetida - a pinch. Pressure cooking the dhal is more convenient. We can cook the dhal in advance and freeze for future use too. This saves a lot of time.

Fry the urid dhal , red chillies and cumin in a drop of oil. Grind them coarsely along with coconut to a fine paste.

Now pour the excess water from cooked dhal and cook the spinach. Mash the greens coarsely. Add the masala paste, mashed dhal to the cooked greens and put salt to taste.

Heat the coconut oil in the pan, add the mustard and let it crackle. Slightly fry the onion, curry leaves and run it over the greens. Mix well.

Switch off as it comes to a boil.

Keerai mulagootal is ready!

Serving suggestions:
The above said quantity is for 2 people.
Serve as curry over rice. Paruppu thogayal (dhal chutney) and fried appalam are the traditional side dishes for this.
Another way is to serve as side dish with rasam+rice.
Pairs well with roti also.

Tuesday, August 17, 2010

Turnip kuruma

'Noolkol'or 'nookkal' is the Tamil word for Turnip or Kohlrabi. It can be used instead of potato in curries. The health benefits are many. It is good for potassium deficient days.

This curry is just another version of kuruma with whole garam masal made into a fine paste. There is no masal powder here except the turmeric. Shallot (sinna vengayam)adds a lot of flavor to this curry. It is a general practice to add potatoes and peas also along with this vegetable. Potatoes give a good flavor and texture to the kuruma.

I try to make something special for Friday nights and the ready made parathas come handy at that time.Parathas with this spicy turnip kuruma tasted wonderful:)
Noolkol korma is my mom's favorite too. As it was a rare vegetable in my home town at that time, mom used to buy this and would fondly tell us how she devoured this vegetable in Madurai, her home town....now I am recollecting hers:)

Turnip kuruma served with paratha.

Ingredients:
Turnip / noolkol / kohlrabi - 1 (250 gm)
Potato - 1 (optional)
Turmeric powder - a pinch
oil - 1 tsp
fennel - 1/2 tsp
cinnamon - 1/2 inch
curry leaf - 1 sprig
ginger garlic paste - 1 tsp
cilantro + mint leaf - a handful (grind)
tomato - 1 (big)

To fry and grind:
Dry red chillies - 4
green chillies - 2
cinnamon - 1/2 inch
cloves - 2
cardamom - 2
black cumin - 1/8 tsp
fennel (sombu) - 1/2 tsp
shallot - 4 (1/2 cup chopped)
shredded coconut - 2 tbsp
coriander seeds - 1 tbsp
cumin - 1/2 tsp
cashew nut - 4
poppy seed - 1/2 tsp
oil - 1 tbsp

Method:
Wash the turnip, potato and remove the skin. Chop them finely into small cubes.
Cook it in a cup of water along with finely chopped tomato and turmeric powder.

Fry the above said ingredients in a tbsp of oil together. They need not be fried till brown, but we just need a good aroma. Let it cool completely and grind it to a fine paste along with mint + cilantro.

Heat 1 tsp oil in a wok. Add the fennel and cinnamon, let them get red. Put the curry leaves and fry a little. Immediately add the ginger garlic paste and fry till the raw smell vanishes. Now add the cooked vegetables along with the masala paste and bring them to a boil. Add salt, reduce the flame and cook in low flame for 10 minutes (till we get a nice kuruma flavor) and switch off.

Noolkol kuruma is ready!

Serving suggestions:
The above said quantity will yield a large amount of kuruma, sufficient for 6 people. Turnip is good at yielding good amount of curry. So reduce the vegetable quantity as per requirement.
Serve with paratha, poori, ghee rice, chapathi, roti, dosa etc.

Sunday, August 15, 2010

Murugal dosai

I didn't realize the need for this post, until one of our friends asked . Dosa is the staple food for any South Indian family .  Just like many of you , the very sight of the dosa batter-container in my refrigerator always gives me a feeling of relief. It is the best friend at supper time, if I can't think much. So I always make a big batch of batter on Fridays, so that the weekends go smoothly :)

The paper roast dosai we get in restaurants is the yummiest version of all dosais. Mom used to call it as 'murugal dosai' (Murugal - crispy) and I like that name very much. Amma's kaipakkuvam (mom's touch) and the 'kalchekku' nallennai (Extra virgin sesame / gingelly oil) along with that perfectly fermented batter would make the house smell heavenly. Even now the same kind of flavor floating from some unknown chimney lifts up my spirit.

How to choose a dosa tawa and maintain it?
Many people add a teaspoon of channa dhal to get the golden brown colored dosa. Below ratio is the one we use. No harm in using whatever works out the best for you. But the real secret lies in the selection of the dosa tawa (dosa girdle).
Indian grocery stores or Indian vessel stores are the best places to get one. Buy an iron dosa girdle of at least 10 mm thickness and as large as 1 feet diameter. The thickness helps in uniform heating, which results in very thin crispy dosas. I am not good at non stick dosa tawas. But the non sticks are great for making soft doas (like pancakes).
Ok, as soon as we buy that thick dosa tawa, immerse it in a solution of rice washed water or water strained out while cooking for 24 hours. After that wash it and heat once uniformly apply a coating of sesame oil over it and put a lid on it. Switch off flame and  let it remain over night. The next morning, gently wipe off the oil and start making dosas.
The rule number one is never use that precious dosa tawa for making chapathi / roti or any other purpose like dhum biryani making etc:) This will spoil fine layers (at molecular level) of the dosa tawa and it will take a lot of time to get rectified.
Keep your dosa-turning spatula clean and sharp. Try to use an ever-silver spatula to turn the dosa, as they are always sharp.  Wipe off the excess batter after every use.

Dosa batter uniformly spread on the conventional dosa tawa.
Golden brown dosa after flipping.
Crispy Murugal dosai served with Coconut chutney.

Ingredients:
Idly rice - 3 cups
black gram dhal - 1 cup
(In India the urad dhal is very fresh so 1:4 ratio is enough. Other than that 1:3 works the best while using an aged dhal or Indian mixie. If using an Indian grinder the ratio can be 1: 3 1/2)
fenugreek seeds - 1 tsp
salt - 3 1/2 tsp (1 tsp for each cup of rice and 1/2 tsp for a cup of black gram)
Sesame oil - 50 ml

Batter preparation:
Soak rice separately for 5 hours. Dhal and fenugreek seeds need to be soaked together for about 3 hours. After that grind dhal till it becomes very smooth and fluffy. The batter should be thick like softened butter. Transfer it to a big bowl. Then grind the rice to a very smooth texture.Do not add lot of water. Add salt and by giving several strokes.
Store this in a large vessel so that there is enough space for batter to rise. Grinding and storing of batter should be done the previous day, preferably in the night so that the batter would be ready the next day. The batter should be allowed to ferment for about 15 – 18 hours.
(If the outside temperature is below 85 deg C, then keep it inside a mildly warmed oven to get warmth). The next day, mix the batter well and it can be used to make idly or dosa.
Generally people prepare Idly with the first day batter and the remaining batter can be used to make dosa. Moreover dosa comes out very well if the batter is more fermented. we can add a dash of yeast to the freshly ground batter to enhance fermentation of the batter.The remaining batter can be preserved in tight containers in refrigerator.
A well prepared batter can remain good for almost a week.

Dosa preparation:
Heat a dosa tawa. Check the heat by sprinkling a drop of water. It should be sizzling hot. For the first dosa, Spread the sesame oil uniformly using the special wooden tool we use for spreading oil or a piece of fresh cloth. Wipe off excess oil. There should be almost no oil now.

Take a ladle of batter and pour it gently over the tawa and spread it to get crepe.
Keep the heat in maximum. Drizzle a tsp of sesame oil over the dosa. After it starts turning red, flip and take out immediately.

From the next dosa, start pouring the batter directly. No need to brush oil at first. But feed the dosa with generous quantity of sesame oil. Serve immediately, as it becomes soggy with time.

Murugal dosai is ready!

Serving suggestions:
Serve hot with sambar, chutney.
Makes 40 dosa.

Approximate calories:
(Click to see source)
1 large home made murugal dosai (10 inch dia)
From batter - 80 to 100 Kcal
from sesame oil (1 tsp) - 40 Kcal
Total 140 Kcal.

Friday, August 13, 2010

Strawberry Ice cream

This is an eggless version of ice cream. There are many methods to prepare an ice cream , such as by boiling milk with custard powder, using eggs, using flourn etc. The packaged ice creams we buy in the stores are made by any one of the methods above.
But the No-cooking ice cream or an ice cream made with condensed milk is more famous among American households. This recipe is known for its lesser number of ingredients and the simplicity. The interesting facts are the lesser calories involved and the health benefits we get from a real fruit.

Here is a strawberry Ice cream I made for hubby and his friends. Inspired by cooks.com website.

Ingredients:
sweetened Condensed milk - 1 can (14 oz) (400 gm)
whipped topping - 8 oz container (250 gm)
strawberry - 20 number (see measurement *)
strawberry (finely chopped) - 2 tbsp


The whipped cream, condensed milk and strawberries.
Method:

All the ingredients mixed before freezing.

Wash and clean the strawberries. Remove the bracts / leaves.
Grind the fruits to get a smooth puree. Reserve 2 fruits for garnishing.

In a mixing bowl add the condensed milk and fold in the strawberry puree.
*(After pouring the condensed milk, measure the fruit puree in the same can. It should be almost 1.5 to 1.75 times that of that can).

Add the whipped topping and mix gently. Add the chopped strawberries. The fruits should be chopped finely, otherwise they taste like ice crystals.

Transfer to a container, close and keep frozen for nearly 4 hours.

Strawberry ice cream served with sliced strawberries and blue berries.


Strawberry ice cream is ready!

Serving suggestions:
Makes nearly 15 big scoops.
Place the ice cream outside for 5 minutes for easy handling.
An ice cream scoop dipped in water makes the job easy.

Approximate calorie calculation:
From fat-free condensed milk - 1300 Kcal
Whipped topping - 100 Kcal
Strawberry (8 fruits = 45) - 120 Kcal

Total calories in the whole batch = 1520 Kcal (approx)
1/15 of the above said will yield 100 Kcal. So it can be had as a safe and satisfying dessert.

Wednesday, August 11, 2010

Pani Poori

In Madras, we belong to an area famous for its Gulfi ice,  paani poori manufacturers with the walk ways surrounded by 'chaat item' (a kind of Indian salad mixed with crispies) vendors. You may need a strong willpower to pass these shops without buying one plate of some snack:) Recently we enjoyed this delicacy once again in one of the parties held by hubby's colleague A. After that our trips to Indian grocery stores won't be complete without getting a chaat item.

What is Paani poori?
Paani poori : Small cute fluffy pooris stuffed with lentil, mashed potatoes, salads and filled with hot chutneys as well as sweet tangy tamarind water.

Paani poori is a great fun food when we have some family get-together or friends coming over unexpectedly. It is a very filling snack / starter / a complete meal without much preparation time or skills. There are 'n' number of variations for the stuffing and chutneys. I prepared it by remembering that Madras paani poori stalls' version and their clay-pots filled with those paanis and chutneys.

All we need is just to poke the poori with our thumb, fill the stuffing, pour the chutneys and munch ....munch...munch:) I love the way it is gobbled in one gulp with lots of laughter:) Nothing can beat the different tastes.... spicy to sweet and tangy mixing up in our mouth while our hands uncontrollably stretching for the next poori....unexplainable joy. Isn't it!

Paani poori along with the various stuffings and filling chutneys arranged.
Paani poori stuffed.
Ready to use paani pooris.

Ingredients:
Pani poori - 1 pack
I used the ready to use paani poori available in Indian grocery stores. Preparing the poori needs a lot of patience and skill. The end product should be a very stiff and hole-less pooris. Still I assure you, the home made ones are the best, if we can make them perfectly. You can see the procedure for making them in

Stuffing:
(The following are the popular stuffing, but we can vary them according to availability)
1.Potato - 3
2.Freshly chopped onion - 1 cup
3.channa dhal / whole green gram (cooked)- 2 cup
4.oma podi (Indian mixture snack) - 1/2 cup (optional)
*Cook the potato and remove the skin. Mash it gently along with some salt, cumin powder (1/4 tsp). Place it in a serving bowl.
*chop the onions finely and keep them for serving.
* cook the dhal and keep it in a bowl.

green chutney:
cilantro - 10 stems
mint leaf - 1/2 cup
green chilly - 2
salt - to taste
lemon - 1/8
wash and clean the leaves. Grind them finely together along with green chilly, salt and some water to get a cup of chutney. Squeeze the lemon to get a balanced chutney taste. Keep it in a serving bowl with a spoon.

Tamarind water:
tamarind - a small lemon size
Water - 2 cup
jaggery / sugar - 1 tsp
salt - 1/4 tsp
dry ginger powder - 1/2 tsp
chaat masala - 1/4 tsp
cilantro - a few leaves
dates / raisin - 1/2 cup
Soak the tamarind and extract the juice. Puree the dates / raisin and mix all the above to get a sweetish tangy water. Transfer it to a serving bowl with a spoon.

How to devour it ?
Take a poori. Hold it in your left hand, in the same time make a small opening at the top (by using your thumb), just like we shell the hard boiled eggs.

Put a small scoop of mashed potatoes, cooked dhal, chopped onion one over the other.Sprinkle the oma podi.
Top it with 1/2 a tsp of spicy green chutney. Fill the remaining space with the tamarind sweet chutney.

Immediately gulp it and enjoy:)

Serving suggestions:
The above said quantity is enough to fill almost 40 paani pooris. Increase the tamarind water quantity if necessary. Create your own stuffing to suit your palettes.
This makes a great starter or an early supper.

Tuesday, August 10, 2010

Hi !

Hello friends,
Hope you are doing great. Due to some unavoidable circumstances I was not blogging or visiting you all for a month. Now I am doing great. Thanks for all your mails, well wishes and comments. Missed a lot of fun in the blogosphere, trying to visit each and every one of your posts now:)

I will resume shortly with your favorite recipes.

Happy blogging!
Love,
Viki.

Thursday, July 1, 2010

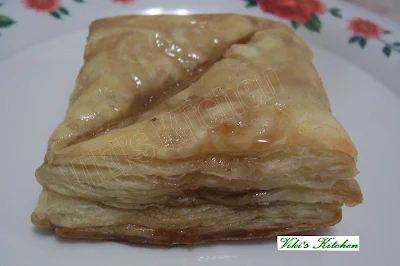
Baklava

Baklava is a sweet pastry made using phyllo dough or puff pastry sheets.

Hubby and myself tasted this crunchy dessert for the first time in an Afghan restaurant in Long Island, NY. At that time I couldn't remember the name or believe if I could do it myself in some point of time. But slowly Baklava started getting much closer to us after he joined this new office and I started trying several ways to get his favorite. The only thing I knew was the taste and invented some recipes of my own. First I tried from scratch, i.e., using All purpose flour, that was a good one. (If you can't find the pastry sheets and want a recipe from scratch, just ask for one through the comment and I will be more than happy to publish that too). But the process was enormous and I couldn't prepare many. So searched the web and got some ideas. Faiza Ali has the best using phyllo.  Then I tried using the phyllo dough , which is claimed to be the most authentic way. But the process of separating the phyllo layers was much difficult and I ended up with a scrambled baklava :) .

Again I bought some puff pastry shells and it was super easy as well as perfect for a beginner like me. It was just removing the pastry top, fill the cavity with the sweet nut mix, close, bake and soak it in honey:) That gave me enough confidence to try it again. So if you want a very quick rich dessert, then buy some 'puff pastry shells' instead of 'sheets'.

While googling I got a perfect recipe from Baking bites and many others.Then prepared it using puff pastry sheets and all of our also friends like that.Nowadays if there comes a long weekend hubby never forgets to fill up the freezer with these pastry sheets:)

This recipe comes handy if we wish to prepare two or more desserts for a party , as this can be made in advance and stored. Here goes the recipe for the Baklava using puff pastry sheets.

Ingredients:
Puff pastry sheets - one box (16 oz)
Walnut (finely chopped) - 1 cup
cinnamon powder - 1/4 tsp
brown sugar - 1/2 + 1/4 cup
honey - 1/4 cup
butter - 1 tsp

Method:

Preheat oven to 375 deg F.

Bring the puff pastry sheet to room temperature as per direction.


Generally there will be two sheets. Take an aluminum foil and coat it with oil.
Place one sheet. Using a pizza cutter or knife divide it into 9 or more pieces. Similarly do the same for the other sheet also and keep aside.

Arrange them with a spacing of 1.5 inch in between.


Mix the finely chopped walnut with cinnamon powder, butter and 1/2 cup sugar.
Spread this mix over one set of squares.


Cover each square with an piece of pastry sheet and make a diagonal slit to facilitate baking.


Bake this in 375 deg F for 10 minutes and check if it is puffed up. Otherwise increase the timing by 5 minutes. (See instructions in the pack).
In the mean time bring to boil a 1/4 cup of brown sugar and 1/4 cup water. Let it achieve a syrup like consistency. Then add a pinch of cinnamon + vanilla essence to it. Let it cool.


Take the baked baklava out.


Pour the prepared syrup in a pan and place the baklava over it. Drizzle some honey over the baklava and we are all set now.


Serve the Baklava immediately or cool. Baklava is ready!

Serving suggestions:
Makes 9 Baklava.
Serve as dessert.

Thursday, June 24, 2010

Green Peas pulao

A very simple and mildly spiced pulao made as an alternative to the usual plain rice.

I make this green peas pulav as a quick dish for hubby's lunch pack. It won't consume much time or demand a great skill during the peak hour.


Ingredients:
Green peas (frozen or fresh) - 3/4 cup
(Don't use dry ones for this recipe)
Basmathi rice / raw rice (pacharise) - 1 cup
ghee - 1 tbsp
ginger - 1 inch
garlic - 2 pearls
green chillies - 2
onion (sliced thinly lengthwise) - 1/2 cup
lemon juice - 2 tbsp
cilantro + mint leaf (chopped) - 1/4 cup
bay leaf - 1
cloves (lavangam) - 2
cinnamon (pattai) - 1 inch
cashews - 10
salt - to taste

Method:
Wash and clean the rice. Soak it for 30 minutes.
Defreeze the peas by putting them in some water.
Grind the chillies, ginger, garlic together to a fine paste.

In the mean time, heat ghee in a wok. Fry the cashews to golden color and keep aside.
In the same wok add the bay leaf, cloves, cinnamon and fry for a few seconds.
Immediately add the sliced onion . Saute it till the onion wilts.
Now put the masala paste and fry till oil separates. Put the green peas and saute a little. Add salt to taste.

Add the soaked rice (remove the excess water by a colander) and fry for a minute. Pour water just enough to immerse the rice. Add the lemon juice (lemon and ghee keeps rice grains separate). Cover and cook in very low flame till done.(We can cook the rice separately and add at the end also). Remove from heat while the rice is almost cooked (but stiff) and serve hot.

Garnish with fried cashews and minced cilantro + mint leaf.

Green peas pulav is ready!

Serving suggestions:
Serves 2 people.
Pair this flavorful peas pulav with any spicy curry like Gobi manchurian or simply a mint chutney + raitha and enjoy!

Tuesday, June 22, 2010

Plain Vanilla cake

Nearly a month ago I wanted to make a plain vanilla cake. Though very long back I tried some method (before the blogging era) , I was not pleased with the outcome.So after a lot of googling and blog hopping, I got a solid idea and some confidence to make it from scratch. There were many recipes and I chose to try Cham's infallible Plain vanilla cake recipe and the result was amazing.

Thank you Cham!

The below recipe is from Cham of Spice club. I have halved the quantity to make one 8x8 inch cake. Click to see the original version.


Plain vanilla cake baked and allowed to cool before slicing.


Plain vanilla cake sliced and arranged.


Ingredients: 
(To make one 8x8 square cake)
All purpose flour (maida) -  1 cup
sugar- 3/4 cup
egg - 3 (medium size eggs)
butter (unsalted) - 1 stick (8 tbsp / 113 gms)
Salt - 1/8 tsp
Baking soda - 1/4 tsp
Baking powder - 1/2 tsp
Vanilla essence - 1 tsp

Method:
Bring the eggs and butter to room temperature , by keeping them outside the refrigerator.

Preheat the oven to 350 deg F. Grease the baking pan with 1/4 tsp butter.

Mix the dry ingredients like maida, baking soda, baking powder by sieving twice.
(This makes the cake spongy).

Add the egg, butter, sugar, vanilla essence , salt to a blender / mixie and beat till it turns fluffy.

Add the dry ingredients and beat well. we can mix the dry ingredients by using a fork / spatula also.

Pour the cake batter in to the greased pan and shake / tap it to release the air.

Place in the oven and bake for 30 to 35 minutes.
(Test the quality of baking by inserting a skewer and see if it comes out clear).

Plain vanilla cake is ready!

Serving suggestions:
Serve as dessert or tea time snack. Icing is optional.

Calorie calculation: (from main ingredients)
AP flour 1 cup = 400 kcal.
Sugar 3/4 cup = (1 tbsp = 45) = 45 x 12 = 540 Kcal
butter 1 stick = 100 x 8 tbsp = 800 Kcal
egg 3 = 70 x 3 = 210 Kcal
Total calories (approx) in this plain vanilla cake = 1950 kcal

(data courtesy : Livestrong.com)
---------------------------
Small 6 inch cake recipe
For a 6 x2 inch round cake: 

unsalted butter 5 tbsp, softened
sugar 1/2 cup
large egg 
vanilla extract 1 tbsp
all-purpose flour 3/4 cup +2tbsp
corn starch 2 tbsp
salt 1/8 tsp
baking powder 3/4 tsp
curd (plain yogurt) or milk - 4 tbsp

Preheat oven to 350 deg F.
Sift together flour, corn starch, salt, baking powder. Keep aside.
In a mixing bowl put butter, sugar - beat for 2 min using an electric beater.
Add milk, egg, vanilla, beat together for 2 mins.
Add the flour. Beat for 1 minute.
Prepare a baking pan by applying butter a coating and coat with 1 tsp four.
Bake for 30-35 mins. 


Thursday, June 17, 2010

Vengaya sambar

Vengayam (Naattu vengayam, ulli, chinna vengayam) - shallot / baby onion; Saambar - A dhal based curry served over plain rice.

Sambars are generally named after the vegetables added and by the variation in masala. e.g., Arachi vitta sambar, murungakkai sambar etc.
The most famous and easy to prepare is the onion sambar.

Though I make many varieties of sambar, this one is my family's  most favorite. Almost all my Fridays will begin with this flavorful sambar along with the potato curry . Moreover I always remember to save some sambar for the night to serve along with crispy paper roast dosas and we never get bored of that menu:)

I am narrating my mom's recipe, which I am following for years.


vengaya sambar served in a bowl.

Ingredients:

To pressure cook:
Toor dhal/red gram lentil - 1/2 cup (100 gms)
water- 2 cups
turmeric powder - 1/4 tsp
asafoetida - 1 pinch
sesame oil- 1 drop
Wash and clean the lentil. Pressure cook the dhal with the above said ingredients for a whistle. Then reduce flame and cook for 10 minutes. Let it cool. Open the lid and add some fresh cumin seeds .Mash well using a spatula. Keep aside.
(we can cook the dhal in stove top also. But we may need to soak it first for 30 minutes or more and cook for 30 minutes).

Other ingredients:
Shallot (sambar vengayam) - 15
(choose small variety. Remove the skin, wash and clean. Don't chop).
Tomato - 1
Tamarind - amla (gooseberry /  nellikkai) size ball
cumin seeds- 1/2 tsp
cooking oil / ghee - 2 tbsp
(Try to use ghee, as it renders more taste to the sambar).
curry leaves- 1 sprig
cilantro/ coriander leaves (chopped)- 1 tbsp
mustard seeds-1/2 tsp
fenugreek -1/2 tsp
jaggery- 1 tsp (optional)
salt - to taste
Red chilly powder - 1 tsp
coriander powder - 2 tsp
Sambar powder - 1/2 tsp

Method:
Soak the tamarind in 2 cups of hot water and extract the juice by squeezing.
Add the red chilly powder, coriander powder, salt and bring it to a boil. Let it boil till the raw smell vanishes.

In the same time heat oil or ghee in a separate wok. Add the mustard seeds, fenugreek seeds and let the mustard splutter. Before they get black, immediately add the shallots, curry leaf and saute well. Continue frying till the shallot starts getting a golden color (not red). Then add the finely chopped tomato and saute till oil separates.

Pour this hot mixture over the boiling tamarind paste. Add the mashed dhal, sambar powder and bring it to a boil. As it starts boiling, put the crushed jaggery, chopped cilantro and switch off.

Vengaya sambar is ready!

Serving suggestions:
Serve hot over plain cooked rice.
The best side dish would be a spicy potato curry and appalam (pappad).
Reserve some sambar for dinner and serve along with paper roast dosas.

Thengai saatham

Thengai - coconut ; saatham - rice.
Kalantha saatham (variety rice or rice mixed with some spices/ masala) is an indispensable one in any South Indian home. The best part in kalantha saatham is that they would be prepared to accompany any long journey and they should withstand the time. For example in olden days they packed the tamarind rice or lemon rice in such a hygienic way that they last for at least 3 days.

But this coconut rice should be consumed within 12 hours because of the addition of coconut. Anyways this rice is loved by all for its nice flavor and taste.


Thengai saatham served with masala egg and bottle-gourd dhal curry.

Ingredients:
Rice (pacharisi / Basmathi) - 1 cup
Shredded coconut - 1/2 cup
moong dhal (split green gram lentil / paasi paruppu) - 2 tsp
mustard - 1/2 tsp
curry leaf - 1 sprig
cilantro - a handful (chopped)
dry red chilly - 2
oil - 1 tsp

cooking the rice:
(I prefer stove top method for pulao and 'variety rices'. we can microwave also. But the pressure cooker method makes the rice mushy. Rice cooker can also be used to prepare the rice).

Wash and soak the rice for 30 minutes or lesser.
Bring to boil some 3 cups of water along with 1/2 tsp salt.
Add the soaked , drained rice and reduce heat. Cook covered till almost done.
Switch off and pour it over a colander and remove the water completely.
Keep the rice open to maintain it as separate grains. Let it cool for sometime.

Method:
Heat 1 tsp oil in a wok and add mustard seeds. As they start to crackle, slide in the moong dhal, red chillies (cut into small pieces), curry leaf, shredded coconut , chopped cilantro, in the same order and fry till the coconut starts smelling great. Switch off immediately before they get red (maintain the white color of coconut).
Add some salt to taste (little only). Switch off heat.

Gently mix the rice with the prepared coconut mixture without breaking the rice grains.

Coconut rice is ready!

Serving suggestions:
Good for a quick packed lunch.
It can also be served as starter rice before serving the sambar over plain rice in an elaborate lunch.
Serve with paruppu thogaiyal (fried dhal chutbney), potato chips etc.

Thursday, June 10, 2010

Bisibelebath

Bisibelebath means Hot lentil rice. It is very famous in Karnataka, India and has become the favorite of all others too.

This is my most favorite lentil rice and I always look for an opportunity to insert it in our menu:) Narrating this one for you all and especially for my friend Pushpa. Enjoy!


Ingredients:
Rice - 3/4 cup
Red gram (Thuvar dhal) - 1/2 cup
Turmeric powder - 1/8 tsp
salt - to taste
Bisibelebath powder - 3 tsp

Vegetables: (Usual combination)
Beans - 20
carrot - 1
fresh green peas - 1/2 cup
potato - 1
Tomato - 1 (optional)
(I added some cherry tomatoes for fun, but the authentic recipe does not call for tomatoes)
Lemon - 1/4 (or) tamarind extract - from 2 inch tamarind

Tempering:
ghee - 3 tbsp
mustard (kadugu) - 1/2 tsp
finelly chopped onion - 1 tbsp (optional)
curry leaf - 1 sprig
channa dhal - 1 tsp
Asafoetida (hing / perungaayam) - a pinch

Method:
Wash and soak the dhal for at least 10 minutes. In the mean time chop the vegetables into small pieces.

Start cooking the dhal with a drop of oil, turmeric and 3 cups of water. I prefer doing it 'stove top' to get the native touch. We can pressure cook also.

When the dhal is 75% done add the rice and cook almost completely.

Now add the chopped vegetables and continue cooking. Add water now and then accordingly. The final product should be of very loose consistency, otherwise the bisibelebath gets solidified after cooling.

When the whole mixture is well cooked (almost 45 minutes), take 3 tsp of the bisibelebath powder, mix with a 1/4 cup of water and add to the rice. Bring it to a boil.

Mean while, heat the ghee in a wok and splutter the mustard seeds. Immediately add channa dhal, curry leaf, onion and saute well.

Pour this over the prepared bisibelebath and take off heat. Add lime juice and serve very hot.

Serving suggestions:
The above said quantity would be enoug for 2 adults and a child.
Always use 3 tsp of the bisibelebath powder for the above said quantity.
Always serve BBB very hot with lots of ghee.
Boondhi raitha or potato chips or pappad are best combinations with BBB.
Some people strew some karaa boondhi over the bisibelebath and enjoy.
I usually prepare Arbi yam (seppan kilangu) fry along with this.

Bisibelebath powder

This is the masala powder used  in  preparing Bisibelebath.


Ingredients
Bengal gram (channa dhal / kadalai paruppu) - 3 tsp
Black gram (urad dhal) - 3 tsp
Poppy seed - 1 tsp
fenugreek (methi seed) - 5 seeds
dry coconut (kopparai thengai) - 3 tbsp
Dry red chilly - 5
Whole black pepper - 10
cumin - 1/2 tsp
coriander seed - 3 tsp
cloves, caradamon - 2
cinnamon - 2 inch piece

Method:
Dry roast the dhals separately (if in large quantity) and keep them aside. Put all the other items together and dry roast till the coconut smells good. Let it cool.
Grind them together to a fine powder. Keep the powder in freezer for further use. We can use this powder for making bisbelebath as well as vangi bath.

Tuesday, June 8, 2010

Banana Walnut cake

Hi friends!
Happy to meet you all after a gap.Thanks for all your encouraging comments and mails that keep me going. Sorry, I missed many of your delicious posts and trying to catch up now:) The summer and the vacations made me quite busy and tired. The heat is horrible here, but couldn't stop us from roaming around and swimming (Don't imagine me with a lot of swimming skills, I am a learner for a long time).Moreover I tried a lot of recipes and waiting to share them with you all.

Let's start with something sweet. Here is a version of a very moist, spongy banana walnut cake. I got the recipe from this website. It is a very successful one and the best cake I have ever tasted. Try and let me know:)

Cake batter prepared without any lumps.


The Banana walnut cake is baked.


Banana walnut cake sliced and served.

Ingredients:
All purpose flour - 2 1/2 cup
Baking soda - 1 tbsp
salt - 1/8 tsp
butter - 1/2 cup (8 tbsp or 1 stick)
(don't use oil here, as I am calculating the moisture from butter too. Otherwise we may need to add some water also)
White sugar - 1 cup
Brown sugar - 3/4 cup
egg - 2
Ripe banana - 4 (long ones)
butter milk - 2/3 cup
(2/3 cup milk + 1 tsp vinegar can be substituted here)
walnut (chopped)- 1/2 cup
vanilla essence - 1 tsp

Method:
Preheat the oven to 350 deg F (175 deg C). Grease two (8"x8" square) cake pans with 1/4 tsp butter (each).

Chop the walnuts into small pieces and mix a tsp of all purpose flour with it.

Add the egg, butter, both sugars,salt,vanilla essence, buttermilk to a mixer / blender and beat till it turns fluffy.

Pour it to a broad mixing bowl.

Then put the bananas in the mixer and slightly mash them (two or three pulse is enough). Add it to the mixing bowl. Mix well.

Now sift the flour with baking soda twice (to make the cake fluffy) and put it in the mixing bowl. Beat and mix the batter very well using a fork or whisk (not a blender, as the bananas will get over mushy).
In between, if you see some lumps, then leave the batter for a 5 minutes and then start beating. This helps in soaking and a smooth batter without any lumps.

Stir in half the chopped nuts.

Pour the prepared batter in the pans for two inches height and spread the walnuts over the batter. Bake the cake for 35 to 40 minutes.

Insert a skewer to check if the cake is completely baked.

Take out and place on a damp towel to cool (This generates much steam and makes the cake moist). Then carefully remove from the pan and cool completely (for an hour or more).

Then slice and serve with or without frosting.

Tips:
Don't open the oven for the first 35 minutes.
The cake will be fluffy as soon as we take out of the oven, but after a few minutes it will loose the bump in the top.Don't panic, this will not affect the texture of the cake.
Always use the well ripened (skin turned black) banana for making a cake.
We can freeze and store the bananas that turn black and of no further use. Remove the skin and store them in zip lock covers in freezer. Just bring them to room temperature and blend in the liquid that oozes out also.
Cream cheese frosting is the usual one.

Wednesday, June 2, 2010

Its award time!

Two lovely bloggers, Gayathri of Heaven on a spoon and Suja of Kitchen corner have passed me the following awards.

Gayathri has a very nice space with interesting articles, anecdotes and I like the energy in her words. I am attracted a lot by her simple sweets and elaborate recipes.

Suja's recipes from Kerala are very authentic.Don't miss her sea food section and I am addicted to it:) Thank you friends! You both made my day.

Visit these enthusiastic bloggers and have a great time.


The rule of the award is to post some of our favorite pictures. The list is endless and here are two of them to enjoy:)


Photo courtesy: ICD parish.

This is the Immaculate Conception church in O'Fallon,Missouri, which we used to attend regularly on Sundays. O'Fallon is a very small town in mid west part of USA. It is full of woods and beautiful rivers. I associate this place with so many pleasant memories and it is my most favorite place to live. I wish to live again in O'Fallon , Missouri forever, if Xavier gets a job there. (Anyways I love my NJ also very much).What a thought..huh!
No wonder, the pictures from there fascinates me very much).

The next one is from St.Louis,MO.


St.Louis Arch in St.Louis. Other names of St.Louis are 'The gateway of the west or Rome of the West'.

Wish you all a beautiful month ahead!

Traditional Tamilnadu style Lemon Rice (Elumichai satham)

Lemon rice is a kind of 'Variety rice' 'sitharannam' prepared in Tamilnadu, Andhra, Kerala and almost whole South India.  Fo...