Monday, February 9, 2015

Valentine's day ...recap !

In USA, Valentine's day is a day to celebrate love and affection. We give greetings and chocolates to our friends, gifts to pets and every store will display decors in red and pink.  Also the lovers and couple's will celebrate this day with lot of excitement, romantic candlelight dinners, roses, gifts and I totally love the way love is celebrated here.

Here is a visual treat of some of the desserts I had made for Valentine's day in the previous years.  Lets start creating our own happy moments and enjoy :)

Gulabjamun:
2014 : Gulabjamun I made as gift for hubby dear
Kesari with kulfi icecream:
2014: kesari with kulfi icecream

 Ladoo:
2013: Ladoo, my gift for hubby dear

Boondhi:


2012 valentines day special !

Bathusha:


2012 Valentine's day special treat for hubby dear !

Ponegranate ice cream:


2011 Valentines day celebration !
Happy St.Valentine's day!


Happy Valentine's day !

Thursday, February 5, 2015

Palak paneer

Paalak paneer , is one of the most popular North Indian vegetarian dishes. Palak means spinach and paneer is Indian cheese. Sometimes I prepare this cheese in my leisure time and keep it in freezer. But buying the paneer in any Indian grocery shop is my first choice, as there are many options like low fat paneer, traditional paneer etc. Palak or spinach as we say in USA is almost similar to the pasali keerai of Tamilnadu, which has thin leaves and purple stem and grown as ornamental plant in a kitchen garden. While Malabar spinach (the thicker leaved palak with thick stems and entirely green in color) is different and it gives a texture like okra. I am not sure, if anyone can use malabar spinach for this curry.

My knowledge on North Indian foods is through restaurants, internet and my neighbors only. My neighbor aunty from Gujarat, prepares all the vegetarian foods of North India, just like restaurant made. I like the way she includes butter and ghee in the foods and I totally agree with her that her foods have good nutrition, just like mine :) We try to share our best foods frequently and will exchange recipes. I think I am very lucky, to get her as my friend, as I am growing my cooking skills with her guidance. She elaborates me the traditional way to arrive at a recipe and also the best short cuts using masala powders.

Making palak keerai in a traditional North Indian pattern is a popular recipe. But if you want to make a palak paneer which tastes like restaurant-made in a jiffy, then here is one of our versions of palak paneer and hope you all love it!
Palak paneer


Cooking the spinach with all the masala


Step 1

Ingredients:
Spinach - 1 large bunch (doesn't matter if it is excess or lesser)
paneer - 15 pieces (Cubed)
butter - 4 tbsp
salt - to taste
red onion - 1 (big)
sugar - 1 tsp
tomato puree - 1 cup
ginger - 1 inch
garlic - 5 pieces
green chillies - 3
cilantro - handful
fresh methi leaves - few (optional)
cinnamom - 1 inch
cloves - 3
fennel - 1 tsp
cumin - 1 tsp
kasoori methi - 1 tbsp
whole milk - 1 cup

Method:
Cut the paneer into small cubes of 1 inch size. Heat 1 tbsp ghee / butter in a frying pan. Fry the paneer cubes and take out. keep this aside.

Coarsely chop onion.
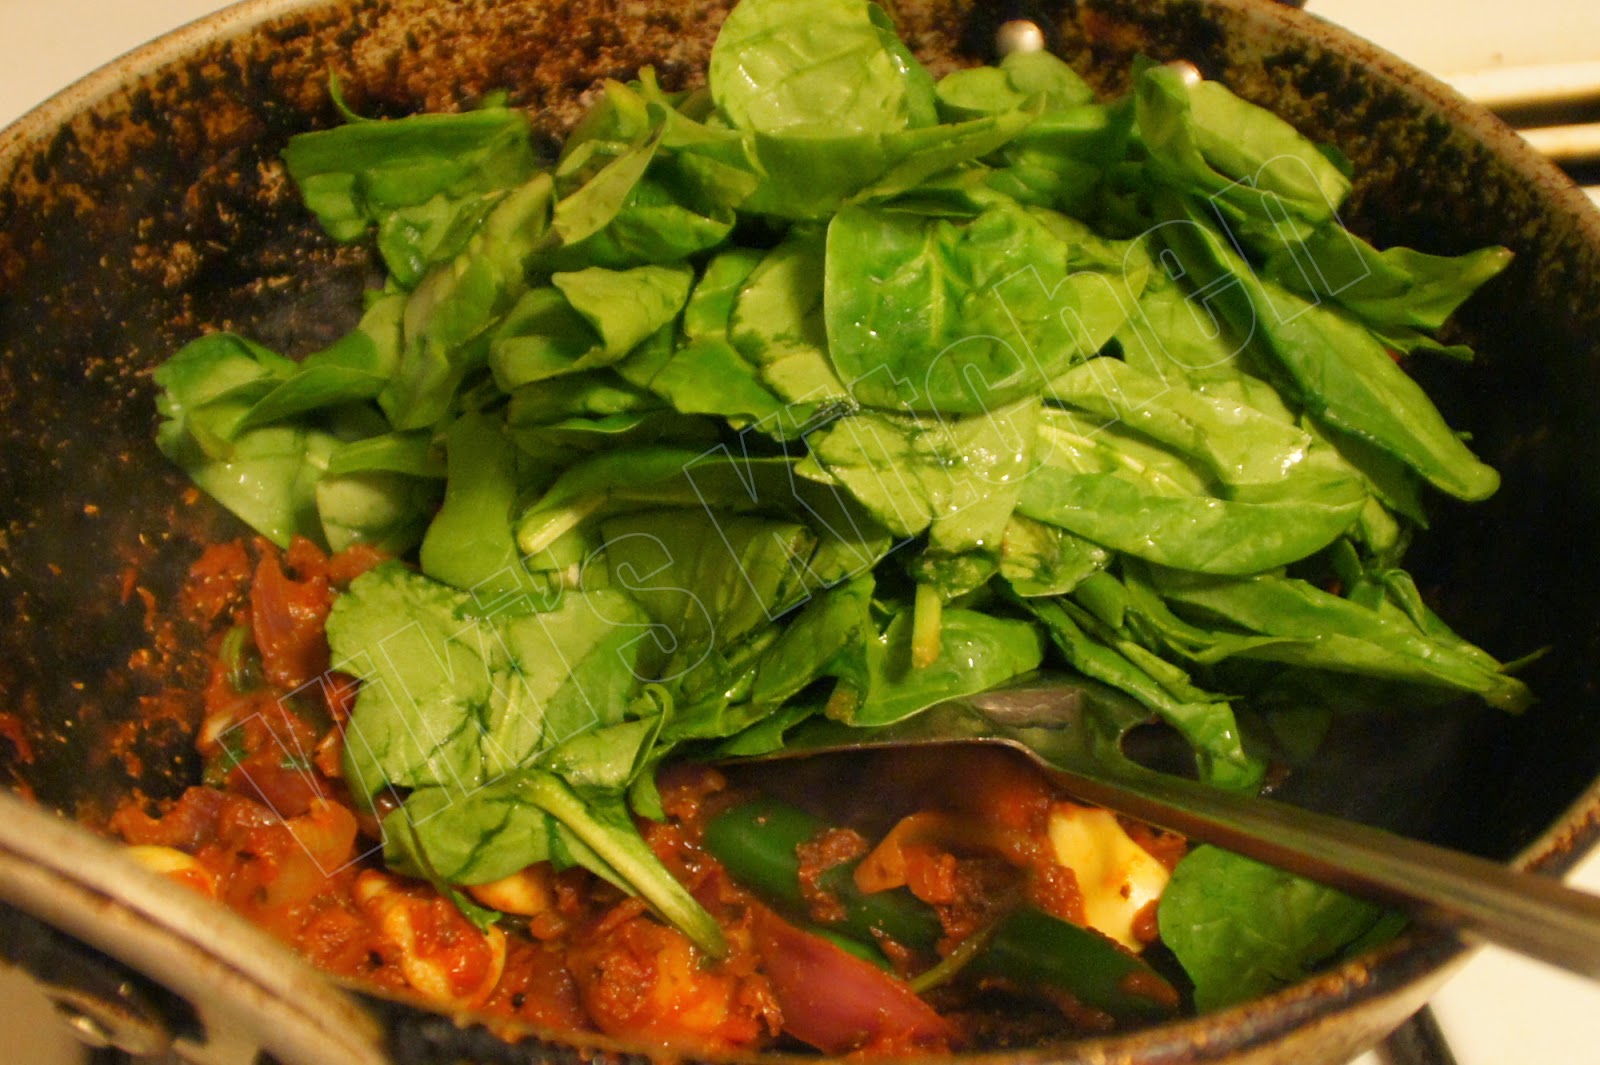
In the frying pan, add some more butter (2 tbsp).Add cinnamon, cloves, cardamom, fennel , cumin and add the chopped onion, sugar. Fry till onion turns golden. Then add chopped ginger, garlic, whole green chillies, few fresh methi leaves (if available), cilantro and fry till they wilt.
Then add a cup of tomato puree (or chopped fresh tomato) and cook well.
Clean the spinach leaves and remove the thick stems. 
Put the spinach and cook for 1 minutes. Switch off.
Add required salt and let cool.
Then grind to a medium fine puree with whole milk.
Return this to the frying pan and cook till raw smell goes (5 minutes). If needed add little more water.
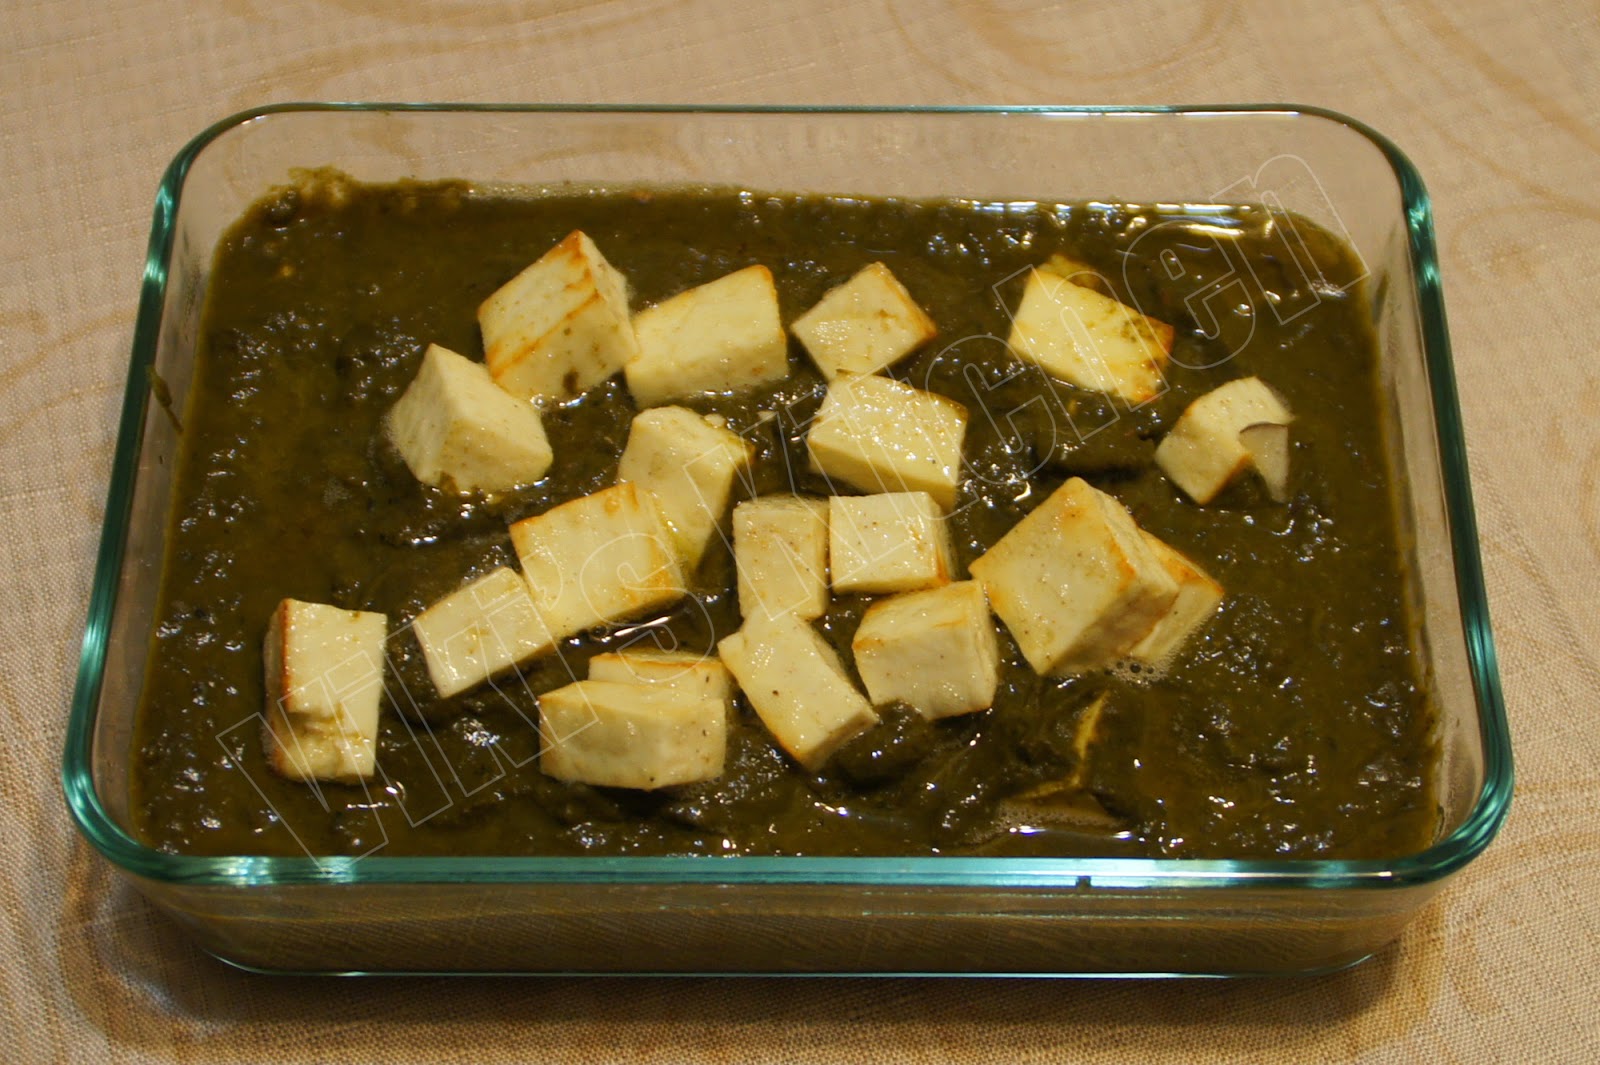
Then add the fried paneer pieces and mix well.
Crush some kasoori methi (dried fenugreek / methi leaves) and switch off !
If needed add some more molten butter while serving.

Palak paneer is ready!

Serving suggestion:
Serve as side dish with chapati, naan, pulka.


Wednesday, February 4, 2015

Chennai special Goat leg soup

Goat leg soup is one of the most healthiest soups of India . I usually make  a simple version to prepare this soup, as I would take half of the soup to serve before meal and use the remaining to make kuruma / paya. Click to see my clear soup method.
Then last year, one of my neighborhood friend made this most popular version of goat leg soup and I got the hint of this recipe also.

Bring everything to a boil with tomatoes.
Ingredients:
Goat leg - 2
Turmeric powder - 1 tsp + 1/2 tsp
ginger- 2 inch
garlic- 1(whole)
Sesame oil - 2 to 3 tbsp
Bay leaves -2
cinnamon- 1 inch
fennel seeds - 1 tbsp
cumin seeds - 1 tsp
black pepper - 1 tsp (whole)+ 2 tbsp (powdered)
Red onion - 2
tomato - 4
curry leaves- 1 sprig
cilantro- 1 handful
mint leaves - 1 handful
Green chilli- 2

Method:
First slightly blacken the skin in legs in flame to burn all the left over hair.
Break it in to two pieces to reduce the length. (In some mutton shops they do these processes before selling).
Then rub and wash it thoroughly by applying 1/2 tsp turmeric powder.
Place the legs in a pressure cooker vessel along with water (10 cups) to immerse the legs. Add 1 tsp turmeric powder.
In a kadai , heat 2 tbsp sesame oil. Add cinnamon, fennel seeds, cumin, black pepper 1 tsp and after it turns red add bay leaves (brinjileaves), curry leaves, chopped onion and saute till onion turns red.
Now put chopped green chillies, cilantro and mint leaves one by one .
Add the ginger garlic paste and saute till raw smell vanishes.
Pour it into the pressure cooker and cook it to get one whistle.
Then reduce the flame and cook in low heat for 30 minutes till the leg gets completely cooked. (or cook till 15 whistles) .Open the lid after the pressure is gone.
Then add required salt, chopped tomato and cook again till tomato dissolves. (we cook tomato in the last to ensure complete cooking of goat leg).
Goat leg soup is ready !

serving suggestions:
Serve before meal or just like rasam over plain rice.
Add some more pepper powder , if needed.

Monday, February 2, 2015

Baked potato snack (Baked French fries)

In my view, 'French fries' is the thicker version of potato chips and it is almost the most favorite snack of the entire world. I have seen kids rushing to reach out to these fries during meal time, than any other food at first sight.
How to get the best French fries?
A. Surely they can be found in a local restaurant :)
B. Buying a pack of frozen French fries and preparing at home:)
C. Making it from scratch.
D. Unconventional methods.
I am sure the first suggestion is the easiest. The next choice is not my favorite version.
The third one requires lots of oil and  definitely the best cooking skills. But I am not sure of the ways to reuse the leftover oil....So my best choice is the fourth one.
If we are not going to fry those potatoes, then baking or microwave is the best.

Yesterday morning, after church, we bought a 10 lb pack of Russet potatoes from Shroprite and then I knew what I was going to do for the snack :) Then in the evening I made these baked French fries for us to have with tea. I am pretty sure that these fries tastes more fresh and as delicious as the fried ones.
Here is one more quick and satisfying treat for the snow days !


Ingredients:
Potato - 3 (Russet or Idaho)
salt - few pinches
Extra virgin olive oil - 2 tbsp
turmeric powder - 1/4 tsp

Method:
Line a baking sheet or tray with aluminum foil. Coat with 1 tbsp olive oil.
Preheat oven to 350 deg C.
Choose potatoes that are long (not round shapes).  Peel the potatoes, wash and pat dry. Slice them in 1/2 inch thick strips.  Pat dry again with a clean kitchen towel.
Add the ingredients mentioned above and mix well.  Spread on the baking tray without touching each other. Bake for 15 minutes one side. Then take out keep outside for 2 minutes and flip by peeling or shaking. It may take some time to do this (2 minutes for me for this quantity).
Then continue baking for 5 more minutes and change it to broil mode for 5 minutes.
Take out and now it will be easy to take them out of the tray (much easier than flipping for me).
 If the fries seem little soft, then microwave for a minute in a plate and voila the crispy Baked French fries is ready ! (I get them perfectly crispy by baking this time, but usually I microwave after baking).

Serving suggestions:
Serve as snack or appetizer with tomato sauce or ketchup.

Tuesday, January 20, 2015

Appam

Aappam or appam (ஆப்பம்) is one of the most comforting foods of South India. One can imagine this as a pancake made with rice flour.  It is a very popular food in Kerala, just like the idli of Tamilnadu. We can get this appam in almost all street side dinner shops in Tamilnadu and Kerala. The side dishes may vary from coconut milk to sambar or egg curry or non veg.  The yeast in the appam has many benefits.

Earlier I have made my mom's recipe for aappam and my own recipe 'easy appam with rice flour' .  The recipes vary from place to place and generation to generation because of the availability of rice quality and weather. Also it varies from family to family also and here is what I got recently from my chithis in Tirunelveli and Tuticorin.
Aaappam with coconut milk


Ingredients: (Makes 12 appam)
Raw rice / Everest basmati - 1 1/2 cup
Idli rice / parboiled rice - 3/4 cup
urid dhal - 1 tbsp
poha (aval) / cooked rice - 1 handful
coconut (shredded) - 3/4 cup
dry yeast - 1 tsp
sugar - 1 tbsp
salt - 1 tsp

Method:
Raw rice is the best. But I have used Everest brand rice that serves both ways and it is economical in my place. Soak  rices, urad dhal , poha  for 2 hours or overnight and grind with shredded coconut to a fine paste. Mix yeast, salt, sugar. Let it be a thick batter like dosa mavu.

Keep it closed and place in a warm place for 12-18 hours. I used to make this batter at night by 9 pm and leave inside oven (heat to 300 for 10 minutes and turn off oven) and in the next day morning there will be bubbles on the surface and the batter would  have risen. Mix well.

Now heat the aappam pan and wipe a drop of coconut oil all over the pan by using a clean cloth.

Check the thickness of aappam batter now. It should be in the more thin in consistency than that of dosa batter.If not so add some coconut milk or water.
Pour 2 ladles of batter,keep heat at medium to low.
Then Shake the pan in a circular motion so that the flour spreads and expands along the edges.(If batter is too thick and does not spread, add a little more milk or water to the batter for the next aapams ). The cooked batter forms a layer of 'lace' around the thicker center portion. It is then covered and cooked in it's own steam over gentle heat.
I wait to hear a dripping sound of water(condensation of steam) .Now we can be sure that the aapam is cooked.Then by using a dosa spatula or spoon gently take out the aapam.

Serving suggestions:
Aapam goes fine with coconut milk.Take coconut milk 1/2 can and dilute it with equal amount of water.Spread 2 teaspoon sugar over aapam and add 4 tablespoon coconut milk over the aapam. Enjoy your aapam.
Number of appam using this recipe is 12

Alternate recipe:
(use these ingredients and follow the above instructions)
Raw rice - 2 cup
Idly rice / boiled rice - 1/2 cup
urid dal - 1 tbsp
shredded coconut - 3/4 cup
coconut water - 1/2 cup
salt - 1 tsp

Wednesday, January 14, 2015

Tuesday, January 13, 2015

How to make coconut milk ?

Making our own fresh coconut milk at home gives much satisfaction than any other version. It creates a good nostalgia for anyone like me who has enjoyed watching their mothers extracting this flavorful milk on a Sunday morning , while cooking the appam on a pan. But somehow I was always for readymade coconut milks.  For many years I have been using a can of coconut milk or coconut milk powder, until I brought my super extractor mixie jar from India. Without knowing the importance of a juicer, some years ago, I had brought only the other jars while we came to USA for the first time and this juicer jar was in our house for  a long time :). Though  I agree that I love the convenience of  readymade milks, I made 2 cups of fresh coconut milk last weekend to serve along with Kerala appam. Hubby dear appreciated this fresh coconut milk with every piece of the appam I made. I was running from kitchen to dining table to meet his appam requirements :) and now I am very sure we will be having fresh coconut milk and appam most of our weekends:).
I am sure most of my blog friends are experts in preparing everything from scratch, but I am just sharing my joy about my coconut milk :) Hope you all like it !
Homemade coconut milk

extracting coconut milk using Super extractor jar.


Coconut milk served with aappam

Ingredients:
Sliced coconut - 1 1/2 cup
(or) shredded coconut - 1 cup
warm water - 2 cups

Common mixie method :
Grind the sliced coconut in a mixer. Add 1/2 cup warm water and squeeze out the milk. Filter it using a fresh cloth. This is the thick milk , which is used in many gravies.
After that grind again and extract milk just like the above three time. Combine all the milks together or keep the thick and thin milks separate as per need.

Using a Super extractor / juicer mixie:
If using a  juicer / super extractor jar from Preethi Mixie, there will not be any need of strainer.
Fix the juicing blade, Fit the filter mesh to the juicer jar.
Put the sliced or shredded coconut directly inside the jar  touching the blade(not in the space outside the filter).
Add 1/2 cup water.
Put the safety lid and close the lid.
Run the mixie in full speed for 30 seconds. The coconut milk will collect in the space between filter and outer jar compartment.
We can pour out the coconut milk straightly out of the jar. This is the thick milk.
After that we can repeat two or three more times to extract all the milk using 1/2 cup water each time.
(I used sliced frozen coconut, which I bought from Indian grocery shop, but fresh coconuts would be excellent).

coconut milk using bare hands:
Add 1/2 cup warm water to the shredded coconut and squeeze the first thick milk using our hands and filter. Then in the same way extract milk thrice.

Uses of coconut milk:
The extracted milk can stay good for at least 3 days in fridge.
Coconut milk can be served with appam, idiyappam.
To thicken curries and gravies in Indian cuisine.
To make biriyani, pulav, coconut milk rice and various rice varieties.
Used in making some kind of kheer like paal kozhukattai.

Chennai Kara Kulambu (vendakkai kara kulambu)

Okra / vendakkai  in tamarind curry. Ingredients: Okra - 150 gm (20 numbers) Onion - 1 Tomato - 1 curry leaves - 1 sprig Garlic - 1 Tamarind...