Tuesday, November 8, 2011

Vegetable biriyani in cooker

Cooker briyani is very common among Tamilnadu people.Though biriyani experts won't accept it as a real briyani, I love this version because of the taste and simplicity. If we have all the ingredients in hand, we can make this briyani within an hour.'Cooker briyani' may be my first dish under the supervision of my mom. Nothing can beat mom's simple cooker biriyani and I can never achieved her perfection till now:) Her secrets are very good quality ghee and cashews, which I hesitate to use because of diet. But I am narrating her procedure here. This kind of biriyani has been a challenge to me since I got used to the dhum / tawa process, as we can't check the rice often in cooker method. But tried this for my blog and got it successful. Posting this fool-proof method for those 'briyani lovers' longing for mom's style briyani:)

Vegetable briyani with potato chips and carrot onion raita.

Vegetables:
Cauli flower - 1/4 flower, potato - 1, butter beans(cooked)-1/2 cup ,
green beans - 10 , carrot -1 , green peas - 1/2 cup .

Other Ingredients:
Basmathi rice / Jeeraga samba raw rice - 2 1/4 cups
salt - to taste
Turmeric powder - 1/4 tsp
Red onion - 1 (big)
green chillis - 5 (slit).
Lemon - 1/4
water - (rice x 2) - 1 = 3 1/2 - curd measure = 3 cups
curd - 1/2 cup

To dry roast and powder:
(or use garam masala powder)
Fennel - 1 tsp
star aniseed - 1/2
kali jeera - 1/4 tsp
cinnamom stick - 2 inch
cardamom - 6
cloves - 4
cumin - 1/4 tsp

To temper: (whole spices)
bay leaves - 2
cashew nuts -10
raisins- 10.
ghee - 5 tbsp

Masala 1:
Tomato - 2

Masala 2:
cilantro- 20 tender plants
mint leaf -1  cup leaves
green chilly - 10
cashew - 5

Masala 3:
Ginger - 2 inch
Garlic - 5 cloves

Preparation:
wash and clean the vegetables. peel the skin of carrot, potato and cut into long thin slices.
Cut the green beans in to long pieces.
Pluck 5 -6 florets from the cauliflower.
Defreeze the green peas.

Wash the rice and soak it for 1/2 an hour.

Grind all the pastes separately.

Chop onion, chilly into long thin slices and keep aside.

Method:
Heat ghee in a broad vessel or cooker.
Add the bay leaves and items given under tempering.
Then goes the chopped onion .
Fry it till golden brown and add the ginger garlic paste and stir well till the raw smell goes.
Now add the tomato paste and cook till the oil oozes out of it.
Then add the cilantro , mint paste and cook till the oil start oozing out. Now put the vegetables and add salt, powdered garam masala. Just stir well. Don't cook them now.
Now add the soaked rice and uncut green chillies to the cooker vessel along with the prepared masala. Squeeze some lime juice over.
Boil the require water separately and pour water, curd, mix well now and check for salt in this stage.Let it come to a boil. (Boiling the water before adding helps in evenly cooking the rice , otherwise sometimes we get some uncooked rice while making briyani).
Close with the cooker lid and put a pressure valve.

(I use a cooker vessel inside the cooker and pour some water around the base cooker, just like idly cooking. Mine is a 10 liter cooker, but we can prepare it directly in cooker if we have a small pressure cooker).

Wait till a whistle comes. Reduce the flame to medium and cook for exactly 5 minutes. Switch off and open lid once the pressure is gone.
Add a little ghee over the biriyani and wait for few minutes. Don't stir now.

Vegetable biriyani in cooker is ready!

Serving suggestions:
Take out the briyani carefully without mashing the whole rice and serve hot.
Serve vegetable biryani hot with onion raitha  and potato chips.
Serves 4 people or more people.

My other briyanis:
Layered vegetable biryani,
Hyderabadi vegetable briyani
vegetable tawa biriyani.

Thursday, November 3, 2011

Kathamba Chutney (mixed chutney)

Kadambam / kathambam - mix of varieties; Chutney - Indian dipping.

Even though coconut chutney is a common side dish for Idly , there are many chutnies in my native that will make us vote for the homely Idly dosa. Every ingredient in this chutney is a blessing that makes it healthy and flavorful.

This is my mom's favorite too. I thought it will be nice to publish this as it is her birthday. Some years back, one fine morning my Amutha Anni (Sister inlaw) prepared it with Idly during her first visit. It was a big delight for our taste buds that got used to the regular coconut chutney and also it was her first dish in my dad's home. We were all surprised to see the young doctor preparing that chutney extremely delicious. Mom liked the chutney very much and told everyone she knew of it:) I fondly remember the way she admired anni and after that , this mixed chutney has become my favorite too.

Enjoy!


Ingredients:
Onion - 1 big
Cilantro / coriander leaf - a small bunch
mint leaf - handful
curry leaf - 2 sprig
tomato - 1
garlic - 2
ginger - 1 inch
cumin - 1/4 tsp
salt - to taste
tamarind - 2 inch
coconut - 1 tbsp
red chilly - 5
black gram - 1 tbsp
mustard - 1/2 tsp
oil - 1 tbsp + 1 tsp

Method:
Heat 1 tbsp oil in a wok.
Fry the dry red chillies, urad dhal (black gram), till the chillies turn glossy and take them out.
In the same wok, add the onion , ginger, garlic and fry till onion gets a golden color.
Add the tomato and cook till it mashes.
At the same time wash the cilantro and mint leaves to remove any impurities.
(I wash thrice or till it runs clear).
Slide in the clantro, curry leaf, mint leaf and stir for a few seconds / till they wilt.
Switch off. Put the salt, cumin, fried chillies, dhal and let them cool.

Grind the ingredients with 1 tbsp water.

Take the chutney in a serving bowl.

In a separate wok pop the mustard seeds in 1 tsp sesame oil, slide in some curry leaves and run over the chutney.

Mixed chutney is ready!

Serving suggestion:
Serve hot as side dish with idly or dosai.
Also goes well with chapathi.

Tuesday, November 1, 2011

Kappa kizhangu

Yezhu ilai kizhangu poriyal / aal valli kizhangu/  yucca root stir fry /  cassava / tapioca stir fry.

Though I am calling it as poriyal, this is not a poriyal for a Keralite. I have seen them serving this as 'kappa' along with fish curry. This is a main dish like rice.

I got introduced to this kappa kizhangu dish, through my mom's friend, Saranya Amma. Many years ago, she was our new neighbor when we did the housewarming in appa's new house. Her husband had a great taste for gardening and he planted a lot of tapioca roots in their backyard along with many beans and greens. Their kitchen garden was marvelous and we like the way she mingles with us all. I learned some gardening skills from that aunt. The tapioca grew extremely fast and he harvested lumps of roots, which they shared with the whole street:) She introduced us to many dishes using kappa.
One among them is the stir fry or poriyal. The more moistened version is taken along with fish curry just like rice as kappa.

Kappa Kizhangu.

Ingredients:
Yucca root - 2 lb (or) 1 (big)
green or red chillies - 3
salt - to taste
turmeric powder - 1 tsp
shredded fresh coconut - 1 cup
Coconut oil - 1 tsp
mustard seeds - 1 tsp
curry leaf - 1 sprig

Method:
Wash the root to remove the soil.
Slice it into big chunks (4 inch long) and remove the bark just like we do with a sharpener and  pencil:)
See 'How to remove the yucca skin?'. It is interesting:)
Then wash again and put the chunks in a big vessel and add enough water to cover it. Add the turmeric powder and 1 tbsp salt. Cook covered for 15 minutes. Check by piercing a knife. It should pass through easily and the root should start falling apart. Otherwise cook again till it becomes soft.

Remove the cooked roots and discard the water.
Chop it into 1 inch cubes.

Heat the oil in a wok and add the mustard seeds. Once it finish popping add the finely chopped chillies, curry leaves. Then slide in the yucca cubes and stir well. Add little more turmeric and salt if needed. Sprinkle a handful of water and cook covered to make more moist.

Switch off and add the freshly shredded coconut.

Kappa kizhangu is ready!

Serving suggestions:
Serve as main course along with fish curry.
Also can be simply served as tea time snack without any curry.

Thursday, October 27, 2011

Unniappam

Unniappam or Neyyappam is a famous sweet dish from Kerala. It is similar to Tamilnadu's 'inippu kuzhipaniyaram' with some banana. some months ago I tasted this made by a friend and absolutely loved it. Making perfect shaped paniyaram using my heavy pan is a challenge for me, so I needed a detailed recipe. Then I googled and got this recipe from this video that gave me the spongy unniappam. Try this during a rainy weekend and enjoy!

My puff pancake pan serving as traditional thick bottom appa kal:) Minimum heat is the secret behind paniyaram.
Unniappam after flipping.
Pillow-soft unniappam ready to eat !

Ingredients:
Rice flour - 1 cup
maida (AP flour) - 1/2 cup
ravai (Sooji) - 2 tbsp
(sooji makes flipping easy)
jaggery (or) palm jaggery - 200 gm (1 cup)
coconut - 2 tbsp
cardamom - 2
banana - 1 (well ripe)
raisin - 4
baking soda - 1/4 tsp
coconut oil / ghee - 1/4 cup (as per need)

Method:
Mix jaggery with 1/2 cup water and bring it to a boil. Switch off, let it dissolve. Filter and remove any impurities. Let it cool.

Grind banana, coconut, raisin,cardamom together to a fine paste.

Mix all the three flours in a mixing bowl. Add the banana paste and jaggery solution, mix well. It should be thick like idly batter. Let it soak for 2 hours.
(We can keep the batter after 2 hours inside fridge and use for a week).

Just before preparing the unniappam, add the baking soda, mix well and let it rest for 10 minutes.

Heat a paniyarakkal (paniyaram pan / puff pancake pan) or appakaral. Add oil/ ghee till 1/2 of the depth of each hole (first time only, then 1 tsp in each hole will do). Let it get hot.

Then pour the uniappam mix in each hole till 3/4.
Reduce heat to the minimum and wait till its cooked on one side.
Then with the help of a wooden skewer (vadai kambi), gently flip the appams.
Let them cook in that side too.

Then take them out and drain the excess oil using a kitchen towel.

Unniappam is ready!

Serving suggestion:
Makes a tea time snack or a  traditional breakfast.
Makes 28 pieces
(7 hole paniyaram pan X 4 times)

Tips:
Mix oil and butter / ghee to get a more flavored neyappam.
Cook the unnippam covered with a tight lid, if it sticks to pan.

Monday, October 24, 2011

Badam Halwa

Happy Deepavali to all my readers and friends! Hope many are busy preparing Diwali snacks. Here is a recipe from my kitchen for your family.

Badam - Almond ; Halwa - fudge.

Batham halwa is a popular dessert of India. Till our good friend Mr.Kannan and family gave us a box of this Badam halwa, I never knew if it is my hubby's most favorite. Thank you friends! I have always ventured into typical South Indian desserts for festivals, but the way Xav enjoyed this almond halwa, scoop by scoop....made me try immediately:) Basically it is a one line recipe with just soaking, grinding and stirring....but involves some essential tips too. I got the recipe from this website and it was so simple and impeccable. Visit her and you will be definitely tempted by that big tray of Almond halwa. Thank you Chithramma!

Home made Badam halwa.

Ingredients:
Almond - 1 cup
milk - 1 cup
ghee - 1 cup
sugar - 1 cup
saffron - few strands
cardamom - 4

Essential Tools:
Thick bottom broad wok
a long handled stirring spatula.
hand gloves - a pair

Method:
Soak almond in water overnight and peel them (or) put them in boiling water and keep till its skin wrinkles. Then add cold water and peel them.
Grind the almonds to a paste using milk. It should be coarse like idly batter, so that we get a nice almond texture afterwards.
Put 1/2 cup ghee, ground almond and cook in a wok for few minutes. Then add the remaining ghee and sugar and stir continuously at medium heat.
Now we will see bubbles (approximately after 10 minutes), reduce the flame and stir carefully. Hand gloves is a must to remain safe at this stage.
After 5 minutes the bubbles will subdue and the halwa will start leaving the edges and ghee starts showing up.
Add the cardamom powder and saffron. Mix well.
(Yellow food color 1 drop can be added if we need more color.But that won't be essential).
Switch off and carefully transfer to a ghee coated ornamental vessel.
Total cooking time 20 minutes.

Serving suggestions:
Serve hot as dessert.


Happy Deepavali!

Tuesday, October 18, 2011

Thengai Podi

Thegai podi - dry coconut chutney powder, kopparai thenga podi, instant coconut rice powder.

I prepare this kind of ready to eat podi during festival times, as I will be much occupied with snack making and won't have much time to concentrate on regular cooking. Paruppu podi and thengai podi can make that hot rice heavenly with just a drop of ghee and appalam. Before marriage I packed this podi for hubby dear as a gift(along with paruppu podi and a sweet)and from then on it became his favorite. He saved those 'plastic sunrise coffee bottles' which I used to pack and showed me after marriage and keeps them as a treasure till now:) It may be a small gift from my side, but the way he remembers it makes me enjoy cooking:)

Thengai podi in container.
Ingredients:Shredded coconut - 1 1/2 cup (or) dried coconut / kopparai thengai - 1 (small)
(I used dry unsweetened coconut)
dry red chillies - 10
tamarind - 2 inch
bengal gram (kadalai paruppu / channa dhal) - 2 tbsp
black gram (urad dhal) - 2 tbsp
cumin - 1 tbsp
curry leaf - 2 sprig
salt to taste (1 tbsp)

Method:
Heat a tbsp oil  and fry the dhals, cumin, tamarind, curry leaf separately and keep aside.
With 1 drop of oil fry the red chilles to get a nice red flavor (not black).
In the same pan add  the coconut pieces / shredded coconut and fry to get a mild red color and nice flavor (do it in low heat). If needed add a few drops of oil.
Let them all cool. Then dry grind them to a fine powder.
It can be kept safely for a month without refrigeration.

Serving suggestion:
It can be served over hot rice with little ghee or mixed and served as quick coconut rice.
Its a good side dish for curd rice also.

Tips:
*Coconut chutney podi / thengai podi holds good as a travel food during vacations. Sometimes people require home made foods during long journey or pilgrimage. In that case a rice cooker along with this thengai podi will do the job:)
*This podi can be used as replacement for coconut paste in any dishes.
*Adding little water with a handful of this podi will become a chutney for idly/ dosa / tamarind rice.

Friday, October 14, 2011

Carrot orange juice

Breakfasts are a must for a healthy start. Juices coupled with a protein rich breakfast is a must for athletes or body builders and also for everyone :)  Homemade juices are not only healthy but also they can be altered according to our need. Here is a juice, rich in vitamins and minerals.

carrot orange juice.

Ingredients:
Carrot - 1
orange - 2
ginger - 2 inch
brown sugar - 4 tsp (optional)
cold water - 2 cup

Method:
Peel the carrot and grind it to a paste along with ginger.
Extract the juice using a filter and some water.
Squeeze the juice from orange. Don't filter to remove the fiber, as it is highly beneficial.
Mix the orange juice with the extracted carrot juice and add enough sugar.
Carrot orange juice is ready!

Serving suggestions:
Serve as a healthy drink along with breakfast.

Thursday, October 6, 2011

Wheat oats Ladoo

Happy Dussera to my readers and friends!

Here is a semi-healthy snack to munch on:)


Ingredients:
Whole wheat flour - 1 cup
oats - 1 cup
puffed channa dhal (pori kadalai) - 1/2 cup
brown sugar / white sugar - 1 1/2 cup
cardamom powder - 1 tsp
ghee - 1 tbsp + 1 tbsp
cashew , raisin - 1 for 1 ladoo
milk - 1/2 cup
dry ginger powder (sukku) - 1 tbsp

Method:
Heat a wide frying pan with 1 tbsp ghee.
Fry the cashews , raisins in the ghee.

In the same wok fry the oats till it turns crispy and mild pinkish.
Once it gets cool, grind it to a fine powder. Keep aside.

Now add the remaining ghee and start roasting the wheat flour.
After some time, the flour will turn very loose and flavorful.
Roast it in medium flame till it starts turning mild pink.
Take it off the wok and let cool.

Grind the puffed channa dhal to a fine powder along with cardamom.

Powder the brown sugar / white sugar in a blender.

Mix the 3 flours, sugar, nuts, ginger powder and sprinkle some milk to moisten it.
Let it be just enough to make balls and not sticky as we are not going to knead it as a dough:)

Make lemon size balls. (It should be soft and powdery, but holding the shape).

Wheat oats laddu is ready!

Serving suggestion:
Serve as snack.
If made with 1/2 cup ghee instead of milk, it stays longer.
If made with milk it can be refrigerated for a week.

Tuesday, September 27, 2011

Thengai mangai pattani Sundal

Thengai - coconut; managai - unripe mango; pattani - dry green peas ; sundal - stir fry.

Navaratri is a festival celebrated by Indians for 9 days continuously during the month of Purattasi. The festival starts today and  hearty wishes for those who are celebrating that.

Kolu (themed arrangement of dolls and statues to depict the Indian culture) and sundal (lentil stir fry) are inseparable during those days. Those who arrange the kolu has to invite friends and relatives. Different types of sundals are made, offered to God and shared with the guests. The 10 th day is called Vijaya Dasami, meaning the victory of Good.

Here is a different and interesting sundal. A spicy sundal is made using cooked dry peas and some masala. Freshly chopped cilantro, unripe mango, onion, tomato, coconut are added before serving. This is also called 'marina beach sundal'.


Ingredients:
Dried peas (white / green pattani) - 1 cup
Turmeric powder - 1/2 tsp
oil - 1 tsp
fennel - 1 tsp
curry leaf - 1 sprig
salt - to taste
lemon juice - 1 tbsp

To grind:
dry red chillies - 4
coconut - 2 large pieces
cumin - 1/2 tsp
coriander powder - 1 tbsp

To Garnish:(finely chopped)
Onion - 1
unripe mango - 1/2
tomato - 1
cucumber - 1/2
coconut - 1 large slice
cilantro - few

Method:
Soak the dried white peas overnight. Drain that water.
Add enough water to immerse the peas and 1 inch to stand above.
Keep it in pressure cooker with turmeric, put pressure valve and let a whistle come.
Reduce the flame and keep it for 5 minutes.
Switch off and open after the pressure releases.

Grind the items given very coarsely.

Heat oil in a kadai. Add the fennel and let it get red. Then add the curry leaves, cooked lentil, salt and let all the water evaporate.
Now add the coarsely ground masala and cook till it becomes grainy.

Sprinkle lemon juice and add all those items given for garnish.

Serving suggestion:
Serve as snack with tea.
Serves 6 people.

Friday, September 23, 2011

Paruppu Podi

A simple serving of paruppu podi over piping hot rice and ghee is my hubby's favorite meal. Paruppu podi or dhal powder is a must for anyone who wants to avoid those weekend's Extra large pizza deals:)

Steaming rice served with paruppu podi, ghee, appalam and vadagam.

Ingredients:
Puffed channa dhal - 3/4 cup
channa dhal - 1/4 cup
Thoor dhal - 1/4 cup
black pepper - 1 tbsp
dry red chillies - 4
salt - to taste
cumin - 1 tbsp

Method:
Dry roast (except salt) everything separately until they loose moisture.
Grind to a fine powder. Let cool and store in air tight container.

Serving suggestion:
Gracefully serve a big spoon of piping hot rice in a serving plate / banana leaf and pour a generous spoon of molten ghee over it. Top it with few tsp of this paruppu podi , mix and enjoy.

Paruppu podi should be served over rice before serving the sambar rice.
Usually a little portion of rice is allocated for this paruppu podi + ghee before serving the sambar.

Pappad and pickles make good combo for the above rice.
This can be kept handy for lazy cooking days.
Paruppu podi is a good backup plan for bachelors and students who stay away from home.
Long distance pilgrimage people can keep it as travel food, if they can make some rice using electric cooker.

Thursday, September 22, 2011

Mango pickle

Nowadays many of us are not including pickles in the daily menu. But there were days when we wanted to have some pickle everyday along with that paruppu kulambu and rice:) In such situation homemade pickles are better. My mom used to make these mango pickles during the mango season in smaller batches and it would always vanish in a day or two:) she would keep a small piece of some kind of pickle in our everyday lunch boxes, so that we consume the rice without any hesitation. Those were very little incidents but her care and thoughtfulness always amazes me.

Here is an instant mango pickle for those picky eaters:)


Ingredients:
Unripe mango - 1 (1/2 kg)
red chilly powder - 4 tbsp
mustard seed - 1 tsp
fenugreek seed (methi/venthayam) - 1 tsp
turmeric - 1 tsp
salt - to taste
sesame oil - 1/4 cup
hing / asafoetida - 1/4 tsp

Method:
Select unripe mango with lesser sour taste (like pacharisi maangai or kilimookku - Tamil).
Finely chop the mango.
Heat oil in a kadai.
Add the mustard and fenugreek and wait till mustard finishes popping.
Slide in the chopped mango with enough salt and turmeric.
Add the hing powder too.
Stir continuously and wait till the mango gets cooked.
Then put the red chilly powder and let it cook in low heat till the oil oozes.
Instant mango pickle is ready!

Serving suggestions:
Serve as side dish with curd rice, sambar rice or paratha.

Tips:
To increase the shelf-life add 2 tbsp of vinegar or juice of 1 lemon after the pickle cools and store in a dry jar. If handled with a clean dry spoon and care, this pickle can stay for a week in room temperature.
If refrigerated, this lasts longer even without vinegar or lemon.

Monday, September 19, 2011

Tandoori chicken drumstick

Almost a few Kms away from my dad's house , a couple started a restaurant solely for north Indian non-veg dishes in a place called Ponnakudi. That restaurant grew very fast and became a center of attraction for many tourists and passers by. Till now its unbeatable there, though not famous like a chain of restaurant. My elder brother used to buy this for us and I absolutely love this smoky flavored tandoori chicken which was rare at that time.
One day I expressed my wish to the owner to see that oven. It was a small restaurant at that time and the lady of the house gracefully took me to the kitchen and surprisingly it was extremely clean like our homely kitchen. Marinated chickens were kept in lidded vessels. Kitchen was spotlessly clean and workers were threading the whole chickens into the oven with much care. I was thrilled to see such an enormous oven and it was much interesting to see their clay oven baked naan and whole chickens. As my mom was not that much attracted to restaurant foods we rarely enjoyed that chicken whenever my brother comes home.

Earlier I posted another detailed post on an authentic tandoori chicken and that's how it is meant to be. Click to see that post on a regular tandoori chicken.

Then I customized that original recipe to my needs and started preparing drumstick tandoori or whole chicken tandooris. Hope you all like it.

Tandoori drumstick chicken served with lemon wedges.
Pat dry the chicken after washing it.

Ingredients:
Chicken drumstick - 5

Marination:
vinegar - 1/4 cup (or) lemon - 1
curd - 1/4 cup
olive oil / butter - 1 tsp per piece
salt - as per need (1/4 tsp per piece)
red chilly powder - 2 tbsp
garam masala powder - 1 tbsp
ginger garlic paste - 2 tbsp
all purpose flour - 3 tbsp
turmeric powder - 1 tbsp
black pepper powder - 1 tsp
cumin powder - 1 tsp
Red food color - a pinch (I won't suggest it)

Method:
Wash the chicken drumstick and pat dry using paper towel.
Make 3 to 4 slits per drumstick and keep aside.
Mix everything given for marination in a large mixing bowl.
Put the chicken pieces and mix well.
Cover and refrigerate 6 hours or keep marinated in room temperature for 3 hours.

Preheat oven to 350 deg F.
Line a cookie sheet or baking tray with aluminum foil.
Apply a tbsp oil over the foil.
Keep the marinated chicken pieces with some spacing.

Turn after 15 minutes.
Let it bake both side for 10 minutes.
Then turn the oven to broil mode and keep for 3 minutes both sides or till we get red color.

Tips:
If needed add some red food color while marination.
BBq will also yield a similar quality tandoori.
If oven is not preferred, then shallow fry the pieces with very little oil and make it red by putting over hot dosa tawa.

Serving suggestion:
Sprinkle some chaat masala before serving.
Wrap a piece of aluminum foil at one end to make it holdable:)
Serve hot as side dish with biriyani, paratha etc.
Lemon wedges, onion slices or raitha are often served along with this tandoori.
It can be reheated by Microwave or using a dosa tawa.
The left over can be made into a gravy.

Friday, September 16, 2011

International festival and How to cook rice for pulav :)


Last week (Sep 10, 2011) we had an International festival in our Church after Mother Mary's Birthday (Sep 8). Groups were made according to their ancestry. The theme was to make some educational displays and explain them to the public, dance, auction, stage performances and most importantly a buffet dinner:) Many Indians put a lot of effort on making it successful.   I couldn't do much with hubby's schedule, so limited myself with  food preparation alone. As a food blogger I wanted to make some Indian dishes with some historic importance. So I chose for me 'Mogul influence on Indian cuisine' and prepared '
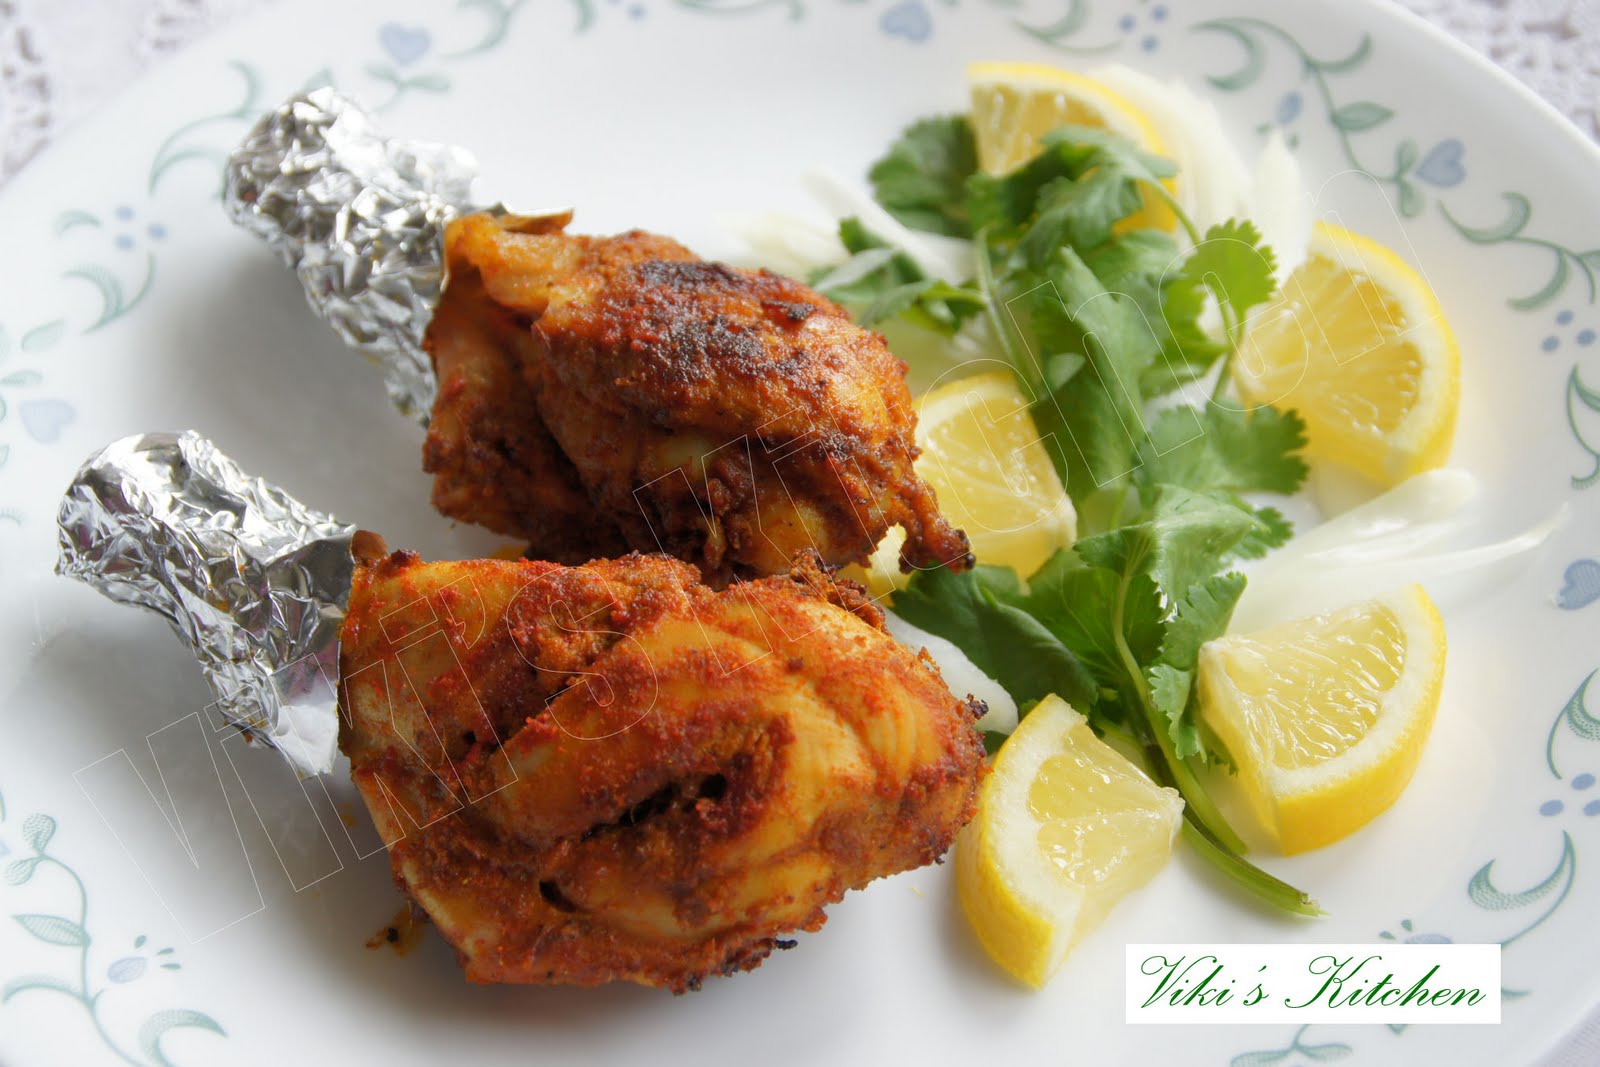
Chicken sheekh Kebab and Kashmiri Pulav' to suit everyone's palette. We were instructed to bring one tray of chicken dish in dry state and another big tray of rice. My friends had brought fried chicken, mint chicken, Rava kesari, Sheera,fried rice, capsicum rice, butter chicken etc. One Indian family had to bring the food warmer set-up.

I calculated the quantity of rice as if everyone (600 people and I have to cater some 80 plate) takes a tbsp of Indian rice and there was nearly 6 trays of rice. So I had to make for some 80 - 100 tbsp or little more than that, as a few can't take foreign food.
I took 8 cups of rice and made that pulav with equal amounts of nuts, dry fruits and fresh fruits.
I made kebabs out of 4 lb chicken and I got 48 pieces totally (which was cut into half  while serving). Making Sheekh kebab was not that difficult as I expected , as hubby dear helped me lifting those heavy baking trays which I find tiresome always.

But I was expecting a challenge in cooking rice. I wanted to make them super fluffy and grainy as that of the restaurant pilaf and was looking for good ways to cook fluffy rice. Then I found in a website 'how to cook perfect rice for pulav' and I am much thankful to that person. Though that is a simple post, I should thank the author enough, because that made my pulav adorable (I will publish the pictures soon). I used all the tips and added a few to make it fast.

I started cooking the rice by 7 Am and finished both the dishes by 1 pm.

The buffet was from 5.30 Pm to 11 Pm (Anyways finally they wanted some one to stand along with the food to serve/ guide/ explain...and I happily enjoyed my role there for 2 hours answering their questions and analyzing the American views on Indian foods).They preferred the non spicy foods and many wanted to try newer dishes. They were looking for some authentic Indian foods. I was amazed at their knowledge on Indian cuisine and I noted down the name of the dishes. I will try to make a few dishes as per their suggestion next year. Then the ladies were more interested in knowing about our Indian salwar kameez and jewels :)
Hubby and myself thoroughly enjoyed the day and tasted many dishes from SriLanka, Philippines, Kenya, England, France USA.


Here is the step by step instruction for cooking the perfect rice and few tips on party planning:

1. Calculate 1/2 cup or 100 gm of uncooked rice for each person for a homely party while 2 tbsp of cooked rice will be enough for pot luck (as there will be more food from your friends too).

2. Select a long grain basmati rice for pulav/pilaf/pulao. Short grain Jeeraga samba for Tamilnadu biriyanis. Raw rice / pacharisi / sona masoori for all the variety rice like tamarind rice, lemon rice etc. Ponni puzhungal arisi or sona masoori pacharisi for sambar rice.

3.Plan ahead and write down the procedure with steps to avoid last minute confusions. Measure the required rice and keep closed the day before.

4.Start cooking as early as possible. Desserts can be made days ahead and refrigerated. But rice and non-veg SHOULD be cooked on the same day.

5. Wash the rice in cold water till it runs clear or 3 times.

6. Soak it in large quantity of cold water for 30 minutes to 1 hour. More time than that or hot water soaking will break the rice.

7. Bring 6 cups of water to boil for 2 cups of rice. Add 1/2 tsp salt,juice from 1/4 lemon, 1 tsp butter / oil.If making a colorful pulav, add the turmeric powder for yellow color and other organic food colors at this stage.
Now add the soaked rice (without any water) and cook till it is 80% done. The rice should be long and stiff but if you bite it it should not be raw. 2 cups of rice will be done in 4-5 minutes after boiling.
**If preparing the hyderabadi vegetable biriyani or hyderabadi chicken biriyani, follow everything above...but cook the rice 50% (check for a little raw taste after cooking) and it will be perfectly done with layering**.

8.We should have a rice drainer or a big size colander (vadi katti). Place the colander over a vessel and immediately pour the cooked rice over it. After the water is almost drained (less than a minute). Discard the water or save it for cattle:)

9. Now bring the colander under running water or pour some cold water above the cooked rice and wash away the sticky carbohydrate. Anyways it is not how I cook for everyday, but since its a party , we have to present the rice in an ornamental way.

10.Keep the rice aside and wait till all the water drains. (The original post says to keep for hours. But I kept for 10 minutes).

11.Spread the rice in a large plate or very large mixing bowl. Let it cool. Don't mix or add anything in warm condition. In big scale production, I have seen the chefs keeping the rice over a new and clean white dhothi (veshti).

12.Once it is cool, add the required mixing or do the layering to get your pulav or biriyani.

Tips:
*Always write down the name of the dish and ingredients list and stick near the tray for a large gathering like this, as it will help many to taste other national cuisine without hesitation.

Hope I have mentioned all the tricks I used to make the pulav as I got many requests on this fluffy rice finish and of-course for the recipe too :)

Wishing you all a very happy weekend and enjoy making restaurant quality pulavs at home:)

Sunday, September 4, 2011

Vegetable Uthappam

Uthappam / oothappam - a thick spongy version of dosa often made with left over dosa batter and a lot of flavorful toppings to make it irresistible:)

Have you ever got inspired to prepare a dish by a comedy video? Well, I did :)  Hubby and myself started liking this uthappam more than we do normally, only after watching this video. Here the famous Tamil comedy actor Mr.Vadivelu explains a waiter how his uthappam should be made:)
Click to watch that if you can understand Tamil. Otherwise read the next para:)

The video:After ordering the uthappam, Vadivelu explains the waiter on how to clean the dosa tawa (with the clean side of an oiling broom, yeah you are right..its a broom but not used for sweeping the floor ), then on the size of the dosa (not too big....not too small....but with a medium dia.), next on the vegetables to go over dosa (onion, carrot etc), then comes a surprisingly 16 tsp ghee over that dosa (we can never do that to our waistline...hi...hi), and to shower-spread some idly-podi all over that and to bring that dosa folded with a golden-red hue. But to his dismay, after hearing the whole mouthwatering recipe, the waiter will shout 'UTHAPPAM for this table' to the chef, as if he has not heard anything. One cannot stop laughter on seeing the customer vadivelu's disappointed face now:)

But how can I, the obliging housewife (hey! just for fun...hi...hi),ignore my regular customer's (hubby's) wish to get a same dosa like Vadivelu's? So I made it for him with just 1 tbsp ghee and not that 16 tbsp...let it be a secret:)

If you watch this video, the next thing you may want will be this vegetable uthappam. So I have narrated this vegetable uthappam recipe for my friends with everything in that ingredient list except the ghee part:)

Enjoy!


Vegetable uthappam tastes great with a sambar and coconut chutney combo:)

Ingredients:
Dosa / idly batter - 2 cup
(thosai mavu)
besan flour - 2 tbsp (optional)
baking soda - 2 pinch
ghee - 2 tbsp
sesame oil - 2 tbsp
onion - a handful for 1 dosa
green chilly - 1/2 for 1 dosa
carrot - 1
idly podi - 2 tbsp
curry leaf , cilantro - a handful

Method:
Take required quantity of sour idly batter. Add baking soda, besan flour and mix the batter briskly for few times. Let it sit for 10 minutes.
Heat a dosa tawa. Drizzle 2 drops of sesame oil over the pan.
Using a clean cloth or wooden spatula rub the oil uniformly over the tawa.
Take a ladle of batter and pour it gently over the tawa and spread it to a thick but small dosa (6 inch dia. approximately). Reduce the flame to medium heat.
Spread the finely chopped onion, carrot, chilly, curry leaf, cilantro over the uthappam. Pour some sesame oil + ghee around and over the dosa.
Strew a tsp idly milagai podi over the uthappam.
(Place a dome shaped lid to cover it. The uthappam should be cooked in that steam to get a spongy texture inside. This step is optional, but I prefer this)
After few seconds flip the uthappam and let it cook the other side for less than 30 seconds. Take out the dosa Again increase the flame, apply oil and repeat the above process to make as many uthappam as we need.

Serving suggestions:
Serve hot with Coconut chutney and sambar.
Other best combinations are Arachi vitta sambar, groundnut chutney.
Once we start making the uthappam, we have to serve it immediately to get that true taste.

Tips:
We can add any left over poriyal like beans poriyal, cauliflower fry, cabbage fry etc also as topping.
Add a tbsp of besan flour to every cup of dosa batter to get a golden red uthappam.
Sour dosa batter can only give a delicious uthappam. If its not so, then add some desi yogurt/ buttermilk and leave for a few hours or start preparing immediately.

Saturday, September 3, 2011

Friday, September 2, 2011

Unripe Tomato koottu

This is a simple koottu / curry / subzi,  common in parts of Tamilnadu. We can see a small kitchen garden in almost every home and tangy tomatoes grow abundant and succulent throughout the year in India. One need not wait to get all their tomatoes ripe, just pluck a few big green tomatoes...enjoy that fresh flavor arising from the leaves and stem, (if you have not before)....even our palm will smell like tomato for a few hours.....isn't it completely relaxing:)

Getting some unripe green tomato is extremely difficult here. Last summer I got a few (see the picture below). The curry should be more on the tangy side. So if you doubt the taste, then try adding one ripe tomato to it. We can make this curry with ripe tomatoes too, but it will be like a thakkali kulambu:) . This can be prepared with tomatillos (sodukku thakkali)also. Tomatillo can be bought in any local grocery store at any season and they are the best fit to make this koottu, next to our native thakkali kaai:)

Source: I got this recipe from my Rukmani aunty while she was preparing this years ago:)

Half ripe tomatoes, I got from store.  If possible get them all in green like the only one above:)

Thakkali kaai koottu / Green tomato curry.

Ingredients:
Unripe green tomato - 1/2 kg
Toor dhal (red gram)- 1/4 cup
channa dhal - 1/4 cup
garlic - 2 pearls
turmeric - 1/2 tsp
asafoetida / hing - a pinch
Onion - 1
curry leaf - 2 sprig
mustard - 1 tsp
urad dhal (black gram)- 1 tsp
coconut oil - 1 tbsp

To fry and grind:
Channa dhal (bengal gram / kadalai paruppu)- 1 tbsp
dry red chilly - 4
cumin - 1 tsp
shredded coconut - 1/2 cup
oil - 1 tsp

Method:
Pressure cook the dhals together with garlic, turmeric, little water, hing. Mash them together coarsely. keep aside.
Heat a tsp of oil in a wok and fry the channa dhal to red color, keep aside. Put the red chillies and take out immediately after it gets crispy. Then fry the coconut to get a nice smell. grind them all together to a coarse paste.

Now chop the tomatoes and onion into small pieces.
Heat oil in a wok and let the mustard splutter. Then goes the split urad dhal along with onion and curry leaves. Fry them for a minute and don't let them get red. Immediately add the tomatoes. Add 1/4 cup water, salt and cook covered for 5 minutes (not mushy). Then add the ground masala, cooked dhal and bring it to a boil. Switch off.

Thakkali kai koottu is ready!

Serving suggestions:
Serve as side dish with chapati, roti.
The best match is with plain rice and some appalam.

Tips:
It is more common to prepare this koottu without garlic and onion.
Total time taken less than 30 minutes.

Wednesday, August 31, 2011

Tuesday, August 16, 2011

Sweet Paratha.

Belated Indian Independence day wishes to all my readers and friends. Here is a healthy dessert idea for the oncoming Vinayagar Chathurthi festival. Happy celebration to all!

This is a green gram based boli / poli/ stuffed paratha.

Some months back I prepared this  paratha, when hubby had a different work schedule. I prefer giving a homemade snack pack especially on such days, so that I can track what he eats:) The beauty of this paratha is the rich fiber content with some jaggery. As we all know how fiber gives a 'fullness' feeling for a long time and so this can be a perfect choice for an evening snack. I prepared the stuffing on the previous day and kept it refrigerated. The next day by early morning I prepared these parathas, let them cool and kept them in rubbermaid lunch box. I am glad that everyone liked it. I am sure this will be a great choice for kids who prefers stuffed parathas for lunch.


Outer layer:
Wheat flour - 1 1/4 cup
Turmeric powder - 1/4 tsp
salt - a pinch
Sesame oil - to make paratha

Mix the flour, salt, Turmeric powder.
Add water little by little to get a thick chapathi dough like consistency. Coat it with little sesame oil and cover it with a wet cloth / clear wrap.We can prepare this dough and keep in fridge overnight.
Before making the paratha leave it in room temperature for 1/2 an hour. After that divide the whole dough into 12 (or equal size balls) portions.Shape them in to balls. Keep aside.

Stuffing:
Green gram - 3/4 cup
Jaggery - 3/4 cup
cardamom powder - a pinch
shredded coconut - 1/4 cup (optional)

Method:
Soak the dhal for 2 hours. Cook and remove the water. Mash the moong gram. (We can use the water to make rasam / soup). Mash the dhal to fine paste using a mixie / a spatula. Heat 1/4 cup water and dissolve the jaggery in it. Then filter any dust / sand present. Mix the jaggery solution with mashed dhal and heat it in a wok. Add coconut and powdered cardamom now. Let it loose all the moisture and become a thick mass.
Switch off stove and let it cool. Divide it in to equal size balls.

To prepare paratha:
Take one 'wheat flour ball'. Apply oil to it. Using a rolling pin flatten it to a circle. Do not use flour to spread the circle. Instead apply oil generously to spread it.
Take one 'stuffing ball'. Place it on the center of the circle.
Now fold it with the covering dough closely , so that no stuffing can be seen from outside.
Now again apply some oil and carefully spread it to a thin circular shape (approximate diameter should be 5 - 6 inch). Don't worry if you see some pooranam from inside in this stage, as it will become fine after frying.
Heat a dosa tawa. Evenly apply sesame oil on the tawa .Reduce flame and fry the bolis on both sides till we see some brown dots all over.
Again increase the heat, apply little oil, reduce heat and fry the bolis in lesser heat.
Take out , let cool and store in a container.
Like wise proceed with the rest of the dough.
Sweet paratha is ready!

Serving suggestions:
Serve as meal or evening snack.
Makes 12 numbers (approx) .
The leftover boli (if any) can be wrapped in ziplock covers and kept refrigerated for a week.

Note:
Like wise we can make numerous verieties of sweet stuffed bolis like, coconut boli , date fruit boli, sesame boli, fruits boli, ghee boli, Jeera boli (boli soaked in sugar solution) etc.

Thursday, August 11, 2011

Kaju Katli

Wishing all my friends and readers a happy and blessed Varalakshmi Nonbu!

Hope many are busy with the Varalakshmi Nonbu pooja preparations. Here is an extremely easy dessert to make this day more special and let it be a good start.

Cashew burfi or kaju kathli is a famous dessert available in almost all the sweet stalls of India. It will be the first choice for many who do the snack shopping while planning to meet a friend or family.

Memories: Mom would buy some broken cashews (the powdery one we get for making kuruma) and do this. Her method involves soaking the cashews in milk for a couple of hours and make a fine paste out of it. Then She would prepare a sugar syrup of 2 string consistency and add this cashew paste,  little ghee. Then she would stir it in low heat till it starts leaving the sides and pour them on a ghee greased plate to make slices.
I have tried this before and I am sure it will be extremely delicious.

But I am describing a much easier version which I got from my friends. I think this is a short cut and much prevalent than my mom's:) Anyways we won't go wrong with any of these methods.

A box full of happiness and smile......Kaju katli:)

Ingredients:
Cashew nut (broken) - 1 cup
sugar - 1 cup
ghee - 1 tsp
water - 1/4 cup

Method:
Powder the cashew to a fine state.

Pour the water and sugar in a wok and start heating. Let it come to a boiling stage. Then reduce flame and heat till we get a single thread consistency.
Now add the cashew powder and mix well. Reduce flame to the lowest and stir continuously till it starts leaving the sides. Switch off.
Let it cool slightly. Now knead it like chapathi dough with ghee and place it over a clean plate / countertop. If powdery add a few drops of milk (or) if it is loose them MW it / stir in low flame again. It should be like a dough and much workable.
Press with a rolling pin and flatten it to 1/2 inch thick sheet. Make diagonal lines and cut that into 2 inch diamonds.

Place them on a greased plate and cool completely. Store in a clean dry vessel.

Kaju katli is ready!

Serving suggestion:
Makes a rich dessert.
Number of slices: Can't remember that:) so please count them from the picture and lemme know :)

Event:
kaju Katli goes to 'Mehjabeen Arif's Iftar night' event.
Wishing you all a blessed ramadan too. Happy hosting dear!

Tuesday, August 9, 2011

Brinjal Raitha

When it comes to vegetable shopping, I can't finish without a  few eggplants. I am always excited to see the purplish ones (big American variety) but also love those with thorns (rare Vellore variety), green round brinjal with crunchy seeds (Thai variety), long purple brinjal (Chinese eggplant), the white buttery brinjal (Tirunelveli Vennai kathirikkai), white with purple stripes (Madras variety) .....OMG! I love all of them:) Click to read how this brinjal lover admires it and its origin:)
So I try as many recipes as possible with them till hubby thinks of other plans to stop me:)
Here is my favorite brinjal pachadi or raitha. Hope you all like it.

Broiled brinjal.

Ingredients:
Eggplant - 1 (100 gm / medium size)
onion - 2 tbsp
green chilly - 1
cumin powder - 1/4 tsp
plain Indian yogurt (fat free) - 1 cup
salt - to taste
curry leaf - 1 sprig
cilantro - 1 plant
mustard - 1/2 tsp
olive oil - 1 tsp

Method:
Apply a drop of oil all over the brinjal and stick a skewer to it.
Show it over burning flame and cook in that open fire till the eggplant's skin gets charred. We can do this in broiling mode in oven also, but it will take more time.
Let it cool.

Peel the skin and coarsely mash it.

Add finely chopped onion, green chillies, cilantro along with require salt and curd.

Heat a wok with a 1/2 tsp oil, splutter the mustard seed, curry leaves and pour over the raita. Sprinkle some cumin powder.

Brinjal raitha is ready!

Serving suggestion:
Serve with roti while making channa masala or any dal based curry.
Can be used as a dip also.

Tips:
Brinjals are low in calorie with more fiber. Good for intestines and relives gas problems. So traditionally they cook the lentils/ dals with brinjal.....e.g., brinjal sambar, mochai kathiri kulambu etc.

Sunday, August 7, 2011

Dry-fish curry

Karuvattu kulambu (Tamil), translated as dry fish curry is a popular curry made during the month of Aadi (mid July to mid August) in almost all the non vegetarian families of Tamilnadu. The devotees of Goddess Amman will gather together on a Sunday of that Tamil month and make this kulambu along with keppai kool(zh) and make an offering.Then that meal will be shared among the relatives and friends as holy food. I thought it will be apt to make a post on that famous 'Chennai Karuvadu kuzhambu' in this month.
Memories: While in Chennai we had / have a friendly neighborhood family. The lady of the house is my best friend till now and she is always praised for her caring nature to every one who comes to her. She usually celebrates this whole month with lot of poojas and we enjoy them together. She would bring a big share for all of us during that time. Also, I used to make this for my father-in law who is a big fan of this:)

Vegetarians can check out my mochai kottai kulambu:)

Dried sardines, I got from an  Asian grocery stores.
I used dried sardine (salai karuvadu / mathi meen karuvadu).Kulambu won't need much dry-fish, a little will bring out a lot of flavor. Being born and brought up in a land with abundant fish, I never thought dry-fish could be in this huge demand. Frankly speaking , many people in my home town won't admit their taste for this dry-fish in public. But we can't hide this flavor inside a house after preparing it:) Many Asian cuisines include dried fish in the sauce, noodles etc , but getting a decent one is a big challenge. As we all know the price of a commodity varies with demand, this understated Asian dried sardine is in a fairly high price here:)

Ingredients:
Dried Sardine - 4
(or) nethili karuvadu - 15 (or) any karuvadu piece - 150 gm.
Mochai kottai / val dhal - 1 cup
Baby Brinjal - 4
Drumstick (vegetable) - 1
Tomato - 2
Tamarind - small lime size
mustard - 1/2 tsp
fenugreek seeds- 1/2 tsp
curry leaves - 1 sprig
oil - 1 tbsp
asafoetida - 1 pinch
Red chilli powder - 1 tbsp
coriander powder - 4 tsp
turmeric powder - 1/4 tsp
water - 2 cups
salt - 2 tsp

To grind:
shredded coconut - 1/2 cup
shallot (nattu vengayam) - 5
cumin - 1 tsp

Preparation:
(If you are using the fresh beans then just start from the method.
otherwise go for pre soaking.)
Dry roast the mochai kottai, till u see dark spots on the outer layer and a nice aroma.
Then rinse it with water twice. Add water till it gets well immersed. Soak overnight or an hour.
Pressure cook for 3 whistles.
(we can cook it in stove top also, but it will take an hour).

Always store the dry-fish in freezer for safety.
De-freeze it by putting in water for 10 minutes. Scrap the tiny scales with a knife and remove them along with fins and intestine.
Wash well till the water runs clear. No need to slice it. Keep aside.

Method:
Cut drumstick into 2 inch pieces and make a small slit in each piece.
Cut the eggplant / brinjal into small pieces.
Soak the tamarind in hot water and extract juice using 2 cups of water.
Heat oil in a pan.
Crackle mustard seeds , add fenugreek seeds , curry leaves and asafoetida.
Then add the chopped tomato and fry till becomes mushy.
Then add the tamarind juice, salt, chilly powder, Turmeric, coriander powder.
Now add the cut vegetables with 2 cups water (use drained water from the cooked dal) and cook till the vegetables become tender.
Then add the cooked val dhal (mochai kottai) and bring it to a boil.
Put the masala paste and bring it to a boil. Then put the cleaned dry-fish and cook closed. Let it boil for 10 minutes and switch off.
Karuvattu kulambu is ready!

Serving suggestions:
The above can be served for 5 people.
This curry will stay fresh for 2 days in room temperature.
This is commonly served as side dish for keppai / kelviragu kool (finger millet porridge).
Otherwise, Serve hot with steamed rice and any vegetable side dish or with egg omlete.
Good with idly, dosa too.

Monday, August 1, 2011

Amla pickle

Amla is a medicinal fruit used on daily basis by Indians. Our elders would suggest it for many health issues like diabetes, improving hemoglobin content etc. So its a habit to prepare some pickle or jam or amla gulabjamun with this amla whenever we get it abundant. Fresh amla can be made into juice or made into amla buttermilk as a health drink. It is also proved that the medicinal value of the amla fruit will not diminish with preservative methods. Here is my version of Amla pickle, that can last long in room temperature.

Other names: Gooseberry pickles , Nellikkai urugai, Periya nellikkai oorukai.


Ingredients:
Amla - 25 (I used frozen)
gingelly oil - 1/2 cup
Vinegar (white) - 1/2 cup
red chilly powder - 1/2 cup
salt - 1/2 cup (per taste)
turmeric powder - 1/2 tsp
asafoetida (kayam / hing) - 1/4 tsp
To dry roast and grind:
mustard seed (kadugu)- 1 tbsp
fenugreek (venthayam) - 1 tsp

Method:
Wash the amla, pat dry with a clean kitchen towel and let dry in shade for an hour.
If using frozen ones, then just de-freeze them by keeping in room temperature.
Dry roast the items given and make a fine powder.

In a wok, pour the oil and let a tsp of mustard to crackle.
Then slide in the amla along with hing, turmeric and fry till it starts turning pale. Then add the red chilly powder , powdered masala, salt and fry well to get rid of the raw smell.

Let it cool completely. Then add the vinegar and mix well. Store it in a dry glass bottle / porcelain pickle jar.

Note:
*We can add lemon juice also , but I am not sure of the shelf-life.
*I have seen my mom preparing this pickle without vinegar or lemon. But it will need a good sun-drying process, lesser oil, great hygiene and little more salt. By prolonged sun-drying, that pickle can stay for an year or more in the cupboard.

Updated on Jan 24, 2013:
I made this bottle of amla pickle (approximately) on Oct 31 2012. All those 6 days till we get power back, We both entertained ourselves with cooking , eating and talking and talking.

Monday, July 18, 2011

Arbi (Seppankilangu) cutlet

One day I tried to make some poriyal with arbi instead of my usual arbi fry. But that poriyal became so loose and dry (due to that variety). So I wanted to make something edible out of it without wastage. To my surprise the cutlet tasted as good as a potato cutlet and this is the story behind my unusual cutlet:)

Seppan kilangu (Tamil) means colocasia or taro root(English), Arbi (Hindi).

Arbi cutlet.

Ingredients:
Arbi - 200 gm
onion - 1
green chillies - 2
ginger garlic paste - 1 tsp
fennel - 1 tsp
curry leaf, cilantro, mint leaf (together) - finely chopped 2 tbsp
red chilly powder - 1 tbsp
garam masal powder - 1 tsp
lime juice from 1/4 fruit
salt to taste
bread crumbs - 1 cup
all purpose flour - 1/4 cup
turmeric - 1/4 tsp
oil - to shallow fry

Cooking the arbi:
Remove the skin and wash the arbi. Cut it into big chunks.
Heat a tbsp oil in a wok and add fennel. Then goes the finely chopped onion, chillies. Immediately add ginger garlic paste and saute till raw smell vanishes.
Then add the chopped arbi and stir well. Add the garam masal powder, chilly powder, turmeric, salt, 1/4 cup water and cook covered till done.
Mash it to a fine paste and add finely chopped cilantro, curry leaf, mint leaf, lemon juice and check if it tastes really good.

Prepare the bread crumbs at home or simply buy it.
Spread the bread crumbs on a broad plate.

Prepare a dipping batter using all purpose flour (maida), water. The batter should be thick like a pan cake mix (or dosa batter).

Frying the cutlet:
Heat some oil in a broad-shallow pan.
Now take a lemon size ball from the prepared arbi mixture. Flatten it to get a oval or circular shape with 3/4 inch thickness.
Dip that in maida batter and roll it bread crumbs.
Bring it to a perfect shape. Shallow fry it both sides. Drain oil and serve hot.
Proceed with all the balls and add oil whenever necessary.
Arbi cutlet is ready!

Serving suggestions:
Serve as evening snack or along with rice as side dish.
Arbi cutlet goes well with tomato sauce.

Tips:
Bread crumbs can be prepared at home using few bread slices. Just leave them in a hot oven for a few minutes and powder it using a mixie.
Left over arbi poriyal can also be made into this cutlet.
If you cannot bring good shape to the cutlet, then try adding  a few tsp of besan flour or home made puffed channa dal flour.

Sunday, July 17, 2011

Pearl millet candy (Kambu urundai)

This candy might have been the power bar / cereal bar for the farmers of  India before this commercial era. Not only Indian farmers, each and every working community all over the world would have had their own recipe before industrialization. While growing up I never cared much for these village recipes as they were readily available to me on daily basis. But after tasting all kinds of store bought power bars and realizing the benefits of home-cooking, I wanted to try my own using the traditional recipe. In my native we used to make a lot of this kind of candies / cereal bars using various combinations. These candies have loads of fiber and nutrition , hence they can be served as after work-out food, evening snack, break fast with milk, dessert etc. We can adjust and make them within 150 K Cal (each).


I have heard people calling it as Kambu kozhukkattai, but I tell it as kambu urundai (candy) as it is prepared without steaming.
Kambu - pearl millet (bajira - Hindi), kolukkattai / kozhukkattai - steamed sweet dumbling, urundai - ball (here it means candy).


Ingredients:
Kambu (bajira) - 1 cup
sesame - 1/4 cup
groundnut - 1/2 cup
dry ginger powder - 1/2 tsp
cardamom powder - 1/2 tsp
jaggery - 1 cup
rice flour - 2 tbsp

Method:
Dry roast the kambu till it smells good and powder it.
(If we can't get whole kambu, then use the powdered version here after roasting).
Dry roast the sesame and groundnut separately.
Remove the skin of groundnut by scrubbing gently.
Coarsely grind the sesame and groundnut, so that groundnut remains as big pieces.
Melt the jaggery and remove any impurities. Bring it to rolling boil (2 string consistency).
Mix the powdered kambu, crushed sesame, crushed groundnut, dry ginger powder, cardamom powder and make small spherical balls (palm size). If needed add a tbsp rice flour to facilitate the rolling process.

Kambu urundai is ready!

Serving suggestions:
Serve just like protein bars
It can be had as healthy snack, after work-out meal, breakfast etc.

Thursday, July 14, 2011

Batham palkova (Almond kova)

Other names: Almond milk halwa, Bathaam palkova, almond fudge.

I don't know , if there exists a sweet dish in this name. But it will be a good choice when we want to make something similar to almond halwa with very little almonds and lesser time. With all these sweet ingredients, we will definitely arrive at a wonderful result.  As expected, this newer sweet was so delicious and became our comfort zone for that weekend. Enjoy this sweet on a special occasion and let me know how it turned out:)


Batham paal kova.

Ingredients:
Almond - 15
milk - 1/2 cup
milk powder - 4 tbsp
Sweetened Condensed Milk – 1 can (14 oz / 396 gm)
Butter – 2 tbsp
cardamom powder - a pinch
Saffron – few strands

Method:
Bring 1 cup water to boil and put the almonds. Let them be in that heat till they swell and show wrinkles. Switch off and put them in cold water for 10 minutes. The skin will come off. (We can soak them overnight too). Peel the skin and grind them to a coarse paste along with the milk.

Now put everything above on a thick bottom wok and start heating in a medium flame. Stir continuously. Don't leave it unattended for a second. If necessary reduce the flame to the lowest. After 5 minutes bubbles will start appearing all over. It will be very hot, so take care. If doing in a big bulk, wear a gloves for safety.

Within 8 - 10 minutes, the kova will thicken and start leaving the sides. It is the best stage. If we want to make slices, then go ahead and stir for few more minutes. Add cardamom powder before switching off.
I wanted mine in halwa stage and so stopped there.

Almond kova is ready!

Another version: (updated 2011, Oct 25)

Almond - 1 1/4 cup
sweetened condensed milk - 300 gm (12 oz / 80 % of a 386 gm tin / 3/4 cup )
milk powder - 3/4 cup
(instead of condensed milk and milk powder we can use equal weight of sweetened milk khova - says the old recipe )
cardamom - 5
saffron - few strands
yellow color
ghee - 2 tbsp

Soak almond overnight. Remove skin and grind coarsely with 1/4 cup milk.
Fry the almond paste in ghee in medium heat for 10 minutes.
Add the milk khova and stir well. Do this in medium heat for another 10 minutes,
Add color, cardamom.
Garnish with finely chopped alomond, saffron.

Serving suggestions:
Serve hot or cold as dessert.

Tuesday, July 12, 2011

Bittergourd curry

Translation : Pakarkkai - bittergourd / bitter melon.

In my childhood, the bittergourd we get nowadays were a hybrid and not available in local shops. We were buying a smaller version of them called 'mithi pagal':), those used to be very tiny and not bitter like the ones we get nowadays. Moreover that mithi pagal plant, root, fruits everything can be made into a juice and drank for obesity and diabetes. Then came the longer version and one day we saw them in our Vivekanandan uncle's house and were amazed at that yield. They were gathering them in big baskets and no one was there to buy them as they couldn't find a better way to cook them without that bitterness. Mom showed them a way using more oil and chilly powder and it was so excellent. Yes, my Mom used to make very good fried curries with this bittergourd and call it as pakarkkai varuval along with paruppu kulambu. At that time I have also consumed that but after I started cooking, I could neither take that bitter flavor nor add oil like my mom. So bittergourd became a rare commodity in my kitchen and I prepared it sometime ago and with chapathi for supper and packed it with lentil rice the next day. Anyways everybody liked it and I am just noting it down because of the way I added very minimal oil.


Myth: Bittergourd curry is a big no no in my native , while inviting guests:)


Ingredients:
Bitter gourd - 2 (150 gm)
tomato - 3 (100 gm)
onion - 1
salt - to taste
red chilly powder - 1 tbsp
garam masala powder - 1 tsp
oil - 1 tbsp
fennel - 1/2  tsp

Method:
Finely chop the vegetables. Remove the seeds of bittergourd.
Heat oil in a wok and add fennel. After they get red, add the sliced onion, curry leaves and fry till they wilt. Then put the tomato and cook till they get mushy.
Now add the bittergourd along with salt and other masala powders mentioned above.
Stir well and after a minute sprinkle a handful of water and cook covered till the bittergourd is cooked well.
Switch off.

Serving suggestions:
Serve with roti or any rice.
If you still find the bitterness unacceptable, then try adding a few drops of lemon or tamarind extract.

Wednesday, July 6, 2011

Thakkali kuruma (Type 2)

Meaning: Thakkali -  tomato, Kuruma - a kind of Indian stew served with rice, breakfast or roti.

Earlier I posted another version for tomato kuruma (type 1) long back and that was quite different from my usual. The kuruma recipe which I am narrating now is a common one in Tirunelveli and its kind of a quickie too. Whenever we got bored of the usual coconut chutney for idly , mom used to make this tomato kuruma. But nowadays idlies are becoming obsolete in most of our houses as we all want to wake up in front of that oats bowl or bread-omelet:) Lunch is the only time to have some rice and writing them and recording is the best way to remember my native kulambu names in these years:) Hubby dear prefers only veggie foods for his lunch box and for me this recipe comes handy only after my sambar:)


Ingredients:
Ripe tomato - 4 (250 gm)
Red onion- 1/2 cup
green chilly - 2
red chilly powder - 1 tbsp
coriander powder - 2 tbsp
ginger garlic paste - 1 tsp
oil - 2 tbsp
fennel - 1 tsp
cinnamon - a small piece
Bay leaves - 2
curry leaf - 1 sprig

To grind:
shredded coconut - 1/2 cup
cumin - 1/2 tsp
fennel - 1 tsp

Method:
Choose country tomato (vine tomato, the juicier ones).
Finely chop the tomatoes and put in a lidded vessel.
Cook the tomato with required salt, 2 cups water, red chilly powder, coriander powder.
After the tomato gets cooked (15 minutes), mash with a ladle.
Heat another wok with a tsp of oil and fry the fennel, bay leaf and cinnamon for 10 seconds. Then add the chopped onion , green chillies, curry leaf till the onion gets golden brown. Then put the ginger garlic paste and stir well. Pour over the cooked tomato. Add the ground masala and bring it to a boil. Switch off.

Tomato kuruma is ready!

Serving suggestions:
Makes 4 cups of Thakkali kuruma.
Serve as a side dish for rice, Idly ,dosai or chapathi.
If served with rice, beans fry, appalam or omelet can be made as side dish.

Sunday, July 3, 2011

Kozhi Rasam

Kozhi(koli) - Chicken ; Rasam - Indian soup.

Rasam made of non veg items is not a common one. But this kind of rasam is prepared in Tamilnadu villages. They generally use a small chicken weighing 1/4 kg for a big family. But for a small family, just use the ribs or the drumsticks in the regular chicken. I prepared this during last winter and it was so good with piping hot rice.
It is a good remedy for body aches, cold, cough and for convalescent period.

Ingredients:
Chicken (with bones)- 100 gm
water - 5 cups
Tomato - 3 (200 gm)
turmeric - 1/4 tsp
salt - to taste
curry leaf - 1 sprig
cilantro - few leaves
dry red chilly - 2
mustard - 1/2 tsp
fenugreek - 1/2 tsp
oil - 1 tbsp
asafoetida / hing - 1 pinch

To coarsely grind:
garlic - 5 pieces
black pepper - 1 tbsp
cumin - 1 tbsp

Method:
Choose a very tender small chicken portion with bones.Wash it with water. Cut it into small pieces and smash the bones with the back side of the butcher's knife.
(Generally they used to crush the pieces in a big mortar).

Put the chicken, salt in a large vessel. Add enough water (5 cups) to cover it. Add the finely chopped tomato, turmeric and cook covered till done. (We can pressure cook it too).

Heat a wok with a tbsp of oil. Add methi, mustard seeds and let the mustard crackle. Put a pinch of hing and curry leaves, dry red chillies. Then add the crushed garlic,pepper, cumin and stir well for 20 seconds.

Pour the cooked chicken along with that soup and bring it to a boil. Garnish with finely chopped cilantro and switch off. Close tightly and let all the flavor remains intact.

Chicken rasam is ready!

Serving suggestions:
Serve with piping hot rice and fried chicken or egg.
It can also be served as soup.

Potato fry (Urulaikilangu varuval)

Potato fry (urulaikilangu varuval) is a famous but simple side dish in Indian cuisine. This can be prepared in a jiffy and a staple in many ...