Friday, November 22, 2019

Red cabbage Sauerkraut

Sauerkraut (shredded raw cabbage fermented under specific conditions) is an Eastern or Central European dish. It is a simple probiotic rich pickle like salad. 
In olden days it started as a way to preserve cabbages that grow abundantly and stock them up for freezing weather conditions.
In USA, we use this in salads, sandwiches and soups. Sometimes it is served as a side dish in Thanksgiving dinners.

Variations:
It should traditionally contain only few ingredients like cabbage and salt.
I have added little vinegar (it slows down fermentation and it is not necessary).
I added vinegar to keep it long and safe. You can feel free to omit vinegar and just use salt to preserve the cabbage (that's the best way to create a probiotic rich sauerkraut).
I have used red cabbage, as I am fascinated by this purple color and by the health benefits. Still feel free to use any cabbage you can get.
I find any kind of pickling as a 'feel good' phase for me and so I do this often :).

Where did I buy these ?

I bought the red cabbage from the nearby Asian grocery store, 'Organic Apple cider vinegar with mother' from Aldi, Sea salt (Chettinad brand) from Indian grocery stores,  32 oz glass Ball jar from Walmart.

Tools I used:
Cuisinart 13 cup food processor - adjustable slicing blade. (Believe me, a food processor makes everything easy 😃)
Or we can use a cutting board and a knife.
A mortar and pestle as weights.
A mixing bowl and a clean glass jar with lid.


Ingredients : Red cabbage , Apple cider vinegar with the 'mother culture', A clean glass jar, sea salt
My hubby presented me in 2017 for Christmas  💕
use the slicing attachment in food processor.
Add salt and mix well.


Or keep it like this.


Transfer everything to a clean dry jar and close well.


Save in fridge or at room temperature. 
A simple salad with onion, purple sauerkraut,  chickpeas , arugula, lettuce and beets pickle.

Ingredients:
Red cabbage - 1 (2 .5 lb)
Sea salt - 1 tbsp
apple cider vinegar - 2tbsp

Method:
Using a cutting board or a food processor (slicing blade) , shred the cabbage into thin slices.
Transfer it to a mixing bowl. Add salt and mix well. Place a weight above the cabbage , so that it releases lot of water and stays inside the water it releases. This is the important phase in preserving the cabbage. Cover it with a thin cloth and let it remain in room temperature for 2 days.
By this time we will notice that the cabbage has shrunk in volume and the amount of juice it is giving out.
Now our Sauerkraut is ready to serve !
At this stage (after 2 days), I have added 2 tbsp 'vinegar with mother' to make sure that it stays safer and I keep it inside fridge for further use. You can feel free to keep it in room temperature too, as that's how everyone is doing globally.

Serving suggestion:
Serve as salad ingredient or sandwich filling or simple side dish or as an ingredient in soups.
This is good for digestive health.

Friday, October 25, 2019

Happy Deepavali,

Dear readers, friends, family,
Wishing all a very happy and prosperous Deepavali !
I made some flower arrangements and my hubby did some lights decor in the windows. Hope you all like my Deepavali  celebrations !
Flower decorations and floating candles I made for Deepavali  2019. 
Deepavali lights in our house 🙂

Masal vadai and kesari I made 


WhatsApp and Facebook image with Happy Diwali Wishes

Monday, October 7, 2019

Sarkarai Pongal in Electric pressure cooker (Instant pot pongal)

I made Sarkarai pongal in Instant pot recently. After the arrival of Instant pot (IP) the electric pressure cookers have become a normal in many households. IP is very good for all kinds of Indian foods, so it has become some stylish and 'must have' gadget like an 'apple product' in the eyes of any desi in abroad.
I too love IP, just like any other new fancy gadget....If you are my regular reader , then you will know how much I admire cooking gadgets :)  LOL !

Apart from my shopoholism , Instant pot is really a necessary gadget for people who loves cooking in a schedule. Even though it works like a stove top pressure cooker, it has its own perks. Below are the points I like the best about IP.
1.Electric cooker is much safer.
2. It has automatic ON OFF features, so it is not necessary to count the whistles just like old times.
3. There is no whistle sound , this is much important if we have to cook in a silent environment :).
4.The smells are contained inside the pot and therefore the food smells and tastes better.
5. Food gets cooked much faster and we can be sure of the results.
6. Delay timer is a good option for many schedules.

Here is my recipe for sarkarai pongal.
In this recipe I have used my 3 qt DUO Instant pot. I cooked pacharisi rice  (raw rice) and moong dal in the IP. Then added the molten jaggery solution , tadka and boiled it for few minutes. This is the shortest narration :) Still read below for measurements and time , pressure settings !

Also check out my other versions on Sarkarai pongal
1 . Pressure Cooker pongal
2.  Simple pongal 
3.  Rich sarkarai pongal
Sarkarai Pongal made in Instant pot

Ingredients: (for 4-5 people)
Raw rice (pacharisi)  or Basmati rice - 1 1/2 cup
green gram lentil (paasi paruppu)- 1/2 cup
whole milk - 2 cups
water - 3 cups
jaggery (Indian brown sugar ) - 250 gm (1/4 kg)
water - 1 cup
ghee -  1 tbsp
cashew - 5
almond - 5
raisins - 10
cardamom powder - 1 tsp
edible camphor (pachai karpooram) - a tiny pinch

Method:
In the Instant pot pressure cooker, choose the 'PRESSURE COOK' button.
Set the cooking time to 10 minutes in 'high pressure' setting.
Pour the milk and start cooking with lid open.

Meanwhile take the rice and dal together and rinse well. Add it to the milk.
Add 3 cups of water.
 Put the lid on. 
Check the weight valve and make sure that it is not in 'vent mode'.
After we place the lid , the IP will start heating and once the required pressure is achieved , we can see the safety valve rising up. It may take 5 minutes to reach this stage.
The Instant pot will automatically switch off after the set timings.
Now it may naturally release the pressure in about 20 minutes or we can manually release the pressure and open the lid.

In the meantime , put the jaggery and 1 cup water and bring to boil and let the jaggery melt.
Pour the clear jaggery solution to the cooked rice+dal in Instant pot.

Heat 2 tbsp ghee in a frying pan.
Add the chopped nuts, raising and fry for few seconds till the nuts turn mild red and the raisin puffs.
Pour this over the rice+dal+jaggery in IP.
Add the cardamom powder, edible camphor powder and mix well.

Put the lid on.
Press the 'Rice' setting and set the time to 1 minutes and low pressure.

Once it is done, release the pressure manually.

Sarkarai pongal is ready !

Serving suggestion:
Serve as breakfast on Pongal day.
Makes a dessert along with idli during a grand breakfast.

Tuesday, October 1, 2019

Navaratri celebrations !

This week is the Navaratri week for Indians. 
 In India, South Indians celebrate Navaratri with a lot of traditions. My amma used to prepare various sundal or kesari or sarkarai pongal on those nine days (in the evenings) and offer to God and would invite some friends / family and we all used to enjoy those snacks in the evening. We had a Golu only one time and somehow couldn't continue. I really really love kolu very much and I used to go to many of my friends' houses or to temples to see kolu , those kolams and to hear the songs along with wearing beautiful dresses. Golu is a kind of display of traditional dolls and statues (handed over through generations), depicting various puranas (ancient Hindu mythology).  It is one of the most colorful and cheerful festivals of India.   
In my father's native place area, this navaratri is celebrated every year with a lot of processions, pooja,  dinners and folk songs and folk dances along with watching some popular movies along with the whole village. In my father's ancestors house, there is a separate family temple. There the celebrations are more homely. Every family in the family tree has to contribute on one day to prepare the festive foods and all the temple traditions. All girl children below 12 years old would be invited from the family and would be considered as Devi and offered sweets , flowers and fruits with some more happy traditions. This festival revolves around women and celebrates the importance of women. And on the 10 th day the 'Devi' wins over all the negativities and blesses and fills the whole world with positive energy (Shakthi), it is called Dassara festival. Most festivals of India would emphasize on appreciating the women and the need to respect them.  So I too like this festival very much. 

This Tuesday, My friend Raji invited me to her home for  Navaratri pooja celebration.  I had a beautiful experience of participating in this amazing festival along with the best lunch prepared by her. She had prepared a fantastic lunch and had invited two friends. She had made semiya payasam, urid dal vadai, Ghee, rice, dal, Mor kulambu (buttermilk curry), rasam, green banana eggplant tamarind curry, a spicy potato fry, cucumber raitha, mango sweet pachadi, mango spicy pachadi, yogurt ... and everything was served on a traditional banana leaf (wow, wow) ! No words to explain her dedication in making that pooja food, while she was fasting and doing all chores herself on that day.  To my surprise every dish was made without onion garlic and still it tasted more yummy in my view !
We all enjoyed the food and the get together very much.
And also as a take home gift she gave us a thamboolam (betal leaf, betal nuts, banana and flower) and a beautiful glass container gift as a part of this tradition along with some payasam and vadai for our houses. 
Navaratri lunch prepared by my friend Raji.

Thamboolam 

Thanks to her and her mom's recipes and guidance we could enjoy a typical Kerala Brahmin festive food on a Navaratri pooja day ! 
We really had a wonderful girls time together and enjoyed the day!

Happy Navaratri to you all ! May God bless everyone !


Tuesday, September 10, 2019

Birthday of Mother Mary !

Our church celebrates the birthday of Mother Mary on September 8 th every year.


From this year onwards, I have started again to cook something special for every happy occasion in our house. So I made this cake for Mother Mary's birthday ! This is a carrot cake with cream cheese frosting.
Happy Birthday dear Mother Mary !

Saturday, August 24, 2019

Happy Krishna Jayanthi !

For this Krishna Jayanthi I made a small batch of butter murukku with 1 cup rice flour and 2 tbsp urid dal. For a detailed recipe for murukku , pls follow my previous post on 'Murukku'.

Here is the Murukku I made to enjoy Krishna Jayanthi !
Tulsi plant with my pot painting ! Love the rain  :) 


2019 : The Roses I planted some years back bloomed a lot this year.

Friday, August 2, 2019

Aviyal in Instant pot (electric pressure cooker)

Aviyal is a mixed vegetable curry prepared in TamilNadu and kerala during auspicious days. The word 'Aviyal' means anything  cooked in water . Aviyal recipe differs from region to region. The below is a kind of Kerala Aviyal.
This dish should be particularly made with native Indian vegetables like unripe plantain, drumstick, brinjal , white pumpkin, cucumber, unripe mango, and all other vegetables and roots vegetables available during the season (except okra, bitter gourd , beetroot etc and some vegetables that can't go in this medley).
The cooking part is much easier than gathering and processing these individual vegetables. The more difficult part is buying all these vegetables in small quantity in abroad.  In Tamilnadu and kerala , the vendors would sell heaps of assorted veggies (called kooru), for sambar and aviyal.  They sell it like 'oru kooru 50 rupees' (one heap for 50 Rupees).
Here most vegetables are sold in lb. We can take 2 or 3 vegetables also, but how can I explain the billing lady that I am buying these in teeny meeny quantity of avarakkai for aviyal. So I avoid that situation by a method. Whenever I wish to do aviyal, I buy all the vegetables (for aviyal) while doing grocery shopping in the available quantity.  Then I reserve each and every vegetable from everyday cooking for a week. For example , if  I buy 3 to 4 unripe banana , I will save one for aviyal in the fridge, after using the remaining for a sidedish on a weekday. Just like that I gather all the primary vegetables.
I use frozen Yam (suran) only, as it is too expensive if we get fresh.

Now coming to the instant pot part. I got a new 3 qt instant pot for $36 in a sale in Kohl's. Though I have a 6qt also, I love the way this small one looks.  I have been eyeing on it for sometime. Then one day I got that push and encouragement from my dear friend Raji, and then I got it on a sale :). wow ! Feeling good !

Instant pot makes the cooking totally easy. Here is the procedure !
Aviyal vegetables
chop the vegetables like this 


vegetables inside vessel


grind the masala paste

add to vegetables

after pressure cooking


add coconut oil, curry leaf, yogurt
mix well
aviyal is ready !

Aviyal made in instant pot


Aviyal vegetables:
Unripe banana (choose Indian banana) - 1
Baby brinjal / small eggplant - 3
Drumstick - 1
Red onion - 1
White pumkin - 100 gms
cucumber - 1 small
Yam (suran / senai kilangu) - 100 gms
Raw mango - 1/2
potato - 1
arbi (seppan kilangu) - 2
avarakkai (broad beans) - 10 number
cluster beans - 10 numbers
green  beans - 10 number
carrot - 1

(Cauliflower , cabbage , broccoli , celery and beetroot do not go along with the recipe. Just use only native Indian vegetables.)

Masala:
fresh shredded coconut - 1 cup
green chilli - 4
shallot - 2
cumin seeds- 1 tsp
black pepper- 1 tsp
(Grind all of the above coarsely).
sea salt - 2  tsp (as per need)

Other ingredients:
coconut oil (or)any cooking oil - 2 tbsp
curry leaves - 2 sprig
thick curd (Indian plain yogurt) - 1 cup

Method:
Cut the vegetables uniformly in to long pieces (1/4 inch thick and 2 inch length). 
Grind the masala given.
Pour the masala paste in the instant pot vessel, add a cup of water and salt. 
Put all the chopped vegetables.
Mix well by shaking.
Close the lid of the Instant pot.
Select the pressure cooking mode. Set the pressure level to high. Pressure cook for 5 minutes.
Manually release the pressure.
Add the curd (yogurt).  
Add the curry leaves, coconut oil and mix well without breaking the vegetables.
Check for salt. If needed add more.
Aviyal is ready !

Serving suggestions:
It can be served with sambar rice , rasam rice , roti , adai or chapathi .

Monday, July 29, 2019

A picnic meal !

Last weekend we planned to go to beach. Summer in NJ are very short, but hot. So we thought of making use of it. Hubby dear asked me to bring anyone of his favorite dishes as we like homemade better. So I prepared this : Lemon rice, masala egg, fryums, channa dal chutney.
Lemon rice, paruppu thogayal, masala egg,  vadagam.


As it was a Sunday, we planned to make a stop at St.Martha's church on the way to attend the mass. But while starting he said that it would take only 53 mins to reach the church, so we should start accordingly and he did not want to be there too early. He did his usual phone calls...we had a coffee and then we started around 11 am. While driving only we realized that everyone in the town is on the road to the beach :)
The traffic became too heavy...too slow and the sun was getting hotter. Then after 40 mins we understood that we have to find another church on that road, as the mass would start by 12 noon. I googled and found a beautiful church 'St. Lawrence church' near Perth Amboy in Laurence harbor. We went there , attended the nice mass and came out. It is a very beautiful church and we felt blessed to go there.

Now we started again towards the beach.
My hubby dear asked me , ' you made ice cream at home?'
Me: Yes. It's in our house.
DH: I liked the lemon rice you are bringing.
Me: (I felt so so happy)...yes , it is your favorite, next to tomato rice :)
DH:I like all that combo. But it is so hot outside, the traffic also moving very slow. I am feeling hungry now itself .
Me : what ?
DH: How about we turn around and go to Piscataway and we can have very good lunch comfortably sitting in our dining table with the AC on. Have we not seen enough of summer or Are we new to beaches ma ?
Me: (I couldn't stop laughing loud). (I understood what he is trying to do) .
Me: How about binge watching our 'Smallville' series too :) Is that your plan ?
DH: you got me :)
Then we came home and had this picnic meal at home and watched some TV shows :)

This story may not be adventurous or worth sharing, but I feel like writing it down. Good that we didn't ask S to come with us.....LOL !


Tuesday, July 23, 2019

Air fried Arbi (Seppan kilangu)

Seppan kilangu / arbi is a delicious root vegetable. It is a popular alternative for potato roast curry of India. 
Usually I prepare the arbi fry by deep frying in oil or by tawa roast method.
After I found that airfryer recipe for arbi, I am making it healthier with less oil in an airfryer.
This is a dish I prepare once or twice a month as a side dish for dal rice or bisibelebath. 

Note:  If you are trying this recipe for a party or for large batch, do this in advance and keep in fridge.  Just make sure to do airfrying  again for a few minutes it before serving.  

Click to see my other versions also:


Seppan kilangu
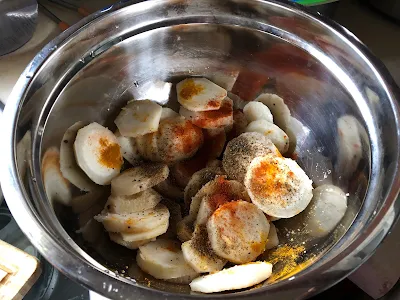
Peeled arbi


Arrange the slices in airfryer 

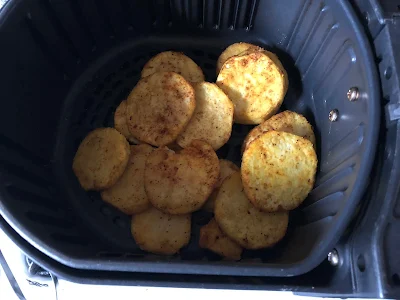
After airfrying

Air fried Arbi is ready !


Ingredients:
Arbi (seppan kilangu) - 10 roots (1/2 kg)
rice flour - 1 tsp
besan flour - 1 tbsp
salt - to taste 
turmeric powder - 1/4 tsp
black pepper powder - 1.5 tbsp
cumin powder - 1/2 tsp
Oil (olive oil) - 2 tsp

Preparation:
First rinse the arbi thoroughly to remove all dirt.
Keep it in a vessel and pour water to cover it fully. Boil it in water for 10 mins. Check if a fork or knife can poke it easily. Switch off. (In this stage it can be cooled and stored in fridge with skin for one or two days for convenience).
For immediate cooking, pour cold water and peel them.
Keep aside.


Method:
Cut the cooked arbi  it into 1/2 inch thick circles.
Mix salt, flours,oil, turmeric, pepper powder with a drop of water. Add it to the pieces and mix well.

Preheat the Air-fryer for 5 mins at 350 F.  
Spread the masala coated arbi slices in a single layer inside the fryer basket.(I keep them tightly packed in single layer).
Air fry for 10 mins. Pull out the basket and shake well. Then keep air frying for another 10 mins. 
Do this until it turns crispy in the outside and soft in the inside for each and every slice.
My air fryer takes less than 20 mins for the entire process. 
Repeat and cook the remaining arbi slices.
Air fried arbi is ready to eat !
Dust some more pepper powder over the fried arbi and shake well and serve hot.


Another method:
Instead of pepper + cumin powder , we can mix red chilly powder and garam masal powder along with flours and deep fry them. Tandoori mix also holds good. 


Serving suggestion:
Serve as side dish with curd rice, vegetable biryani, pulav, bisibelebath or simply as a tea time snack.

Tips:
Normally taro or arbi won't cause any allergies. In Indian recipes, black pepper is added to remove allergens from all root veggies,
The South American arbi contains less mucilage and easy to handle, whereas Indian arbi has a unique nice flavor. 
We can boil the arbi and keep refrigerated without peeling for a day or two. I generally do the boiling part the previous night. It comes handy. 
As this recipe takes long time (than frying in oil), it won't come handy while having guests. So we can prepare it and keep it in fridge and we can re-fry them in air fryer  for a few minutes before serving. By this way we can make a healthy fried side dish for our party.

Sunday, April 21, 2019

Happy Easter

Wishing all a happy and blessed Easter.
Easter Cake I baked in 2015

Paruppu masa vadai and Susiyam , I made for Easter 2019.


Flowers and cake for Easter vigil celebration.


Bakery soft Vanilla cake, Butter cream icing

Bakery soft Vanilla cake, Butter cream icing -  For a detailed explanation pls click to see my video on making vanilla cake, icing rose tech...