Wednesday, November 17, 2010

Vazhaikkai bajji

Other names: Banana fritters, raw plantain bajji, valaikkai bajji.

'Vazhaikkai bajji prepared in bulk and placed in that glass covered shelves' is a regular scene in any tea shop in Tamilnadu and Kerala. There was/is a shop near my dad's house which sells these flavorful bajjis and mom would send someone to get them for any unexpected guests. But this is a very simple snack and she would prefer to make it at home most of the time. Mom used to prepare these bajjis with great care, so that the plantain pieces are sliced with some green-skin on. She used to add some dosa batter to the bajji batter as per her sister's suggestion:)This is my most favorite fried item and She was so caring enough to prepare this for me on the eve of my holidays. Bajjis bring me those loving memories always. I like it with chilly-garlic ketchup at that time. But nowadays I make it with coconut chutney for hubby. See, how our taste changes after marriage:)


Traditionally they dry-grind 1 kg of besan flour with 1/4 kg raw rice, 200 gms of dry red chilly, asafoetida,  in the mill and store as bajji mavu. Whenever needed this flour can be used to make bajji and pakoda.
Nattu vazhaikkai (Indian plantain).

Ingredients:
Indian green banana (small variety)- 2
Besan flour (kadalai mavu) - 3/4 cup
dosa batter - 1/4 cup
(or) rice flour - 2 tbsp
salt - to taste
red chilly powder - 1 tbsp
hing (asafoetida)- 1/8 tsp
baking soda - 1/10 tsp
garlic - 2 pieces (finely ground)
red food color - a pinch (optional)
oil - to deep fry

Method:
Always use nattu vazhaikkai for making this bajji. Nattu vazhakkai are available in Indian grocery shops and they are sold in bunches.
Wash the banana, remove the stem and tip. Scratch and peel the skin mildly by keeping some thick green skin on. That will give a good flavor to bajji.
Slice it into thin (long) pieces.

Mix all the above with 1/4 cup water to a thick batter. Add more water if needed, but keep the batter like idly batter ,otherwise the bajjis will drink lot of oil:)
Heat oil in a wok.

Dip the banana slices in the batter and put it on the hot oil. Flip and fry both sides. Drain oil and take out.

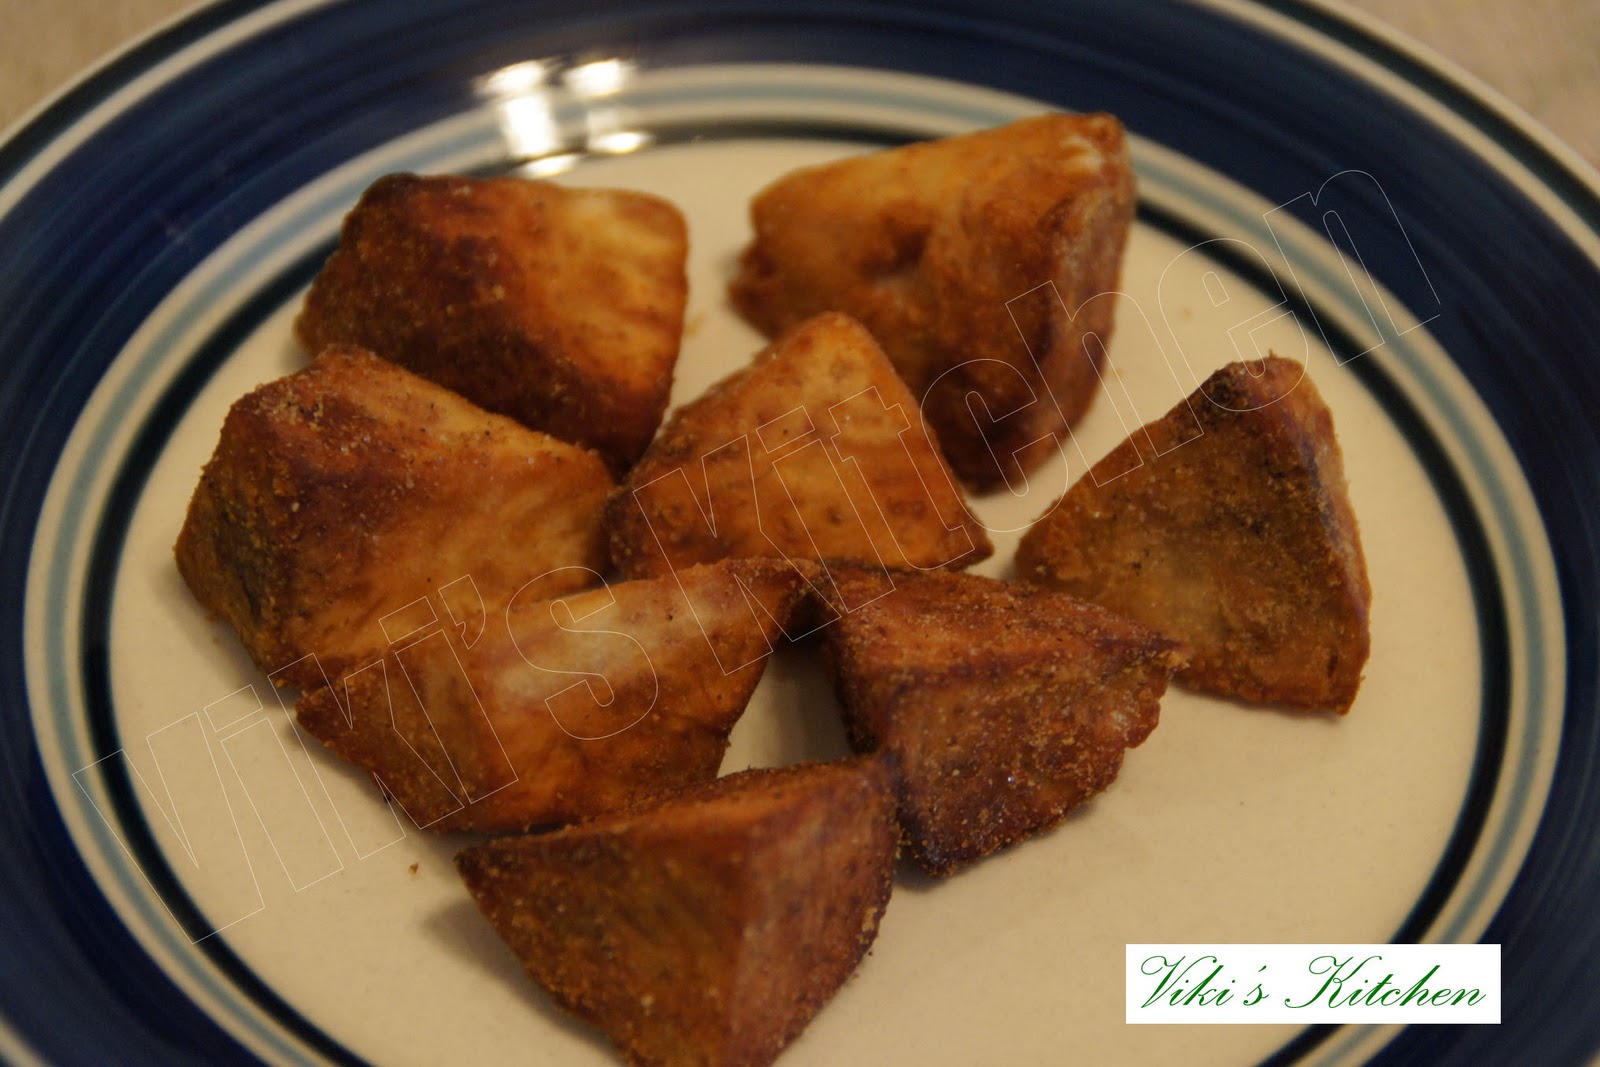
Vazhakkai bajji is ready!

Serving suggestions:
Serve hot as snack along with piping hot coffee or tea. Coconut chutney or tomato sauce is a best side dish for this vazhaikkai bajji.

Monday, November 15, 2010

Hyderabadi Chicken biryani

I prepared this Hyderabadi chicken biryani during a weekend. I love the way it brightens up a winter day:) The main challenge lies in getting all the things ready. But once we setup the dhum process, then we can sit and relax  with our loved ones. So keep everything handy before starting.

Hyderabadi biryanis are admired for their beautiful coloration and flavor. So once in a while I use organic food colors to get that real touch. In this method there will not be any separate gravy preparation like the Tamilnadu version. The meat gets cooked with rice and hence we will get juicy moist chicken pieces. This briyani  is  prepared in  a slow cooking process called dhum cooking which involves placing hot charcoal over the dhum vessel. But I am narrating that process to do at home, with the equipments we normally have:)
 Hyderabadi Chicken biryani in vibrant coloration.


Main Ingredients for Hyderabadi chicken biryani.
Arranging the layers for Hyderabadi chicken biryani before dhum process.

A homely  dhum process. Biryani vessel tightly sealed with wheat dough and placed over hot tawa.

To cook rice:
Basmati rice - 2.5 cups (500 gm)
salt - 1 tsp
water - 6 cup
bay leaf - 3
star aniseed - 1
black cumin - 1/2 tsp
cinnamon - 1 inch
cardamom - 4
clove - 4
lemon juice- 1/4 of a fruit

Wash and clean the rice. Soak it for 30 minutes. Bring to boil some 6 cups of water.
Add the bay leaf, star anise, cinnamon, cardamom, clove, lemon juice salt, kali jeera (black cumin) and let the rice gets semi cooked. It should be very firm and almost raw. Drain the water using a colander and keep aside.

For garnishing:
cashews - 10
raisins - 20
ghee - 2 tbsp
mint leaf , cilantro (chopped)- 2 tbsp
yellow or orange food color - 1 drop ea.
(we can use saffron instead)
cooking oil - 3 tbsp
Red onion - 1 cup (chopped lengthwise)

Heat oil in a flat bottom vessel and fry the chopped onions to golden brown. Take it out and save for garnishing.
In the remaining ghee , fry the cashews and raisins. Keep aside.

For the masala:
Chicken (with bones) - 500 gm
raisins - 2 tbsp
red chilly powder - 1 tsp
salt - 1 tbsp
ginger garlic paste - 2 tbsp
mint - 1/4 bunch
cilantro - 1/4 bunch
green chilly - 5
turmeric - 1/4 tsp
ghee - 2 tbsp
plain yogurt (from whole milk)- 1 cup

Grind the mint, cilantro and green chillies to a fine paste.
Now ,wash and clean the chicken. Cut it into big chunks. Mix all the items mentioned above with chicken and place it in the bottom of the dhum vessel. Spread them uniformly.

For flavored water:
salt - 1/2 tsp
lemon - 1/2
sugar - 1 tsp
kewra water - 2 tbsp
(or, rose essence 2 drops + 2 tbsp water)
ghee - 2 tbsp
black pepper corn - 10
cinnamon - 1/2 inch
cardamom - 2
clove - 2
black cumin (kali jeera) - 1/2 tsp
green chilly - 2
Mace (javithri / jathipathiri) - 1 strand
nutmeg (jathikkai) - a small scraping

Run everything above in a mixer and make a fine liquid. If you don't have enough time then , leave the whole garam masalas and mix 2 tbsp of Hyderabadi biryani masala powder with the other things mentioned above. (I like shan brand biryani masala powder).

For dhum process:
wide vessel with tight lid
A dosa tawa
chapathi dough using 1 cup wheat flour

Mix the wheat flour with water to get a bread dough consistency and keep aside.
We can use an aluminum foil also, if we do not want to waste the dough. But sealing with dough is the best method and it is called dum / dhum process, which means 'slow cooking with hot steam sealed inside'. I would suggest sealing with the dough for a tasty dhum biryani.
If you are using a flat lid, then boil 2 liters of water in a vessel and place over the vessel (after sealing) for more heat generation.

Arranging the layers:
Now spread the semi cooked rice uniformly over the raw chicken masala layer.
Mix saffron with 1/4 cup warm milk (or) mix the food color with 2 tbsp water and sprinkle it over the rice. I used food color here.(Food color gives a beautiful look.so choose according to the occasion. Natuaral colors can be obtained from saffron, beetroot, carrot etc).
Place a thick dosa tawa over stove, heat it. Now place the dhum vessel over the tawa.
Over the rice, spread the fried cashews, finely chopped cilantro , mint, fried onion and sprinkle the flavored water.
Close the vessel with a tight lid.
Seal the edges with the prepared chapathi dough.
Start heating the arrangement. Keep the flame at high till the tawa gets heated and then reduce it to a minimum. Leave the whole set up for 2 hours. (Cook it in very low heat to avoid burnt smell). If you are making for a large scale, baking is the best method. Place the entire setup inside the oven and bake at 350 deg C and 90 minutes.
After that discard the dough, open the lid carefully.

Hyderabadi chicken biryani is ready!
 Hyderabadi Chicken biryani.


Serving suggestions:
Serve the biryani like a layered rice, so that every plate gets a portion of rice, chicken and colorful topping.The guest has to mix and devour:)
Serve with boiled eggs and raitha of your choice.
Serves 5 to 6 people.

Thursday, November 11, 2010

Arbi Fry (Seppan kilangu varuval)

Seppan kilangu (Tamil) means colocasia or taro root(English),  Arbi (Hindi). 
 Arbi fry is the most sought fried item in my house. Thanks to hubby this fry hardly reaches the dining table . Normally I start preparing our weekend lunch by 10.30 Am. If I make this fry for lunch, then hubby may start demanding it with his 11 Am tea:) So I plan to make some extra servings or totally some other dish along with this:) I personally think this as a catchy side dish for vegetarians. This is my mom's signature dish too. Mom used to make this arbi with paruppu kulambu and rice.
Sembu or seppan kizhangu is a tiny root vegetable available throughout the year. There is another one root vegetable with similar taste, that is the elephant yam (chenai kilangu), which can also be made into attractive fries. This seppan kilangu (arbi) can be stored at room temperature for a week and can be refrigerated for a month.  The matured  round / oval roots are tastier .
Bisibelebath served with arbi fry.( Indian Arbi fried).

Ingredients:
Arbi - 6 roots (1/2 kg)
rice flour - 1 tsp
besan flour - 1 tbsp
salt - to taste
turmeric powder - 1/4 tsp
black pepper powder - 1.5 tbsp
cumin powder - 1/2 tsp

Method:
Cook the arbi root with skin till it is almost cooked (not mushy). Poke a skewer or knife to check if its cooked. This makes the peeling easy.

Cool and remove the skin. Cut it into 1/2 inch thick circles. (If using the South American arbi , the bigger variety, then cut it into big chunks and cook it. Again peel and cube it).

Mix salt, flours, turmeric, pepper powder with a drop of water. Add it to the pieces and mix well.
A bigger variety of taro root .

Heat enough oil to deep fry.  Fry the pieces in small batches till they turn almost golden brown (crunchy outside and softer inside).

Take out, drain oil. Dust some pepper powder over the fried arbi and shake well , so that all the pieces gets some more pepper.


Another method:
Instead of pepper + cumin powder , we can mix red chilly powder and garam masal powder along with flours and deep fry them. Tandoori mix also holds good.


Serving suggestion:
Serve as side dish with curd rice, vegetable biryani, pulav, bisibelebath or simply as a tea time snack.

Tips:
I have heard some people making this fry (baking) in oven. But I have not tried it yet. May be a good option too.
Black pepper is added to root vegetables to make them allergy-free. But this arbi root is not caustic and safer for most of the people.
The South American arbi contains less mucilage and easy to handle, but I prefer the taste of Indian arbi better.
We can boil these vegetables and keep refrigerated without peeling for a day or two. I generally do the boiling part the previous night.

Monday, November 8, 2010

Paneer Pulav

Necessity is the mother of invention is what I can say about this recipe!

Preparing a complete vegetarian dinner is a tricky one, as we have to sneak protein in some form in almost all the dishes to make them attractive and delicious. Generally I won't coin or try newer recipes for guests. But that particular week was so busy for hubby and he could not take me out for a grocery shopping while I had a party on Friday:) So when all my plans for a vegetable biryani with fresh vegetables were collapsed, I had to find an alternative:)

This paneer pulav is a medley of Shahi pulao and ghee rice. Along with this paneer pilaf I made a vegetable kuruma, fried arbi, Malaysian parotta, raitha, bakalava and gulab jamun as per plan and it was quite a successful one. Try this and enjoy!

Paneer pulav served with raitha and arbi fry.

Ingredients:
Basmati rice - 2 cup
(1/2 cup for 1 person)
paneer - 100 gm
Ghee - 2 tbsp
oil - 2 tbsp
bay leaf - 2
cinnamon - 2 inch
cashew, raisin - each 20
garam masala powder - 1 tbsp
lemon juice - 1/4 fruit
sugar - 1 tbsp
onion - 1 (big)
shahi jeera - 1/2 tsp
ginger garlic paste - 1 tsp
mint, cilantro - handful
saffron - 5 threads

Method:
Cook the rice with lot of water, 2 tsp salt to a stiff finish. Drain water and keep the lid open.

Heat oil and ghee in a wok. Fry the paneer cubes to get a golden hue and take out.

Now add the bay leaves, cashew, raisin, cinnamon, shahi jeera.Add the thinly sliced onion and fry it a little. Then add the sugar and let it caramelize. Put the ginger garlic paste and stir well. Now add the chopped mint, cilantro, fried paneer, little salt, lemon juice and switch off.

Gently mix the cooked rice. Dissolve the saffron in few spoons of warm milk and sprinkle over the pulav. Serve hot.

Paneer pulav is ready!

Not:
We can microwave / directly heat the pulav before serving.
Vary the paneer quantity, so that every one gets at least 5 pieces.

Thursday, October 28, 2010

Boondhi ladoo

Sweets and Deepavali are inseparable. Here is my ladoo for you all to enjoy.
My hearty prayers and well wishes to you all on this golden occasion. Happy Deepavali to you all!

Boondhi ladoo prepared.


Boondhi ladoo:
Boondhi ladoo or simply the laddu available in SouthIndia is different from motichoor ladoo. A traditional South Indian ladu resembles the famous Tirupathi ladoo and long lasting in room temperature too. while the mothichoor version is more soft, colorful and should be kept in fridge to ensure the freshness.

This is my mom's recipe and I have seen her struggling during Deepavalis with these to get that shape. Those were the days when moms would start making sweets and savories nearly a week before Diwali. Ladoo is her specialty. Her kitchen is large and well ventilated, so that many can join hands during festival days.
Ladoo making is a laborious task, if we don't plan well ahead. She and her maid would simplify the job by frying the boondhis on one evening and the ladoo making the next day. She used to have a long list of friends to send gifts during Diwali. Those large vessels sleeping now in the attic would be filled with home made murukku, muthiri kothu, athirasam, achi murukku, ladoo and another remarkable sweet which I will tell later . My ladoo saga started again, when we wanted to prepare for a thanks giving.

Ladoo has given me so many sweet memories and it is my most favorite sweet too. Those box of ladoo my chithappa used to buy for me from the Lakshmi vilas, my friend M's loving Tirupathi ladoo came through USPS, my elder uncle's care to take me to Tirupathi in my childhood, Kanagam mama buying ghee ladoo for me, my mom's diwali rushes, the carry home gifts of marriages, hubby's strong passion and possessiveness for these home made ladoos, etc etc:)

Method:
Boondi soaked in sugar syrup before making the ladu balls.
Enjoy:)
Ladoo I made for Valentine's day 2013

Ingredients:
Besan flour (kadalai mavu)- 5 cups (1 kg)
(1 -200 ml cup / 200 gms flour yields nearly 10 ladoo)
(water for boondhi- almost half the flour)
sugar - 5 cups (1 kg)
(water for syrup - almost 75% of sugar measure; 4 cups)
baking soda - 1/2 tsp
oil - 1/2 liter (500 ml)
cardamom - 15
pachai karpuram (edible camphor) - a pinch
cashew - 50 number
raisin - 50 number

Special equipment needed:
1.A perforated vessel to make boondhis.
(If we are doing for a small batch, say 1 cup flour, then make holes on a disposable plate using a skewer. I have done this home made boondhi making plate , before buying a traditional boondhi maker and it was very successful too.).
2. disposable hand gloves to bear the heat. Those days they didn't use gloves, I can't imagine that.

Preparing Boondhi:
Mix the baking soda, yellow food color - 2 drops (optional), with a cup of water and pour it into the four. Add water little by little, till it reaches a thick dosa batter consistency. The consistency should be so thick that, if we place a scoop of batter on the perforated plate, it should not run down (we press and make spheres through the holes).

In the same time heat few tbsps of ghee in a broad wok and fry the cashew nuts and raisins separately. Keep aside.

Now add the oil in the wok and start heating slowly, without reaching the fuming point. Gently pour a ladle of batter over the boondhi making plate and press it to the hot oil. Fry till its done. The final product should be crispy.(My version calls for crispy white boondhis. But if you want, you can make soft boondhis too) . Drain oil , let cool and store them.

Making ladoo:
Then in your convenient time, start preparing the syrup. You may need more time and energy to prepare these balls.

Mix the 5 cups of white-sugar with 4 cups of water and *heat it till we get a two thread consistency. (Test:A drop of sugar syrup put in a cup of cold water remains intact as a hard ball). Switch off and add fried boondhis, cardamom powder, fried cashews, raisins. Stir well.

Wear your gloves and start preparing the cute balls out of that hot boondhi mix. Rub some melted ghee to get a good shape. Hurry up, before they get solidify. Make sure that each and every ladoo gets a cahsew and a raisin:)
If you can't do it fast, it may crystallize and the ladoo won't hold together. If it solidifies , don't panic. Just heat the sweetened boondhi with a drop of water, make sure it melts and start making the remaining ladoo.

Boondhi ladu is ready!

Note:
* //If making small quantity if ladoo, then no need for 2 thread consistency syrup. Single thread is enough. //
We can make these ladoos using ready-made boondhis too. But buy the boondhi without salt or seasoning.
Don't be anxious on the results. The ladoo will turn out successful for all.It will be much easier, if we split and do the process as said in the anecdote.
Add 1/2 cup milk powder to boondhi syrup mixture, before making the laddu. This gives a more rich taste.

My treat for you all on  Diwali::

Sweets:
Boondhi ladoo
Jangiri
Athirasam (with rice flour)
Baklava
Maladdu

Gulab Jamun
Carrot halwa
Rasgulla
Wheat Halwa
Mysore bah
Maida Burfi
Badam katli
Milk peda(MW method)
Rava ladoo
Besan flour ladoo

Savories:
Murukku
Cashew pakoda
Ulunthu Vadai
Cinema theater samsa
Ribbon Pakoda
ordinary pakoda
Thukkada
Vaazhai poo vadai
Masal vadai

Payasam and kesari:
Semiya Javvarisi Paal Payasam
Paruppu payasam
Pineapple kesari
Rava kesari

For health:
Sukku malli coffee
Deepavali Legiyam
Home made Digestion syrup

Enjoy and have a beautiful Deepavali!

Wednesday, October 6, 2010

Gray squash poriyal

This is one vegetable I had a lot of confusion in buying. I don't know the Tamil translation for this vegetable, as I have never seen this before:) So when I saw this for the first time in an Asian market, I was not sure of the taste. But bought it one day to trial run. Surprisingly this tasted just like our Ridge gourd. Recording this Indianised gray squash recipe for you all.


Gray squash in a pack.


Ingredients:
Gray squash - 3
Onion - 1/2 cup (chopped)
green chilli - 2 (slit)
curry leaf - 1 sprig
Shredded coconut - 2 tbsp
Oil - 2 tsp
mustard seed - 1/2 tsp
cumin seed - 1/4 tsp
Salt - to taste

Method:
Peel and chop the squash. keep aside.
Heat oil in a wok.
Add mustard seeds and let them pop.
Immediately add chopped onion, curry leaf, green chilly and stir well til the onion gets semi cooked.
Now add the chopped squash along with 1/2 cup water and cook it tightly covered till the squash gets soft.
Add salt to taste.
Then add the cumin and shredded coconut and stir to loose all the moisture.
Take off heat.
Gray squash stir fry is ready!

Serving suggestions:
The above said quantity can be served for 3 people.
Serve as side dish with roti or sambar rice, rasam or any spicy puli kulambu.

Monday, October 4, 2010

Fish cutlet

I tasted this cutlet for the first time in my friend Gnanam's house (school days). At that time cutlets were served only in restaurants in my home town and newer recipes were rare. Only the young girls would try newer recipes from the cook-books, while the elders sticking with their own tradition. Gnanam's elder sister Clara akka is the one I admire a lot for her cooking, dedication and religious activities. May be she is the one kindled my passion for Jesus, though we have not talked much on that Subject. We all have some role models in life in each and every thing we do, may be our dressing style or way of talking etc, I should say I learned much from her.... Her recipes are the best for me till now. Then I prepared this cutlet at home to impress my mom. So it became our family's  favorite from then on. After marriage I rarely cook fish because of hubby's taste buds:)

Fish cutlet served with lemon wedge. The picture didn't do justice here :)

Fishes suitable for cutlet:
Fish -1/4 kg
Shark (sura meen), king fish (vanjiram/seela meen), sword fish (vazhai meen),
Any fish with good flesh like salmon, red snapper(sankara / romeo), Tuna fish fresh or canned.
I generally prefer shark for this cutlet.

Cooking the fish:
Bring 2 cups of water to a boil in a vessel. Add turmeric powder 1/2 tsp (to reduce fishy smell), salt - 1 tsp. Then add the washed / cleaned fish pieces along with the skin and bones.
Close it with a lid and cook for 5 minutes.
After it gets cool, peel off the skin and remove the bones.
Mash the fish with your hand or masher without any lumps.

Other ingredients:
Potato (boiled) - 2 (100 gm)
onion - 1
green chillies - 2
ginger garlic paste - 1 tsp
fennel - 1 tsp
curry leaf, cilantro, mint leaf (together) - finely chopped 2 tbsp
red chilly powder - 1 tsp
garam masal powder - 1 tsp
lime juice from 1/8 fruit
salt to taste
bread crumbs - 1 cup
egg - 1
oil - to shallow fry

Method:
Heat 1 tbsp oil in a wok. Add the fennel, finely chopped onion, green chilly, leaves and fry till they wilt. Then add the ginger garlic paste and stir well.
Now add the mashed fish, chilly powder, garam masal powder, salt and fry till moisture is gone.
Now mash the cooked potatoes and add, again stir well.
Sprinkle the lemon juice and switch off.

Frying the cutlet:
Heat some oil to shallow fry the cutlet in a broad based wok.
Pour the egg to a broad dish. Add salt and beat well.
In another plate spread the bread crumbs.
Now take a lemon size ball from the prepared fish mixture. Flatten it to get a oval or circular shape with 3/4 inch thickness.
Dip that in beaten egg, then dip it in bread crumbs.
Bring it to a perfect shape. Shallow fry it both sides. Drain oil and serve hot.
Fish cutlet is ready!

Serving suggestions:
Serve as evening snack or along with rice as side dish.
Mostly this fish cutlet goes well with tomato sauce.

Tips:
Making the cutlets with canned fish is much easy.
Bread crumbs can be prepared at home using few bread slices. Just leave them in a hot oven for a few minutes and powder it.
Left over sura puttu can be made into this cutlet the next day.
2 tins of Tuna fish (water based) and 2 small potatoes will yield 10 or 11 cutlets.

Tomato rice in Briyani Flavor

Tomato rice in home style was the first tomato rice we all used to take to school (in my childhood). Then afterwards it was jazzed up by our...