Lets welcome the New year with joy,
with lots of prayers and well wishes,
May every day be filled
with happiness and peace,
May every face on earth live happily forever,
with all our needs satisfied,
May every life lives peacefully
with all our dreams come true,
May every child gets love and care,along
with all the toys they want:)
May God shower His abundant love on all of us,
Wishing you all a
beautiful, Prosperous and Blessed
Happy New Year and Happy blogging!
Love,
Viki.
Friday, December 31, 2010
Wednesday, December 29, 2010
Christmas celebration : Event entry
Here are some snaps from our Christmas celebration.
I am Sending the below entries for Shamas's Christmas and New year event , 2010.
Happy hosting Shama!
A Birthday cake for Child Jesus:
Its a tradition in our house to bake a cake for the 'Baby Jesus'. This year I made a fruit cake and did icing with home made 'butter cream frosting'. I like the way the roses and color combo came out. After attending the mass we cut this cake and shared with friends and family.
Putting out cookies and chocolate drink for Santa is an American tradition. I added all the items I prepared for Christmas. The platter has thengai paal murukku, athirasam, butter biscuit, fruit cakes and Ovaltine milk. Also I left a bunch of cilantro for His Reindeers. We leave this platter near the Christmas tree and expect the Santa to give us all our favorite gifts. Yes, Santa came to our house really and we got a lot of gifts:) On the Christmas day, I got up very early and found a beautiful pair of earrings in my stockings:) Also, Xav got his favorite movie dvds and a shirt under the tree:) Thank you Santa! We all love you so much!
I am Sending the below entries for Shamas's Christmas and New year event , 2010.
Happy hosting Shama!
Its a tradition in our house to bake a cake for the 'Baby Jesus'. This year I made a fruit cake and did icing with home made 'butter cream frosting'. I like the way the roses and color combo came out. After attending the mass we cut this cake and shared with friends and family.
The Christmas tree:
This is how we decorated the Christmas tree, this year.Snacks for Santa:
Putting out cookies and chocolate drink for Santa is an American tradition. I added all the items I prepared for Christmas. The platter has thengai paal murukku, athirasam, butter biscuit, fruit cakes and Ovaltine milk. Also I left a bunch of cilantro for His Reindeers. We leave this platter near the Christmas tree and expect the Santa to give us all our favorite gifts. Yes, Santa came to our house really and we got a lot of gifts:) On the Christmas day, I got up very early and found a beautiful pair of earrings in my stockings:) Also, Xav got his favorite movie dvds and a shirt under the tree:) Thank you Santa! We all love you so much!
Reposts and event entry
Hope you all had a beautiful Christmas and waiting to celebrate the New year along with your yummy creations.
I have not participated in many of your events for almost an year, because of my laziness:) One of my New year resolutions is to send at least a few entries once in a month. So as a beginning here are my reposts for Sameena's Cookies and cakes for Christmas event.
2.Easter Carrot cake.
2.Sugar cookies
Happy hosting dear!
I have not participated in many of your events for almost an year, because of my laziness:) One of my New year resolutions is to send at least a few entries once in a month. So as a beginning here are my reposts for Sameena's Cookies and cakes for Christmas event.
Cakes:
1.Christmas plum cake (fruit cake)2.Easter Carrot cake.
Cookies:
1.Butter biscuit2.Sugar cookies
Happy hosting dear!
Saturday, December 25, 2010
Thursday, December 16, 2010
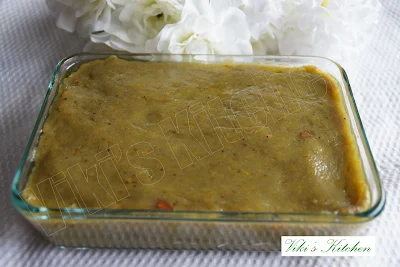
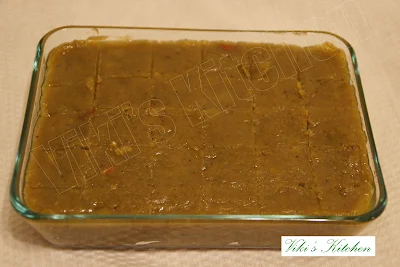
Banana halwa (vazhaipazha halwa)
A chewy sweet resembling fudge prepared using ripe plantain (long banana/ yetham pazham/ Ethampazham / ethan pazham / nenthram pazham).
I tasted it for the first time (as a child) , when Sr. Janet Mary (whom we consider as a great guidance in our family) presented us a pack of Banana halwa from Kerala, then she told us that this is a famous sweet in Tuticorin also. Then it became our favorite next to macaroons of Tuticorin. One can buy this in bakeries of Tuticorin (Thoothukudi), Tamilnadu, India. It will be sold as a circular shape piece of nearly 5 inch dia and 1 cm thickness. The proper color should be more darker than what I got. If you want to get that color add more ghee while making this halwa. I used 1/4 cup butter only, but 1 cup will be good for the authentic taste.After that mom tried to make it once or twice at home but I am not sure of the recipe. So I referred Mahanandi's Nenthram pazham halwa. It came out well. Thank you dear! (I have made some variations for my convenience, so click the above link to see her beautiful snap and the original recipe).
Ingredients:
Ripe plantain (long version) - 4
(pureed to 2.5 cups)
sugar - 1 cup
butter - 1/4 cup (1/2 of a bar)
lemon juice - 1 tsp
All purpose flour / maida - 1 tbsp
water - 2 tbsp
chopped almond or cucumber seeds or cashew - a handful
Method:
Steam cook the banana. Peel the skin and remove the seeds. Puree it.Take a thick bottomed wok, large enough to stir the halwa.
Pour the puree to the wok. Add the sugar, butter, lemon juice and mix well.
Start heating. After sometime the banana will start bubbling, then reduce the heat and stir in medium fire.
After the halwa starts leaving the sides, say in 10 minutes, mix the maida with water and pour over the halwa. This step is optional only. we can do the halwa without maida also.
Then stir continuously for another 10 minutes or till halwa starts becoming thick and tend to form a ball. Now add the nuts and stir well. Put off fire.
Grease a container (lesser height but wide) with a drop of ghee and pour the mixture.
Spread a little ghee on top to prevent drying.
Using a spoon or knife flatten it to get a glossy surface.
Allow it to cool. After cooling the halwa will become more thick and easy to slice.
Slice and serve as dessert.
Banana halwa is ready!
Serving suggestion:
If prepared with more ghee (enough to ooze out), this sweet will remain good in room temperature for more than a week.Serve hot/cold as dessert or snack.
Monday, December 13, 2010
Fish platter (Meen Saappadu)
This post is not on any recipe but to show you all a kind of platter available in restaurants of TamilNadu (and some parts of Kerala). They call it as meen(fish) saappadu (meals). I am sure it is an unique name for many out there, but people in my native place love this platter than many non veg dishes:) You can get this kind of meal in any non veg restaurant in Tamilnadu. This plate will include a big cup of fine rice or red rice, a thin slice of king fish fry,a bowl of thick fish curry, some vegetables, boiled egg or an omelet ,sambar, rasam, buttermilk etc and everything will be neatly served in a tender banana leaf. Can you imagine that!
My father-in-law is an ardent fan of fish and he will order this whenever we go to a restaurant. While in Madras, I too tried my best to make this platter on his visits . At that time, as a newly married I would put a lot of effort in getting him all the sea foods he may like. And one day he told me that he likes crab very much but had no opportunity to taste them because of my mother-in-law's preference:) So I prepared nandu kulambu (crab curry) immediately the next day and waited to hear his comments. Then only he told me that he has tasted crab made by his mother as a 6 year old and after loosing her, he had not had it at home and appreciated my effort a lot.I hold his words in my heart and cherish them forever. So whenever he comes to our home I would try to prepare a few things he likes the best:) I am dedicating this post to him:)
The above plate shows rice, fish curry, fried fish, shark puttu (scrambled), mashed greens (keerai masiyal)and mangoes.I couldn't cut that king fish piece into a fine slice, so made it a big chunks:) Yes, It is a tradition in my home town to have ripe mango with fish curry and rice:) The options are endless and I am sure you all enjoyed this Tirunelveli style fish platter:)
Enjoy!
My father-in-law is an ardent fan of fish and he will order this whenever we go to a restaurant. While in Madras, I too tried my best to make this platter on his visits . At that time, as a newly married I would put a lot of effort in getting him all the sea foods he may like. And one day he told me that he likes crab very much but had no opportunity to taste them because of my mother-in-law's preference:) So I prepared nandu kulambu (crab curry) immediately the next day and waited to hear his comments. Then only he told me that he has tasted crab made by his mother as a 6 year old and after loosing her, he had not had it at home and appreciated my effort a lot.I hold his words in my heart and cherish them forever. So whenever he comes to our home I would try to prepare a few things he likes the best:) I am dedicating this post to him:)
Meen saappadu . |
The above plate shows rice, fish curry, fried fish, shark puttu (scrambled), mashed greens (keerai masiyal)and mangoes.I couldn't cut that king fish piece into a fine slice, so made it a big chunks:) Yes, It is a tradition in my home town to have ripe mango with fish curry and rice:) The options are endless and I am sure you all enjoyed this Tirunelveli style fish platter:)
Enjoy!
Wednesday, December 8, 2010
Vazhaikkai puttu
Vazhaikkai - unripe banana; puttu - anything steam cooked and loose as sand .Vazhaikkai puttu is a spicy scrambled plantain fry served as side dish with rice.
Brinjal, drumstick, mango, unripe banana, small juicy tomato, pumpkin, yam etc are called native vegetables (naattu kaai) in Tamilnadu , while green beans, cauliflower, cabbage, beetroot, carrot etc are called English kaai:) I love those naattu kaai very much and will spend a lot of time in that vegetable section in the Indian store till hubby's turn comes in the billing counter:)
Coming to the unripe banana, the Indian variety holds good for side dishes like this. The other variety normally available here is the ethankkai (long banana), which is great for making chips. If you have not tasted this puttu so far, then make it for dinner and serve with piping hot rice and vatral kulambu / sambar and appalam, I am sure you will fall in love with this like me. This puttu comes in my menu at least once a month and here is the recipe for you all.
Nattu vazhaikkai (Indian plantain). Aren't they cute! |
Ingredients:
unripe Indian banana - 2onion (finely chopped) - 1/2 cup
dry red chilly - 2
curry leaf - 1 sprig
coconut oil - 1 tbsp
shredded coconut - 1/4 cup
cumin - 1/4 tsp
turmeric - a pinch (optional)
salt - to taste
Method:
Wash the green plantains / bananas. Steam cook them using an Idly cooker or in a normal cooker without adding the pressure valve for 10 minutes. Check it by piercing a fork and it should pass through without difficulty but firm in shape.Take out and let them cool. Remove the skin and grate the unripe banana in a carrot shredder. Mix salt and cumin to it. Keep aside.
In a wok, heat the coconut oil and add mustard seeds followed by the black gram lentil. As soon as the mustard crackles add the dry red chillies, curry leaves , onion and stir till the onion wilts. Immediately add the shredded plantain and mix well. Check for salt. Fry till it becomes loose. Then mix the freshly shredded coconut and switch off.
Vazhaikkai puttu is ready!
Serving suggestions:
Serve as side dish with rice and sambar or vatral kulambu or kara kulambu or rasam.Note:
Some people ad d turmeric to the puttu , while others make it white. Both tastes good.
Monday, December 6, 2010
Sundal
Here is a well known healthy snack, the sundal. In India sundals are very regular during festivals, temple offerings etc. It occupies a major role in Navarathiri pooja, a prominent Hindu festival in India. The Navarathiri or Dhasara is celebrated 10 days continuously. It is a celebration of Goddess Ambal's victory .The ladies arrange Golu (scene depicting culture using idols) and offer these sundals to the God and distribute to the guests as prasatham.
Memories: It varies from region to region and depends on which God they consider as their main deity . In my native place (dad's home town), the major Goddess is Bagavathy Amman and so Navarathiri is celebrated to honor the ladies of a family. The unmarried girls are considered as Goddesses and offered many gifts while participating in the function. In my dad's family the aim of the function is to welcome the daughters who are given in marriage and to pamper the homesick girls , of course with her husband too:) Some do the fasting the whole day (9 days and the 10 th day is full of feasts) , powder the rice manually (using ural + ulakkai), make rice flour lamps (mavillakku) , sweet dumplings (kolukkattai) and in the evening there will be singing and poojas and a lot of yummy goodies to all:) .
coconut oil - 1 tsp
shredded coconut - 2 tbsp
dry red chillies - 3
curry leaf - 2 sprig
mustard seed - 1 tsp
salt - to taste
water (to cook) - to immerse and 1 cup standing over.
The easiest way is to buy a canned one, but I prefer the home cooked ones better .
Remove the soaked water (must). Wash again and add some more water. Pressure cook the peas with more water to stand above the peas. Let it whistle once, then reduce the flame and cook in low flame for 15 minutes. Release pressure and take out. Add salt, drain the water.
Heat oil in a wok. Splutter the mustard seeds. Reduce flame and add the red chillies, curry leaves and wait till the chillies turn dark red. Add the cooked channa and stir fry till it looses all the water. Check the salt and put lot of freshly grated coconut. Switch off immediately.
It is my habit to make some chundal with variety rice like puli saatham (Yummy!).
This is a very healthy protein rich snack with nearly 100 calories per cup.
We can make many chundals like this from various lentils like whole green gram (pachai payaru), channa dhal (kadalai paruppu), moon dhal (paasi paruppu), cow peas (thattam payaru), field beans (mochai /val) etc.
Memories: It varies from region to region and depends on which God they consider as their main deity . In my native place (dad's home town), the major Goddess is Bagavathy Amman and so Navarathiri is celebrated to honor the ladies of a family. The unmarried girls are considered as Goddesses and offered many gifts while participating in the function. In my dad's family the aim of the function is to welcome the daughters who are given in marriage and to pamper the homesick girls , of course with her husband too:) Some do the fasting the whole day (9 days and the 10 th day is full of feasts) , powder the rice manually (using ural + ulakkai), make rice flour lamps (mavillakku) , sweet dumplings (kolukkattai) and in the evening there will be singing and poojas and a lot of yummy goodies to all:) .
Konda kadalai sundal. |
Ingredients:
White or red chick peas - 100 gm (1 coffee mug full)coconut oil - 1 tsp
shredded coconut - 2 tbsp
dry red chillies - 3
curry leaf - 2 sprig
mustard seed - 1 tsp
salt - to taste
water (to cook) - to immerse and 1 cup standing over.
Method:
Soak the chick peas over night.Fast Soaking can be done in hot water for 6 to 8 hours along with some baking soda. The peas will double in size after soaking. The easiest way is to buy a canned one, but I prefer the home cooked ones better .
Remove the soaked water (must). Wash again and add some more water. Pressure cook the peas with more water to stand above the peas. Let it whistle once, then reduce the flame and cook in low flame for 15 minutes. Release pressure and take out. Add salt, drain the water.
Heat oil in a wok. Splutter the mustard seeds. Reduce flame and add the red chillies, curry leaves and wait till the chillies turn dark red. Add the cooked channa and stir fry till it looses all the water. Check the salt and put lot of freshly grated coconut. Switch off immediately.
Serving suggestion:
Serve as snack with tea / coffee.It is my habit to make some chundal with variety rice like puli saatham (Yummy!).
This is a very healthy protein rich snack with nearly 100 calories per cup.
We can make many chundals like this from various lentils like whole green gram (pachai payaru), channa dhal (kadalai paruppu), moon dhal (paasi paruppu), cow peas (thattam payaru), field beans (mochai /val) etc.
Thursday, December 2, 2010
Thayir vadai
In most of the Indian households or restaurants, the left over ulunthu vadai after serving with the ven pongal in the morning gets a makeover and becomes thayir vadai in the afternoon. Thayir (curd) vadai (spicy black gram donut), is similar to the North-Indian dahi vada, except for the shape and few ingredients.
Some years ago, I read in Varamalar (a complimentary book for Dinamalar, a popular Tamil daily magazine), how to do thayir vadai. Before that also I knew this simple recipe from my mom, but the way the author, Andhumani described is still ringing in my head:) According to Andhumani, 'Grind the well soaked urid dhal in hand mortar till it gets fluffy as cotton and deep fry in ghee (?), dip in cold water, squeeze the water out, Soak it in the thickest possible curd and garnish with tempering'. Though that ghee fried vada recipe seems so idealistic and impossible for a woman of this era, I admire the way the author describing his thirst for a perfect thayir vadai:). Yes, home made thayir vadais are more delicious and healthy.
Ulunthu vadai is hubby's favorite and he can finish them off in one sitting:) So that varamalar 'thayir vadai' was a distant dream for me till I bought a pack of boondhi. The next day I prepared some extra vadais for breakfast and soaked them in curd the whole day to serve along with dinner:)
thick yogurt - 500 ml
mustard - 1/2 tsp
urad dhal - 1 tsp
curry leaf - 2 sprig
cilantro - 2 tbsp (chopped)
ginger (finely chopped) - 1 tbsp
oil / ghee - 1 tsp
salt - to taste
kara boondhi - 1/4 cup
Put the vadai in some cold water for 2 minutes and take out. Squeeze the water thoroughly. Place it in a serving bowl.
Beat the curd with required salt. keep aside.
Heat oil in a wok. Add mustard and let it crackle. Immediately add the urad dhal and let it get red, in the same time add the curry leaf, cilantro, ginger and switch off. Add it to the curd.
Run the tempered curd over the vadai and let it soak for an hour (4 hours is better. Soaking can also be done inside fridge overnight).
Serve thayir vadai garnished with fresh cilantro (malli thazhai), grated carrot and kara boondhi.
In my home, mom won't soak / squeeze vadai in water before adding curd. I don't know the reason but I do the squeezing part too.
Some years ago, I read in Varamalar (a complimentary book for Dinamalar, a popular Tamil daily magazine), how to do thayir vadai. Before that also I knew this simple recipe from my mom, but the way the author, Andhumani described is still ringing in my head:) According to Andhumani, 'Grind the well soaked urid dhal in hand mortar till it gets fluffy as cotton and deep fry in ghee (?), dip in cold water, squeeze the water out, Soak it in the thickest possible curd and garnish with tempering'. Though that ghee fried vada recipe seems so idealistic and impossible for a woman of this era, I admire the way the author describing his thirst for a perfect thayir vadai:). Yes, home made thayir vadais are more delicious and healthy.
Ulunthu vadai is hubby's favorite and he can finish them off in one sitting:) So that varamalar 'thayir vadai' was a distant dream for me till I bought a pack of boondhi. The next day I prepared some extra vadais for breakfast and soaked them in curd the whole day to serve along with dinner:)
Thayir vadai. |
Hot crispy urid dal vadai served with chutney. Save some for thayir vadai:) |
Ingredients:
Ulunthu vadai - 10thick yogurt - 500 ml
mustard - 1/2 tsp
urad dhal - 1 tsp
curry leaf - 2 sprig
cilantro - 2 tbsp (chopped)
ginger (finely chopped) - 1 tbsp
oil / ghee - 1 tsp
salt - to taste
kara boondhi - 1/4 cup
Method:
Choose a fresh curd, so that it is not too sour.Put the vadai in some cold water for 2 minutes and take out. Squeeze the water thoroughly. Place it in a serving bowl.
Beat the curd with required salt. keep aside.
Heat oil in a wok. Add mustard and let it crackle. Immediately add the urad dhal and let it get red, in the same time add the curry leaf, cilantro, ginger and switch off. Add it to the curd.
Run the tempered curd over the vadai and let it soak for an hour (4 hours is better. Soaking can also be done inside fridge overnight).
Serving suggestions:
Serve as starter during lunch / dinner and also as snack.Serve thayir vadai garnished with fresh cilantro (malli thazhai), grated carrot and kara boondhi.
Note:
During hot weather the curd gets sour quickly. So add some milk with curd before soaking the vadai or keep the dish inside fridge.In my home, mom won't soak / squeeze vadai in water before adding curd. I don't know the reason but I do the squeezing part too.
Tuesday, November 30, 2010
old fashioned egg pudding
This post is dedicated to my Sakunthala athai (my dad's sister), who makes every one around cheerful by her kindness and high spirit . Our summer vacations get sweeter upon her arrival. Even from February we would start waiting for her letter and plans.On her arrival we would go and wait in that train station to take her and kids home with lots of joy. In those days there were no in-law fights or ego problems and the whole family would cheer-up for each others' victory. Still I remember how my mom and Athai compliment each other in everything they did. Her incredibly long thick black hair is her specialty. Athai is a very thin and beautiful lady (now also) and so energetic in such a way that she would play hide and seek, make kootan choru (camping food), long healthy gossips till midnight etc. We would sit around her and listen as if it is a live show :) We all sleep together and the bed time stories were endless. I love the way she listens the Ceylon Radio, watching the cricket matches . She and her husband (mama) never fail to help others whenever there is a need. She is a great mom and good friend to all of us. Her tips on house management, grocery purchase always works for me and I held her as my guru while mingling with my family.
Athai makes this pudding for fuzzy egg eaters, when they need some protein. Many days she gives us this with breakfast (may be we are the odd family who craves for a dessert in breakfast time also) and I get satisfied with the dessert alone:) Recently I got this old fashioned pudding recipe from her and here goes the recipe.
milk - 1/2 cup
sugar (brown or white) - 3 tsp
salt - a very small pinch
cinnamon - a pinch (optional)
vanilla essence - a tiny drop
Beat egg well. Add other ingredients and beat again.
Pour into an ever-silver bowl and steam cook in an idly cooker or pressure cooker (without putting the pressure valve weight) for 10 minutes.
If touched it should be like a jelly (spring back) at the edges and slightly loose at the center. It should retain the shape while transferring it.
Take out, empty it to a serving bowl. Garnish with fresh fruit.
Serve chill as dessert or a simple breakfast.
*An egg pudding should be essentially cooked in high humidity to get that real taste. I have narrated an Indian pressure cooker method here. My aunt won't add salt or cinnamon. But I did so to enhance the sweetness of the recipe.
*cooks.com says, we can bake this pudding in oven at 300 deg F for 40 minutes. They suggest to keep the pudding vessel inside a pan of water.
*We can use this pudding as a custard base for ice creams and cakes.
Athai makes this pudding for fuzzy egg eaters, when they need some protein. Many days she gives us this with breakfast (may be we are the odd family who craves for a dessert in breakfast time also) and I get satisfied with the dessert alone:) Recently I got this old fashioned pudding recipe from her and here goes the recipe.
Egg pudding served with apple....A complete breakfast! |
Egg pudding cooked in a vessel. |
Ingredients:
Egg - 1 or 2milk - 1/2 cup
sugar (brown or white) - 3 tsp
salt - a very small pinch
cinnamon - a pinch (optional)
vanilla essence - a tiny drop
Method:
Start heating a pressure cooker with 2 cups of water.Beat egg well. Add other ingredients and beat again.
Pour into an ever-silver bowl and steam cook in an idly cooker or pressure cooker (without putting the pressure valve weight) for 10 minutes.
If touched it should be like a jelly (spring back) at the edges and slightly loose at the center. It should retain the shape while transferring it.
Take out, empty it to a serving bowl. Garnish with fresh fruit.
Serve chill as dessert or a simple breakfast.
Note:
*This recipe seems to have some historical background. While googling I found out that, this is a British recipe and hope the British settlers could have passed on this delicious pudding to my home town (which was known for its British settlement at that time).*An egg pudding should be essentially cooked in high humidity to get that real taste. I have narrated an Indian pressure cooker method here. My aunt won't add salt or cinnamon. But I did so to enhance the sweetness of the recipe.
*cooks.com says, we can bake this pudding in oven at 300 deg F for 40 minutes. They suggest to keep the pudding vessel inside a pan of water.
*We can use this pudding as a custard base for ice creams and cakes.
Monday, November 22, 2010
Vanilla Ice cream
I got this recipe from my younger brother.When hubby presented me this beautiful ice-cream scoop(one of the gifts for my birthday), I couldn't control my eager to try Venkatesh's recipe:) He is our favorite ice-cream maker and I like that homely version very much:). He is good at making jellies too:) Though he is much younger than me, he pampers me with this ice cream once in a while. At that time he would hurry to the near by shop on Fridays to buy a small pack of this ice cream mix (which we later found out as custard powder) and prepare the ice cream in a jiffy. Hubby and myself think that this resembles an ice cream sold in Kalimark shop in Palayamkottai. At that time, they used to make their ice cream and beverages on their own. The good thing about this ice-cream is the less calorie count (when compared to my other versions). But we have to beat the mix in a blender multiple times to get that fluffy ice cream.
custard powder - 2 tbsp (vanilla flavor)
sugar - 1/2 cup (or) 3/4 cup
condensed milk - 2 tbsp (optional)
butter - 1 tbsp
vanilla extract - 2 drops
In the remaining 1/2 cup milk add sugar, condensed milk, vanilla, custard powder and mix well.
Add this mixture into the boiled milk.
Start heating in low fire. It will become somewhat thick. Take care not to burn it at bottom.
Switch off , add butter, essence and let it cool.
Place it in freezer. Then after 30 minutes take out and beat it in the mixie for a minute or more.
Freeze it again for 30 minutes and beat for a minute in mixer.
Then freeze it for 4 hours or till it sets completely..
Tips:
For more creamy ice cream, add 4 oz whipped topping before freezing.
By this we can reduce the usage of blender. I just blend it for 1 minute and only once before freezing.
But if we can't get the topping, then do the blending twice or thrice or more till its hard to churn.
Home made vanilla ice cream. |
Ingredients:
Milk (full fat) - 2.5 cups / 1/2 litercustard powder - 2 tbsp (vanilla flavor)
sugar - 1/2 cup (or) 3/4 cup
condensed milk - 2 tbsp (optional)
butter - 1 tbsp
vanilla extract - 2 drops
Method:
Bring to boil 2 cups of milk.In the remaining 1/2 cup milk add sugar, condensed milk, vanilla, custard powder and mix well.
Add this mixture into the boiled milk.
Start heating in low fire. It will become somewhat thick. Take care not to burn it at bottom.
Switch off , add butter, essence and let it cool.
Place it in freezer. Then after 30 minutes take out and beat it in the mixie for a minute or more.
Freeze it again for 30 minutes and beat for a minute in mixer.
Then freeze it for 4 hours or till it sets completely..
Tips:
For more creamy ice cream, add 4 oz whipped topping before freezing.
By this we can reduce the usage of blender. I just blend it for 1 minute and only once before freezing.
But if we can't get the topping, then do the blending twice or thrice or more till its hard to churn.
Saturday, November 20, 2010
Vithai kothamalli thovaiyal
Vithai - seed; kothamalli - coriander ; thovaiyal - thick chutney (Tamil - English)
This is chutney recipe is from my mom's maid Mary Vadivu ammal. She assisted mom for a very long time and I can't predict her age. Hope she was a old lady but very strong as a little girl. I love her hints on simple foods and home remedies. One of her recommendations for a sluggish winter day after a grand food is the kollu rasam and the vithai malli thovaiyal. Here goes the recipe. Coriander seed chutney. |
Ingredients:
coriander seeds - 2 tbspchanna dhal - 2 tbsp
shredded coconut - 3 tbsp (optional)
dry red chillies - 4 or 5
garlic - a piece
cumin - 1/4 tsp
curry leaf - 1 sprig
salt - to taste
tamarind - 2 inch
oil - 1 tsp
Method:
Heat oil in a wok. Roast the channa dhal to a mild red color. Take out.Then roast the coriander seeds, red chillies and coconut one by one.
Let them cool.
Then grind the roasted ingredients with all the above with very little water to get a thick chutney (thogaiyal).
Vithai malli chutney is ready!
Serving suggestions:
Serve with piping hot rice and kollu rasam.Pairs well with curd rice, dhal rice , idly etc.
Health benefits:
Coriander seed helps subduing pitham and hence a good remedy for giddiness.It increases digestion.
Its fiber is great for weight loss.
Wednesday, November 17, 2010
Vazhaikkai bajji
Other names: Banana fritters, raw plantain bajji, valaikkai bajji.
'Vazhaikkai bajji prepared in bulk and placed in that glass covered shelves' is a regular scene in any tea shop in Tamilnadu and Kerala. There was/is a shop near my dad's house which sells these flavorful bajjis and mom would send someone to get them for any unexpected guests. But this is a very simple snack and she would prefer to make it at home most of the time. Mom used to prepare these bajjis with great care, so that the plantain pieces are sliced with some green-skin on. She used to add some dosa batter to the bajji batter as per her sister's suggestion:)This is my most favorite fried item and She was so caring enough to prepare this for me on the eve of my holidays. Bajjis bring me those loving memories always. I like it with chilly-garlic ketchup at that time. But nowadays I make it with coconut chutney for hubby. See, how our taste changes after marriage:)
Traditionally they dry-grind 1 kg of besan flour with 1/4 kg raw rice, 200 gms of dry red chilly, asafoetida, in the mill and store as bajji mavu. Whenever needed this flour can be used to make bajji and pakoda.
Besan flour (kadalai mavu) - 3/4 cup
dosa batter - 1/4 cup
(or) rice flour - 2 tbsp
salt - to taste
red chilly powder - 1 tbsp
hing (asafoetida)- 1/8 tsp
baking soda - 1/10 tsp
garlic - 2 pieces (finely ground)
red food color - a pinch (optional)
oil - to deep fry
Wash the banana, remove the stem and tip. Scratch and peel the skin mildly by keeping some thick green skin on. That will give a good flavor to bajji.
Slice it into thin (long) pieces.
Mix all the above with 1/4 cup water to a thick batter. Add more water if needed, but keep the batter like idly batter ,otherwise the bajjis will drink lot of oil:)
Heat oil in a wok.
Dip the banana slices in the batter and put it on the hot oil. Flip and fry both sides. Drain oil and take out.
Vazhakkai bajji is ready!
'Vazhaikkai bajji prepared in bulk and placed in that glass covered shelves' is a regular scene in any tea shop in Tamilnadu and Kerala. There was/is a shop near my dad's house which sells these flavorful bajjis and mom would send someone to get them for any unexpected guests. But this is a very simple snack and she would prefer to make it at home most of the time. Mom used to prepare these bajjis with great care, so that the plantain pieces are sliced with some green-skin on. She used to add some dosa batter to the bajji batter as per her sister's suggestion:)This is my most favorite fried item and She was so caring enough to prepare this for me on the eve of my holidays. Bajjis bring me those loving memories always. I like it with chilly-garlic ketchup at that time. But nowadays I make it with coconut chutney for hubby. See, how our taste changes after marriage:)
Traditionally they dry-grind 1 kg of besan flour with 1/4 kg raw rice, 200 gms of dry red chilly, asafoetida, in the mill and store as bajji mavu. Whenever needed this flour can be used to make bajji and pakoda.
Ingredients:
Indian green banana (small variety)- 2Besan flour (kadalai mavu) - 3/4 cup
dosa batter - 1/4 cup
(or) rice flour - 2 tbsp
salt - to taste
red chilly powder - 1 tbsp
hing (asafoetida)- 1/8 tsp
baking soda - 1/10 tsp
garlic - 2 pieces (finely ground)
red food color - a pinch (optional)
oil - to deep fry
Method:
Always use nattu vazhaikkai for making this bajji. Nattu vazhakkai are available in Indian grocery shops and they are sold in bunches. Wash the banana, remove the stem and tip. Scratch and peel the skin mildly by keeping some thick green skin on. That will give a good flavor to bajji.
Slice it into thin (long) pieces.
Mix all the above with 1/4 cup water to a thick batter. Add more water if needed, but keep the batter like idly batter ,otherwise the bajjis will drink lot of oil:)
Heat oil in a wok.
Dip the banana slices in the batter and put it on the hot oil. Flip and fry both sides. Drain oil and take out.
Vazhakkai bajji is ready!
Serving suggestions:
Serve hot as snack along with piping hot coffee or tea. Coconut chutney or tomato sauce is a best side dish for this vazhaikkai bajji.Monday, November 15, 2010
Hyderabadi Chicken biryani
I prepared this Hyderabadi chicken biryani during a weekend. I love the way it brightens up a winter day:) The main challenge lies in getting all the things ready. But once we setup the dhum process, then we can sit and relax with our loved ones. So keep everything handy before starting.
Hyderabadi biryanis are admired for their beautiful coloration and flavor. So once in a while I use organic food colors to get that real touch. In this method there will not be any separate gravy preparation like the Tamilnadu version. The meat gets cooked with rice and hence we will get juicy moist chicken pieces. This briyani is prepared in a slow cooking process called dhum cooking which involves placing hot charcoal over the dhum vessel. But I am narrating that process to do at home, with the equipments we normally have:)
salt - 1 tsp
water - 6 cup
bay leaf - 3
star aniseed - 1
black cumin - 1/2 tsp
cinnamon - 1 inch
cardamom - 4
clove - 4
lemon juice- 1/4 of a fruit
Wash and clean the rice. Soak it for 30 minutes. Bring to boil some 6 cups of water.
Add the bay leaf, star anise, cinnamon, cardamom, clove, lemon juice salt, kali jeera (black cumin) and let the rice gets semi cooked. It should be very firm and almost raw. Drain the water using a colander and keep aside.
raisins - 20
ghee - 2 tbsp
mint leaf , cilantro (chopped)- 2 tbsp
yellow or orange food color - 1 drop ea.
(we can use saffron instead)
cooking oil - 3 tbsp
Red onion - 1 cup (chopped lengthwise)
Heat oil in a flat bottom vessel and fry the chopped onions to golden brown. Take it out and save for garnishing.
In the remaining ghee , fry the cashews and raisins. Keep aside.
raisins - 2 tbsp
red chilly powder - 1 tsp
salt - 1 tbsp
ginger garlic paste - 2 tbsp
mint - 1/4 bunch
cilantro - 1/4 bunch
green chilly - 5
turmeric - 1/4 tsp
ghee - 2 tbsp
plain yogurt (from whole milk)- 1 cup
Grind the mint, cilantro and green chillies to a fine paste.
Now ,wash and clean the chicken. Cut it into big chunks. Mix all the items mentioned above with chicken and place it in the bottom of the dhum vessel. Spread them uniformly.
lemon - 1/2
sugar - 1 tsp
kewra water - 2 tbsp
(or, rose essence 2 drops + 2 tbsp water)
ghee - 2 tbsp
black pepper corn - 10
cinnamon - 1/2 inch
cardamom - 2
clove - 2
black cumin (kali jeera) - 1/2 tsp
green chilly - 2
Mace (javithri / jathipathiri) - 1 strand
nutmeg (jathikkai) - a small scraping
Run everything above in a mixer and make a fine liquid. If you don't have enough time then , leave the whole garam masalas and mix 2 tbsp of Hyderabadi biryani masala powder with the other things mentioned above. (I like shan brand biryani masala powder).
A dosa tawa
chapathi dough using 1 cup wheat flour
Mix the wheat flour with water to get a bread dough consistency and keep aside.
We can use an aluminum foil also, if we do not want to waste the dough. But sealing with dough is the best method and it is called dum / dhum process, which means 'slow cooking with hot steam sealed inside'. I would suggest sealing with the dough for a tasty dhum biryani.
If you are using a flat lid, then boil 2 liters of water in a vessel and place over the vessel (after sealing) for more heat generation.
Mix saffron with 1/4 cup warm milk (or) mix the food color with 2 tbsp water and sprinkle it over the rice. I used food color here.(Food color gives a beautiful look.so choose according to the occasion. Natuaral colors can be obtained from saffron, beetroot, carrot etc).
Place a thick dosa tawa over stove, heat it. Now place the dhum vessel over the tawa.
Over the rice, spread the fried cashews, finely chopped cilantro , mint, fried onion and sprinkle the flavored water.
Close the vessel with a tight lid.
Seal the edges with the prepared chapathi dough.
Start heating the arrangement. Keep the flame at high till the tawa gets heated and then reduce it to a minimum. Leave the whole set up for 2 hours. (Cook it in very low heat to avoid burnt smell). If you are making for a large scale, baking is the best method. Place the entire setup inside the oven and bake at 350 deg C and 90 minutes.
After that discard the dough, open the lid carefully.
Hyderabadi chicken biryani is ready!
Serve with boiled eggs and raitha of your choice.
Serves 5 to 6 people.
Hyderabadi biryanis are admired for their beautiful coloration and flavor. So once in a while I use organic food colors to get that real touch. In this method there will not be any separate gravy preparation like the Tamilnadu version. The meat gets cooked with rice and hence we will get juicy moist chicken pieces. This briyani is prepared in a slow cooking process called dhum cooking which involves placing hot charcoal over the dhum vessel. But I am narrating that process to do at home, with the equipments we normally have:)
Hyderabadi Chicken biryani in vibrant coloration. |
Main Ingredients for Hyderabadi chicken biryani. |
Arranging the layers for Hyderabadi chicken biryani before dhum process. |
A homely dhum process. Biryani vessel tightly sealed with wheat dough and placed over hot tawa. |
To cook rice:
Basmati rice - 2.5 cups (500 gm)salt - 1 tsp
water - 6 cup
bay leaf - 3
star aniseed - 1
black cumin - 1/2 tsp
cinnamon - 1 inch
cardamom - 4
clove - 4
lemon juice- 1/4 of a fruit
Wash and clean the rice. Soak it for 30 minutes. Bring to boil some 6 cups of water.
Add the bay leaf, star anise, cinnamon, cardamom, clove, lemon juice salt, kali jeera (black cumin) and let the rice gets semi cooked. It should be very firm and almost raw. Drain the water using a colander and keep aside.
For garnishing:
cashews - 10raisins - 20
ghee - 2 tbsp
mint leaf , cilantro (chopped)- 2 tbsp
yellow or orange food color - 1 drop ea.
(we can use saffron instead)
cooking oil - 3 tbsp
Red onion - 1 cup (chopped lengthwise)
Heat oil in a flat bottom vessel and fry the chopped onions to golden brown. Take it out and save for garnishing.
In the remaining ghee , fry the cashews and raisins. Keep aside.
For the masala:
Chicken (with bones) - 500 gmraisins - 2 tbsp
red chilly powder - 1 tsp
salt - 1 tbsp
ginger garlic paste - 2 tbsp
mint - 1/4 bunch
cilantro - 1/4 bunch
green chilly - 5
turmeric - 1/4 tsp
ghee - 2 tbsp
plain yogurt (from whole milk)- 1 cup
Grind the mint, cilantro and green chillies to a fine paste.
Now ,wash and clean the chicken. Cut it into big chunks. Mix all the items mentioned above with chicken and place it in the bottom of the dhum vessel. Spread them uniformly.
For flavored water:
salt - 1/2 tsplemon - 1/2
sugar - 1 tsp
kewra water - 2 tbsp
(or, rose essence 2 drops + 2 tbsp water)
ghee - 2 tbsp
black pepper corn - 10
cinnamon - 1/2 inch
cardamom - 2
clove - 2
black cumin (kali jeera) - 1/2 tsp
green chilly - 2
Mace (javithri / jathipathiri) - 1 strand
nutmeg (jathikkai) - a small scraping
Run everything above in a mixer and make a fine liquid. If you don't have enough time then , leave the whole garam masalas and mix 2 tbsp of Hyderabadi biryani masala powder with the other things mentioned above. (I like shan brand biryani masala powder).
For dhum process:
wide vessel with tight lidA dosa tawa
chapathi dough using 1 cup wheat flour
Mix the wheat flour with water to get a bread dough consistency and keep aside.
We can use an aluminum foil also, if we do not want to waste the dough. But sealing with dough is the best method and it is called dum / dhum process, which means 'slow cooking with hot steam sealed inside'. I would suggest sealing with the dough for a tasty dhum biryani.
If you are using a flat lid, then boil 2 liters of water in a vessel and place over the vessel (after sealing) for more heat generation.
Arranging the layers:
Now spread the semi cooked rice uniformly over the raw chicken masala layer.Mix saffron with 1/4 cup warm milk (or) mix the food color with 2 tbsp water and sprinkle it over the rice. I used food color here.(Food color gives a beautiful look.so choose according to the occasion. Natuaral colors can be obtained from saffron, beetroot, carrot etc).
Place a thick dosa tawa over stove, heat it. Now place the dhum vessel over the tawa.
Over the rice, spread the fried cashews, finely chopped cilantro , mint, fried onion and sprinkle the flavored water.
Close the vessel with a tight lid.
Seal the edges with the prepared chapathi dough.
Start heating the arrangement. Keep the flame at high till the tawa gets heated and then reduce it to a minimum. Leave the whole set up for 2 hours. (Cook it in very low heat to avoid burnt smell). If you are making for a large scale, baking is the best method. Place the entire setup inside the oven and bake at 350 deg C and 90 minutes.
After that discard the dough, open the lid carefully.
Hyderabadi chicken biryani is ready!
Hyderabadi Chicken biryani. |
Serving suggestions:
Serve the biryani like a layered rice, so that every plate gets a portion of rice, chicken and colorful topping.The guest has to mix and devour:)Serve with boiled eggs and raitha of your choice.
Serves 5 to 6 people.
Thursday, November 11, 2010
Arbi Fry (Seppan kilangu varuval)
Seppan kilangu (Tamil) means colocasia or taro root(English), Arbi (Hindi).
Sembu or seppan kizhangu is a tiny root vegetable available throughout the year. There is another one root vegetable with similar taste, that is the elephant yam (chenai kilangu), which can also be made into attractive fries. This seppan kilangu (arbi) can be stored at room temperature for a week and can be refrigerated for a month. The matured round / oval roots are tastier . Arbi fry is the most sought fried item in my house. Thanks to hubby this fry hardly reaches the dining table . Normally I start preparing our weekend lunch by 10.30 Am. If I make this fry for lunch, then hubby may start demanding it with his 11 Am tea:) So I plan to make some extra servings or totally some other dish along with this:) I personally think this as a catchy side dish for vegetarians. This is my mom's signature dish too. Mom used to make this arbi with paruppu kulambu and rice.
Bisibelebath served with arbi fry.( Indian Arbi fried). |
Ingredients:
Arbi - 6 roots (1/2 kg)rice flour - 1 tsp
besan flour - 1 tbsp
salt - to taste
turmeric powder - 1/4 tsp
black pepper powder - 1.5 tbsp
cumin powder - 1/2 tsp
Method:
Cook the arbi root with skin till it is almost cooked (not mushy). Poke a skewer or knife to check if its cooked. This makes the peeling easy.Cool and remove the skin. Cut it into 1/2 inch thick circles. (If using the South American arbi , the bigger variety, then cut it into big chunks and cook it. Again peel and cube it).
Mix salt, flours, turmeric, pepper powder with a drop of water. Add it to the pieces and mix well.
A bigger variety of taro root . |
Heat enough oil to deep fry. Fry the pieces in small batches till they turn almost golden brown (crunchy outside and softer inside).
Take out, drain oil. Dust some pepper powder over the fried arbi and shake well , so that all the pieces gets some more pepper.
Another method:
Instead of pepper + cumin powder , we can mix red chilly powder and garam masal powder along with flours and deep fry them. Tandoori mix also holds good. Serving suggestion:
Serve as side dish with curd rice, vegetable biryani, pulav, bisibelebath or simply as a tea time snack.Tips:
I have heard some people making this fry (baking) in oven. But I have not tried it yet. May be a good option too. Black pepper is added to root vegetables to make them allergy-free. But this arbi root is not caustic and safer for most of the people.
The South American arbi contains less mucilage and easy to handle, but I prefer the taste of Indian arbi better.
We can boil these vegetables and keep refrigerated without peeling for a day or two. I generally do the boiling part the previous night.
Monday, November 8, 2010
Paneer Pulav
Necessity is the mother of invention is what I can say about this recipe!
Preparing a complete vegetarian dinner is a tricky one, as we have to sneak protein in some form in almost all the dishes to make them attractive and delicious. Generally I won't coin or try newer recipes for guests. But that particular week was so busy for hubby and he could not take me out for a grocery shopping while I had a party on Friday:) So when all my plans for a vegetable biryani with fresh vegetables were collapsed, I had to find an alternative:)
This paneer pulav is a medley of Shahi pulao and ghee rice. Along with this paneer pilaf I made a vegetable kuruma, fried arbi, Malaysian parotta, raitha, bakalava and gulab jamun as per plan and it was quite a successful one. Try this and enjoy!
Ingredients:
Basmati rice - 2 cup
(1/2 cup for 1 person)
paneer - 100 gm
Ghee - 2 tbsp
oil - 2 tbsp
bay leaf - 2
cinnamon - 2 inch
cashew, raisin - each 20
garam masala powder - 1 tbsp
lemon juice - 1/4 fruit
sugar - 1 tbsp
onion - 1 (big)
shahi jeera - 1/2 tsp
ginger garlic paste - 1 tsp
mint, cilantro - handful
saffron - 5 threads
Method:
Cook the rice with lot of water, 2 tsp salt to a stiff finish. Drain water and keep the lid open.
Heat oil and ghee in a wok. Fry the paneer cubes to get a golden hue and take out.
Now add the bay leaves, cashew, raisin, cinnamon, shahi jeera.Add the thinly sliced onion and fry it a little. Then add the sugar and let it caramelize. Put the ginger garlic paste and stir well. Now add the chopped mint, cilantro, fried paneer, little salt, lemon juice and switch off.
Gently mix the cooked rice. Dissolve the saffron in few spoons of warm milk and sprinkle over the pulav. Serve hot.
Paneer pulav is ready!
Not:
We can microwave / directly heat the pulav before serving.
Vary the paneer quantity, so that every one gets at least 5 pieces.
Preparing a complete vegetarian dinner is a tricky one, as we have to sneak protein in some form in almost all the dishes to make them attractive and delicious. Generally I won't coin or try newer recipes for guests. But that particular week was so busy for hubby and he could not take me out for a grocery shopping while I had a party on Friday:) So when all my plans for a vegetable biryani with fresh vegetables were collapsed, I had to find an alternative:)
This paneer pulav is a medley of Shahi pulao and ghee rice. Along with this paneer pilaf I made a vegetable kuruma, fried arbi, Malaysian parotta, raitha, bakalava and gulab jamun as per plan and it was quite a successful one. Try this and enjoy!
Paneer pulav served with raitha and arbi fry. |
Ingredients:
Basmati rice - 2 cup
(1/2 cup for 1 person)
paneer - 100 gm
Ghee - 2 tbsp
oil - 2 tbsp
bay leaf - 2
cinnamon - 2 inch
cashew, raisin - each 20
garam masala powder - 1 tbsp
lemon juice - 1/4 fruit
sugar - 1 tbsp
onion - 1 (big)
shahi jeera - 1/2 tsp
ginger garlic paste - 1 tsp
mint, cilantro - handful
saffron - 5 threads
Method:
Cook the rice with lot of water, 2 tsp salt to a stiff finish. Drain water and keep the lid open.
Heat oil and ghee in a wok. Fry the paneer cubes to get a golden hue and take out.
Now add the bay leaves, cashew, raisin, cinnamon, shahi jeera.Add the thinly sliced onion and fry it a little. Then add the sugar and let it caramelize. Put the ginger garlic paste and stir well. Now add the chopped mint, cilantro, fried paneer, little salt, lemon juice and switch off.
Gently mix the cooked rice. Dissolve the saffron in few spoons of warm milk and sprinkle over the pulav. Serve hot.
Paneer pulav is ready!
Not:
We can microwave / directly heat the pulav before serving.
Vary the paneer quantity, so that every one gets at least 5 pieces.
Thursday, October 28, 2010
Boondhi ladoo
Sweets and Deepavali are inseparable. Here is my ladoo for you all to enjoy.
My hearty prayers and well wishes to you all on this golden occasion. Happy Deepavali to you all!
This is my mom's recipe and I have seen her struggling during Deepavalis with these to get that shape. Those were the days when moms would start making sweets and savories nearly a week before Diwali. Ladoo is her specialty. Her kitchen is large and well ventilated, so that many can join hands during festival days.
Ladoo making is a laborious task, if we don't plan well ahead. She and her maid would simplify the job by frying the boondhis on one evening and the ladoo making the next day. She used to have a long list of friends to send gifts during Diwali. Those large vessels sleeping now in the attic would be filled with home made murukku, muthiri kothu, athirasam, achi murukku, ladoo and another remarkable sweet which I will tell later . My ladoo saga started again, when we wanted to prepare for a thanks giving.
Ladoo has given me so many sweet memories and it is my most favorite sweet too. Those box of ladoo my chithappa used to buy for me from the Lakshmi vilas, my friend M's loving Tirupathi ladoo came through USPS, my elder uncle's care to take me to Tirupathi in my childhood, Kanagam mama buying ghee ladoo for me, my mom's diwali rushes, the carry home gifts of marriages, hubby's strong passion and possessiveness for these home made ladoos, etc etc:)
Method:
(1 -200 ml cup / 200 gms flour yields nearly 10 ladoo)
(water for boondhi- almost half the flour)
sugar - 5 cups (1 kg)
(water for syrup - almost 75% of sugar measure; 4 cups)
baking soda - 1/2 tsp
oil - 1/2 liter (500 ml)
cardamom - 15
pachai karpuram (edible camphor) - a pinch
cashew - 50 number
raisin - 50 number
(If we are doing for a small batch, say 1 cup flour, then make holes on a disposable plate using a skewer. I have done this home made boondhi making plate , before buying a traditional boondhi maker and it was very successful too.).
2. disposable hand gloves to bear the heat. Those days they didn't use gloves, I can't imagine that.
In the same time heat few tbsps of ghee in a broad wok and fry the cashew nuts and raisins separately. Keep aside.
Now add the oil in the wok and start heating slowly, without reaching the fuming point. Gently pour a ladle of batter over the boondhi making plate and press it to the hot oil. Fry till its done. The final product should be crispy.(My version calls for crispy white boondhis. But if you want, you can make soft boondhis too) . Drain oil , let cool and store them.
Mix the 5 cups of white-sugar with 4 cups of water and *heat it till we get a two thread consistency. (Test:A drop of sugar syrup put in a cup of cold water remains intact as a hard ball). Switch off and add fried boondhis, cardamom powder, fried cashews, raisins. Stir well.
Wear your gloves and start preparing the cute balls out of that hot boondhi mix. Rub some melted ghee to get a good shape. Hurry up, before they get solidify. Make sure that each and every ladoo gets a cahsew and a raisin:)
If you can't do it fast, it may crystallize and the ladoo won't hold together. If it solidifies , don't panic. Just heat the sweetened boondhi with a drop of water, make sure it melts and start making the remaining ladoo.
Boondhi ladu is ready!
Don't be anxious on the results. The ladoo will turn out successful for all.It will be much easier, if we split and do the process as said in the anecdote.
Add 1/2 cup milk powder to boondhi syrup mixture, before making the laddu. This gives a more rich taste.
Sweets:
Boondhi ladoo
Jangiri
Athirasam (with rice flour)
Baklava
Maladdu
Gulab Jamun
Carrot halwa
Rasgulla
Wheat Halwa
Mysore bah
Maida Burfi
Badam katli
Milk peda(MW method)
Rava ladoo
Besan flour ladoo
Savories:
Murukku
Cashew pakoda
Ulunthu Vadai
Cinema theater samsa
Ribbon Pakoda
ordinary pakoda
Thukkada
Vaazhai poo vadai
Masal vadai
Payasam and kesari:
Semiya Javvarisi Paal Payasam
Paruppu payasam
Pineapple kesari
Rava kesari
For health:
Sukku malli coffee
Deepavali Legiyam
Home made Digestion syrup
Enjoy and have a beautiful Deepavali!
My hearty prayers and well wishes to you all on this golden occasion. Happy Deepavali to you all!
Boondhi ladoo prepared. |
Boondhi ladoo:
Boondhi ladoo or simply the laddu available in SouthIndia is different from motichoor ladoo. A traditional South Indian ladu resembles the famous Tirupathi ladoo and long lasting in room temperature too. while the mothichoor version is more soft, colorful and should be kept in fridge to ensure the freshness. This is my mom's recipe and I have seen her struggling during Deepavalis with these to get that shape. Those were the days when moms would start making sweets and savories nearly a week before Diwali. Ladoo is her specialty. Her kitchen is large and well ventilated, so that many can join hands during festival days.
Ladoo making is a laborious task, if we don't plan well ahead. She and her maid would simplify the job by frying the boondhis on one evening and the ladoo making the next day. She used to have a long list of friends to send gifts during Diwali. Those large vessels sleeping now in the attic would be filled with home made murukku, muthiri kothu, athirasam, achi murukku, ladoo and another remarkable sweet which I will tell later . My ladoo saga started again, when we wanted to prepare for a thanks giving.
Ladoo has given me so many sweet memories and it is my most favorite sweet too. Those box of ladoo my chithappa used to buy for me from the Lakshmi vilas, my friend M's loving Tirupathi ladoo came through USPS, my elder uncle's care to take me to Tirupathi in my childhood, Kanagam mama buying ghee ladoo for me, my mom's diwali rushes, the carry home gifts of marriages, hubby's strong passion and possessiveness for these home made ladoos, etc etc:)
Method:
Boondi soaked in sugar syrup before making the ladu balls. |
Enjoy:) |
Ladoo I made for Valentine's day 2013 |
Ingredients:
Besan flour (kadalai mavu)- 5 cups (1 kg)(1 -200 ml cup / 200 gms flour yields nearly 10 ladoo)
(water for boondhi- almost half the flour)
sugar - 5 cups (1 kg)
(water for syrup - almost 75% of sugar measure; 4 cups)
baking soda - 1/2 tsp
oil - 1/2 liter (500 ml)
cardamom - 15
pachai karpuram (edible camphor) - a pinch
cashew - 50 number
raisin - 50 number
Special equipment needed:
1.A perforated vessel to make boondhis.(If we are doing for a small batch, say 1 cup flour, then make holes on a disposable plate using a skewer. I have done this home made boondhi making plate , before buying a traditional boondhi maker and it was very successful too.).
2. disposable hand gloves to bear the heat. Those days they didn't use gloves, I can't imagine that.
Preparing Boondhi:
Mix the baking soda, yellow food color - 2 drops (optional), with a cup of water and pour it into the four. Add water little by little, till it reaches a thick dosa batter consistency. The consistency should be so thick that, if we place a scoop of batter on the perforated plate, it should not run down (we press and make spheres through the holes).In the same time heat few tbsps of ghee in a broad wok and fry the cashew nuts and raisins separately. Keep aside.
Now add the oil in the wok and start heating slowly, without reaching the fuming point. Gently pour a ladle of batter over the boondhi making plate and press it to the hot oil. Fry till its done. The final product should be crispy.(My version calls for crispy white boondhis. But if you want, you can make soft boondhis too) . Drain oil , let cool and store them.
Making ladoo:
Then in your convenient time, start preparing the syrup. You may need more time and energy to prepare these balls.Mix the 5 cups of white-sugar with 4 cups of water and *heat it till we get a two thread consistency. (Test:A drop of sugar syrup put in a cup of cold water remains intact as a hard ball). Switch off and add fried boondhis, cardamom powder, fried cashews, raisins. Stir well.
Wear your gloves and start preparing the cute balls out of that hot boondhi mix. Rub some melted ghee to get a good shape. Hurry up, before they get solidify. Make sure that each and every ladoo gets a cahsew and a raisin:)
If you can't do it fast, it may crystallize and the ladoo won't hold together. If it solidifies , don't panic. Just heat the sweetened boondhi with a drop of water, make sure it melts and start making the remaining ladoo.
Boondhi ladu is ready!
Note:
* //If making small quantity if ladoo, then no need for 2 thread consistency syrup. Single thread is enough. //
We can make these ladoos using ready-made boondhis too. But buy the boondhi without salt or seasoning.* //If making small quantity if ladoo, then no need for 2 thread consistency syrup. Single thread is enough. //
Don't be anxious on the results. The ladoo will turn out successful for all.It will be much easier, if we split and do the process as said in the anecdote.
Add 1/2 cup milk powder to boondhi syrup mixture, before making the laddu. This gives a more rich taste.
My treat for you all on Diwali::
Sweets:
Boondhi ladoo
Jangiri
Athirasam (with rice flour)
Baklava
Maladdu
Gulab Jamun
Carrot halwa
Rasgulla
Wheat Halwa
Mysore bah
Maida Burfi
Badam katli
Milk peda(MW method)
Rava ladoo
Besan flour ladoo
Savories:
Murukku
Cashew pakoda
Ulunthu Vadai
Cinema theater samsa
Ribbon Pakoda
ordinary pakoda
Thukkada
Vaazhai poo vadai
Masal vadai
Payasam and kesari:
Semiya Javvarisi Paal Payasam
Paruppu payasam
Pineapple kesari
Rava kesari
For health:
Deepavali Legiyam
Home made Digestion syrup
Enjoy and have a beautiful Deepavali!
Wednesday, October 6, 2010
Gray squash poriyal
This is one vegetable I had a lot of confusion in buying. I don't know the Tamil translation for this vegetable, as I have never seen this before:) So when I saw this for the first time in an Asian market, I was not sure of the taste. But bought it one day to trial run. Surprisingly this tasted just like our Ridge gourd. Recording this Indianised gray squash recipe for you all.
Onion - 1/2 cup (chopped)
green chilli - 2 (slit)
curry leaf - 1 sprig
Shredded coconut - 2 tbsp
Oil - 2 tsp
mustard seed - 1/2 tsp
cumin seed - 1/4 tsp
Salt - to taste
Heat oil in a wok.
Add mustard seeds and let them pop.
Immediately add chopped onion, curry leaf, green chilly and stir well til the onion gets semi cooked.
Now add the chopped squash along with 1/2 cup water and cook it tightly covered till the squash gets soft.
Add salt to taste.
Then add the cumin and shredded coconut and stir to loose all the moisture.
Take off heat.
Gray squash stir fry is ready!
Serve as side dish with roti or sambar rice, rasam or any spicy puli kulambu.
Gray squash in a pack. |
Ingredients:
Gray squash - 3 Onion - 1/2 cup (chopped)
green chilli - 2 (slit)
curry leaf - 1 sprig
Shredded coconut - 2 tbsp
Oil - 2 tsp
mustard seed - 1/2 tsp
cumin seed - 1/4 tsp
Salt - to taste
Method:
Peel and chop the squash. keep aside.Heat oil in a wok.
Add mustard seeds and let them pop.
Immediately add chopped onion, curry leaf, green chilly and stir well til the onion gets semi cooked.
Now add the chopped squash along with 1/2 cup water and cook it tightly covered till the squash gets soft.
Add salt to taste.
Then add the cumin and shredded coconut and stir to loose all the moisture.
Take off heat.
Gray squash stir fry is ready!
Serving suggestions:
The above said quantity can be served for 3 people.Serve as side dish with roti or sambar rice, rasam or any spicy puli kulambu.
Monday, October 4, 2010
Fish cutlet
I tasted this cutlet for the first time in my friend Gnanam's house (school days). At that time cutlets were served only in restaurants in my home town and newer recipes were rare. Only the young girls would try newer recipes from the cook-books, while the elders sticking with their own tradition. Gnanam's elder sister Clara akka is the one I admire a lot for her cooking, dedication and religious activities. May be she is the one kindled my passion for Jesus, though we have not talked much on that Subject. We all have some role models in life in each and every thing we do, may be our dressing style or way of talking etc, I should say I learned much from her.... Her recipes are the best for me till now. Then I prepared this cutlet at home to impress my mom. So it became our family's favorite from then on. After marriage I rarely cook fish because of hubby's taste buds:)
Shark (sura meen), king fish (vanjiram/seela meen), sword fish (vazhai meen),
Any fish with good flesh like salmon, red snapper(sankara / romeo), Tuna fish fresh or canned.
I generally prefer shark for this cutlet.
Close it with a lid and cook for 5 minutes.
After it gets cool, peel off the skin and remove the bones.
Mash the fish with your hand or masher without any lumps.
onion - 1
green chillies - 2
ginger garlic paste - 1 tsp
fennel - 1 tsp
curry leaf, cilantro, mint leaf (together) - finely chopped 2 tbsp
red chilly powder - 1 tsp
garam masal powder - 1 tsp
lime juice from 1/8 fruit
salt to taste
bread crumbs - 1 cup
egg - 1
oil - to shallow fry
Now add the mashed fish, chilly powder, garam masal powder, salt and fry till moisture is gone.
Now mash the cooked potatoes and add, again stir well.
Sprinkle the lemon juice and switch off.
Pour the egg to a broad dish. Add salt and beat well.
In another plate spread the bread crumbs.
Now take a lemon size ball from the prepared fish mixture. Flatten it to get a oval or circular shape with 3/4 inch thickness.
Dip that in beaten egg, then dip it in bread crumbs.
Bring it to a perfect shape. Shallow fry it both sides. Drain oil and serve hot.
Fish cutlet is ready!
Mostly this fish cutlet goes well with tomato sauce.
Bread crumbs can be prepared at home using few bread slices. Just leave them in a hot oven for a few minutes and powder it.
Left over sura puttu can be made into this cutlet the next day.
2 tins of Tuna fish (water based) and 2 small potatoes will yield 10 or 11 cutlets.
Fish cutlet served with lemon wedge. The picture didn't do justice here :) |
Fishes suitable for cutlet:
Fish -1/4 kgShark (sura meen), king fish (vanjiram/seela meen), sword fish (vazhai meen),
Any fish with good flesh like salmon, red snapper(sankara / romeo), Tuna fish fresh or canned.
I generally prefer shark for this cutlet.
Cooking the fish:
Bring 2 cups of water to a boil in a vessel. Add turmeric powder 1/2 tsp (to reduce fishy smell), salt - 1 tsp. Then add the washed / cleaned fish pieces along with the skin and bones.Close it with a lid and cook for 5 minutes.
After it gets cool, peel off the skin and remove the bones.
Mash the fish with your hand or masher without any lumps.
Other ingredients:
Potato (boiled) - 2 (100 gm)onion - 1
green chillies - 2
ginger garlic paste - 1 tsp
fennel - 1 tsp
curry leaf, cilantro, mint leaf (together) - finely chopped 2 tbsp
red chilly powder - 1 tsp
garam masal powder - 1 tsp
lime juice from 1/8 fruit
salt to taste
bread crumbs - 1 cup
egg - 1
oil - to shallow fry
Method:
Heat 1 tbsp oil in a wok. Add the fennel, finely chopped onion, green chilly, leaves and fry till they wilt. Then add the ginger garlic paste and stir well.Now add the mashed fish, chilly powder, garam masal powder, salt and fry till moisture is gone.
Now mash the cooked potatoes and add, again stir well.
Sprinkle the lemon juice and switch off.
Frying the cutlet:
Heat some oil to shallow fry the cutlet in a broad based wok.Pour the egg to a broad dish. Add salt and beat well.
In another plate spread the bread crumbs.
Now take a lemon size ball from the prepared fish mixture. Flatten it to get a oval or circular shape with 3/4 inch thickness.
Dip that in beaten egg, then dip it in bread crumbs.
Bring it to a perfect shape. Shallow fry it both sides. Drain oil and serve hot.
Fish cutlet is ready!
Serving suggestions:
Serve as evening snack or along with rice as side dish.Mostly this fish cutlet goes well with tomato sauce.
Tips:
Making the cutlets with canned fish is much easy.Bread crumbs can be prepared at home using few bread slices. Just leave them in a hot oven for a few minutes and powder it.
Left over sura puttu can be made into this cutlet the next day.
2 tins of Tuna fish (water based) and 2 small potatoes will yield 10 or 11 cutlets.
Thursday, September 30, 2010
Mango Ice cream
This is my hubby's most favorite ice cream. He always grabs a pack of this flavor whenever we visit a nearby Asian grocery shop. On seeing that, I wanted to make it at home to get the true Indian flavored Mango ice cream. while browsing, I got this recipe from the video, hosted by Hetal and Anuja. Thanks dearies. You have given me a very handy recipe admired by all our friends and family.
From then on, our Fridays can't be complete without this yummy bowl of ice cream on hand:)
There are only three ingredients here, which makes our job easy. We may need just 5 minutes to prepare this one by using readymade pulp. But the ice cream made from fresh mangoes are worth trying too, during the mango season.
Last summer I tried it using fresh mangoes and it was successful. But I would like to recommend mango pulp in can, as we cannot be sure of the quality of fresh mangoes in some places. Sour mangoes won't give the expected taste or color. So its safer to use the canned ones.
Alphonso mango varieties are the best. Here is the picture of another variety (don't know the name) of mangoes I used.
(or) 1 kg of fresh mango
Sweetened Condensed Milk - 14 oz can (400 gm)
Whipped Topping - 8 oz (225 gm)
Fresh Mango - cubed (optional)
Then add the finely chopped mango pieces .(optional).
Now put the whipped topping and mix gently.
Transfer them to a freezer-safe container.
Cover and freeze for 3-4 hours.
Creamy rich mango ice cream is ready!
Serves nearly 15 people.
Before scooping, keep the ice cream in room temperature for 2 minutes to facilitate smooth handling.
From then on, our Fridays can't be complete without this yummy bowl of ice cream on hand:)
There are only three ingredients here, which makes our job easy. We may need just 5 minutes to prepare this one by using readymade pulp. But the ice cream made from fresh mangoes are worth trying too, during the mango season.
Last summer I tried it using fresh mangoes and it was successful. But I would like to recommend mango pulp in can, as we cannot be sure of the quality of fresh mangoes in some places. Sour mangoes won't give the expected taste or color. So its safer to use the canned ones.
Alphonso mango varieties are the best. Here is the picture of another variety (don't know the name) of mangoes I used.
The mangoes I got from an Indian grocery store. |
Those three ingredients..... |
Very natural mango ice cream garnished with blueberry, mango slice and mint leaf. |
When the mango season was over, I started using canned mango pulp. |
Mango ice cream before freezing. Look at the gorgeous color I got by the canned version. |
Inviting cup of Home made mango ice cream served. |
Ingredients:
Mango Pulp - 30 oz can (4 cups of puree)(or) 1 kg of fresh mango
Sweetened Condensed Milk - 14 oz can (400 gm)
Whipped Topping - 8 oz (225 gm)
Fresh Mango - cubed (optional)
Method:
Take a mixing bowl and add the mango Pulp (or freshly pureed mangoes) and Condensed milk . Mix well.Then add the finely chopped mango pieces .(optional).
Now put the whipped topping and mix gently.
Transfer them to a freezer-safe container.
Cover and freeze for 3-4 hours.
Creamy rich mango ice cream is ready!
Serving suggestions:
Serve as dessert.Serves nearly 15 people.
Before scooping, keep the ice cream in room temperature for 2 minutes to facilitate smooth handling.
Wednesday, September 29, 2010
A book sale and Dijon chicken
Book sale:
We cherish some sales as remarkable and incredibly fantastic. One among them is the book exhibition. I am not a great fan of novels, but love to read on various culture, cuisines , arts etc. I have a good collection of folk tales and comics in our house in India but never thought of experiencing one here till I saw a pamphlet on the side-walk.
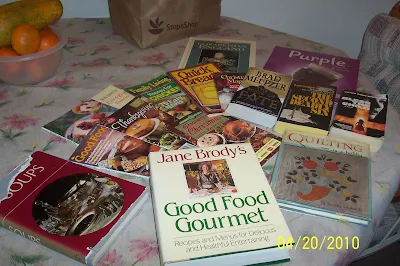
Some months ago, we went to a book sale conducted by the public library of Piscataway, NJ. They called it as the 'brown bag sale'. I hope this is common in many parts of the country. The sale was on some marked books aimed at removing the clutter, it seems. They sold big brown paper bag for $5 and people were allowed to fill the bag with the books they wish. It was much beneficial for both the ends and I could see happy faces all over the hall. That was like cherry picking for the book worms and thrillers were sold the best. I was surprised at their cook book collection as well as the arts side. While hubby was browsing the mystery novels, I gathered some nice books on cooking, quilting etc. Look at the treasure I got:)
Dijon Chicken:
Then I tried a simple recipe, Dijon chicken from the book 'Hooray for chicken', by Family Living magazine. All the ingredients are very common except the dijon mustard. So I bought it from Shoprite and prepared this dish along with pasta. It was a big hit.
If you cannot get dijon mustard, please see the guidelines to make one. I prefer wine-less dijon mustard, so look for the ingredients before buying, if you have any preference. (Vinegar is substituted for wine in my pack).
Dijon mustard - 3 tbsp
(its a sauce available in supermarkets)
butter - 5 tbsp
garlic powder - 1 tbsp
onion - 1 (crushed)
salt - to taste
black / white pepper powder - 2 tbsp
I cut it into 3 inch size pieces. But the original version calls for using the whole big pieces.
Mix Dijon mustard sauce, butter, salt, pepper, onion, garlic.
Add to chicken and marinate for 20 minutes.
Preheat the oven to 350 deg.
Grease a baking pan.
Place the chicken pieces separately in a baking pan and bake for 1 hour.
Broil to get the red color.
Garnish with parsley. (I didn't have parsley, so I left it).
Makes a good side dish for pasta.
We cherish some sales as remarkable and incredibly fantastic. One among them is the book exhibition. I am not a great fan of novels, but love to read on various culture, cuisines , arts etc. I have a good collection of folk tales and comics in our house in India but never thought of experiencing one here till I saw a pamphlet on the side-walk.
Various books we bought from the sale. That is the brown bag I mentioned here. |
Wow! what a catch for $5. |
Then I tried a simple recipe, Dijon chicken from the book 'Hooray for chicken', by Family Living magazine. All the ingredients are very common except the dijon mustard. So I bought it from Shoprite and prepared this dish along with pasta. It was a big hit.
If you cannot get dijon mustard, please see the guidelines to make one. I prefer wine-less dijon mustard, so look for the ingredients before buying, if you have any preference. (Vinegar is substituted for wine in my pack).
Dijon chicken served with pasta. |
Ingredients:
chicken boneless / breast - 1 lbDijon mustard - 3 tbsp
(its a sauce available in supermarkets)
butter - 5 tbsp
garlic powder - 1 tbsp
onion - 1 (crushed)
salt - to taste
black / white pepper powder - 2 tbsp
Method:
wash and clean the chicken breasts (approximately 4).I cut it into 3 inch size pieces. But the original version calls for using the whole big pieces.
Mix Dijon mustard sauce, butter, salt, pepper, onion, garlic.
Add to chicken and marinate for 20 minutes.
Preheat the oven to 350 deg.
Grease a baking pan.
Place the chicken pieces separately in a baking pan and bake for 1 hour.
Broil to get the red color.
Garnish with parsley. (I didn't have parsley, so I left it).
Serving suggestions:
Generally they use big pieces of chicken for this recipe, but I chopped mine for more marinated effect.Makes a good side dish for pasta.
Subscribe to:
Posts (Atom)
சக்கரைப்பொங்கல் Fast and Tasty Chakkara Pongal
Dear friends, Wishing all a happy and prosperous Pongal , Ingredients: Raw rice - 200 gm Moong dal - 2 Tbsp Water - 3 cups Milk - 1 to 1.5 c...
-
North Indian biryani and Hyderabadi Biryani are entirely different from the TamilNadu Muslim's version. In TN , the rice is cooked in ...
-
Being a big fan of Domino's chicken kickers , I never believed if I could make a similar one. Then I formulated my very own version to m...
-
Hope many of you know my passion to cook sea food. So I look for an opportunity to buy newer and cuter fish varieties whenever I visit a nea...